Evaporative Emission Control System 11-191
|
Fuel and Emissions11-1
Evaporative Emission Control System 11-191 |
Evaporative Emission Control System 11-191
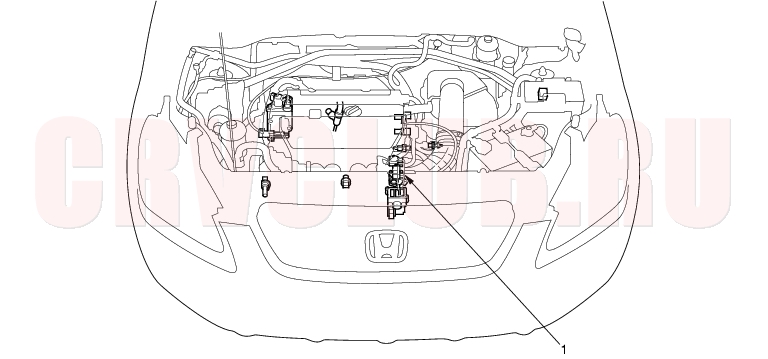
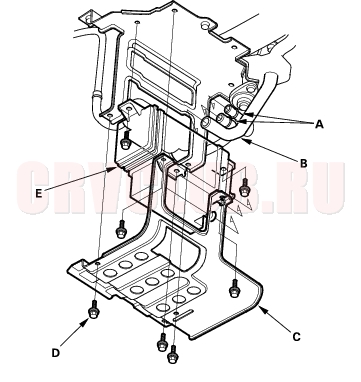
Component Location Index
*: The illustration shows LHD model.
Troubleshooting, (see page 11-193)
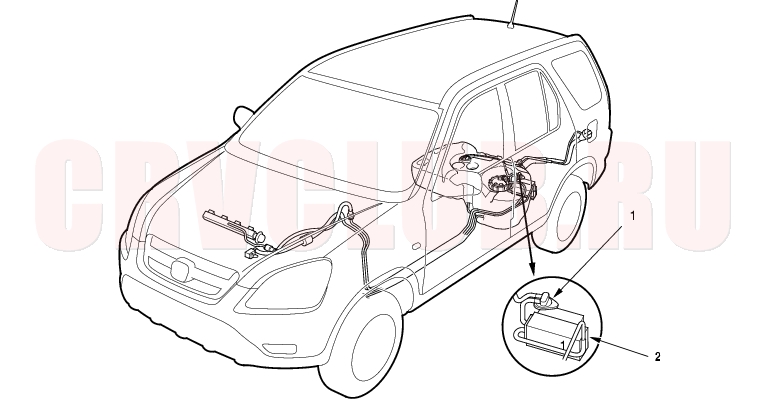
KG, KS, KE, KR models:
Test, page 11-198 Troubleshooting, page 11-195 ; Replacement, page 11-199
Component Location Index (cont'd)11-192
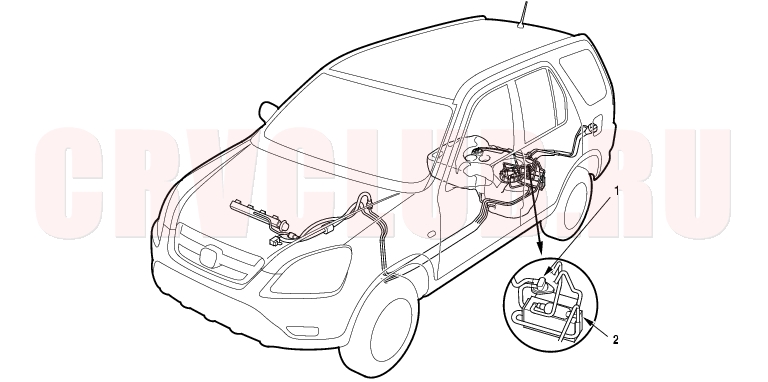
Except KG, KS, KE, KR, KZ models:
Test, page 11-198 Troubleshooting, page 11-195 ; Replacement, page 11-199
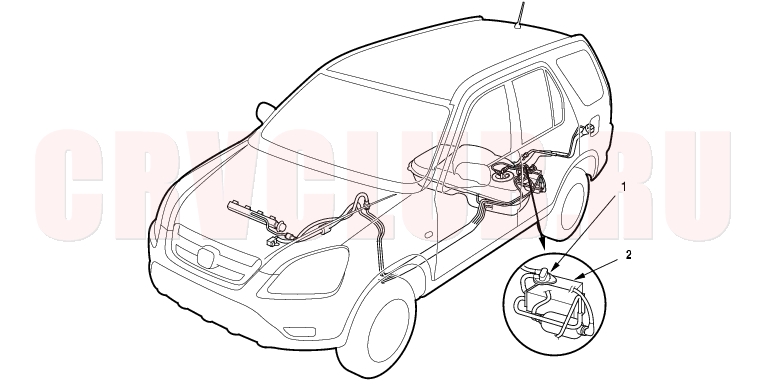
KZ model:
Test, page 11-198 Troubleshooting, page 11-195 ; Replacement, page 11-199
DTC Troubleshooting11-193
DTC P0443 (92-4): A electrical problem in the EVAP Canister Purge Valve circuit
- Reset the ECM/PCM (see page 11-4) .
- Turn the ignition switch ON (II).
Is the DTC P0443 indicated?
Yes : Go to step 3.
No : Intermittent failure, system is OK at this time. Check for poor connections or loose wires between the EVAP canister purge valve and at the ECM/PCM.

- Turn the ignition switch OFF.
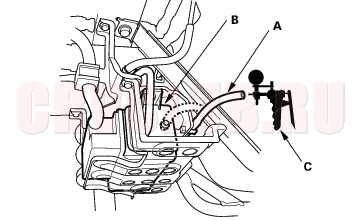
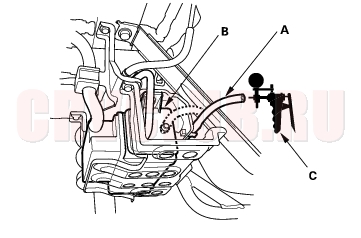
- Disconnect the vacuum hose (A) from the EVAP canister (B) and connect a vacuum pump/gauge (C) to the hose.
*: The illustration shows KG, KS, KE, KR models.
Is there vacuum?
Yes : Go to step 6.
No : Go to step 11.
- Turn the ignition switch OFF.
- Disconnect the EVAP canister purge valve 2P connector.
- Check for continuity between EVAP canister purge valve 2P connector terminal No. 2 and body ground.
Is there continuity?
Yes : Go to step 9.
No : Replace the EVAP canister purge valve.
- Disconnect the negative cable from the battery.
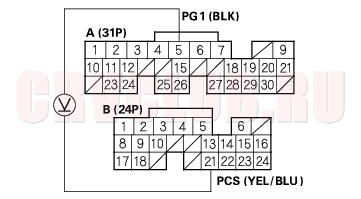
- Disconnect ECM/PCM connector B (24P).
- Check for continuity between EVAP canister purge valve 2P connector terminal No. 2 and body ground.
Is there continuity?
Yes : Repair short in the wire between the EVAP canister purge valve and the ECM/PCM (B21).
No : Substitute a known-good ECM/PCM and recheck (see page 11-5). If symptom/indication goes away, replace the original ECM/PCM.
DTC Troubleshooting (cont'd)11-194
- Turn the ignition switch OFF.
- Disconnect the EVAP canister purge valve 2P connector.
- Turn the ignition switch ON (II).
- At the hamess side, measure voltage between EVAP canister purge valve 2P connector terminal No. 1 and body ground.
Is there battery voltage?
Yes : Go to step 16.
No : Repair open in the wire between No. 4 ACG (10 A) fuse in the under-dash fuse/relay box and the EVAP canister purge valve.
- Turn the ignition switch OFF.
- Reconnect the EVAP canister purge valve 2P connector.
- Turn the ignition switch ON (II).
- Measure voltage between ECM/PCM connector terminals A5 and B21.
Is there battery voltage?
Yes : Substitute a known-good ECM/PCM and recheck (see page 11-5). If symptom/indication goes away, replace the original ECM/PCM.
No : Repair open in the wire between the EVAP canister purge valve and the ECM/PCM (B21). If wire is OK, replace the EVAP canister purge valve.
Evaporative Emission (EVAP) System Troubleshooting11-195
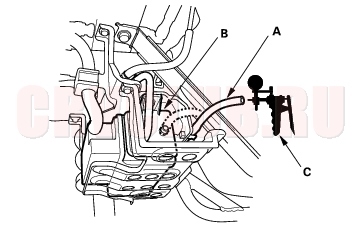
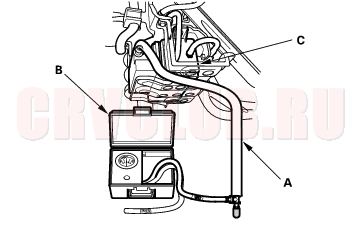
- Disconnect the vacuum hose (A) from the EVAP canister (B) and connect a vacuum pump/gauge (C) to the hose.
*: The illustration shows KG, KS, KE, KR models
Is there vacuum?
Yes : Inspect vacuum hose routing. If OK, replace the EVAP canister purge valve.
No : Go to step 3.
- Hold the engine at 3,000 rpm (min-1) with no load (in Park or neutral) until the radiator fan comes on, then raise the engine speed to 3,000 rpm (min-1).
Is there vacuum?
Yes : Go to step 4.
No : Inspect vacuum hose routing. If OK, replace the EVAP canister purge valve.
- Turn the ignition switch OFF.
- Reconnect the vacuum hose to the EVAP canister.
- Remove the fuel fill cap.
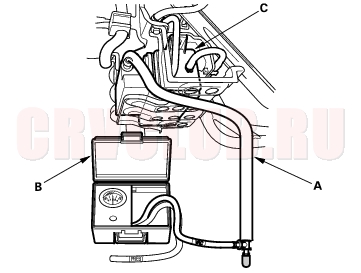
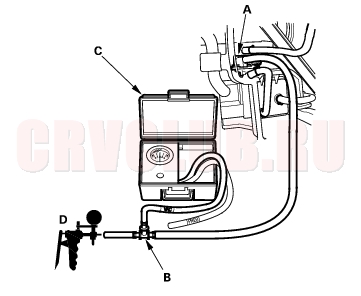
- Disconnect the purge air hose (A) from the EVAP canister and connect a vacuum pressure gauge 0 -100 mmHg (0 - 4 in.Hg) (B) to EVAP canister (C).
*: The illustration shows KG, KS, KE, KR models.
Does vacuum appear on gauge within 1 minute?
Yes : See EVAP two way valve test to complete. Evaporative emission controls are OK.
No : Replace the EVAP canister.
Evaporative Emission (EVAP) System Troubleshooting (cont'd)11-196
Is fuse OK?
Yes : Go to step 2.
No : Replace the fuse, and recheck.
- Disconnect the vacuum hose (A) from the EVAP canister (B) and connect a vacuum pump/gauge (C) to the hose.
- Start the engine and let it idle.
- NOTE: Engine coolant temperature must be below 65°C (149°F).
- Quickly raise the engine speed to 3,000 rpm
(min-1).
Is there vacuum?
Yes : Go to step 5.
No : Go to step 11.
- Disconnect the EVAP canister purge valve 2P connector.
- Quickly raise the engine speed to 3,000 rpm
(min-1).
Is there vacuum?
Yes : Inspect vacuum hose routing. If OK, replace the EVAP canister purge valve.
No : Go to step 7.
- Turn the ignition switch OFF.
- Disconnect the negative cable from the battery.
- Disconnect ECM/PCM connector B (24P).
- Check for continuity between EVAP canister purge valve 2P connector terminal No. 2 and body ground.
Is there continuity?
Yes : Repair short in the wire between the EVAP cansiter purge valve and the ECM/PCM (B21).
No : Substitute a known-good ECM/PCM and recheck (see page 11-5). If the symptom/indication goes away, replace the original ECM/PCM.
- Start the engine. Hold the engine at 3,000 rpm (min-1) with no load (in Park or neutral) until the radiator fan comes on, then let it idle.
- Check for vacuum at the vacuum hose after the starting the engine.
- Quickly raise the engine speed to 3,000 rpm
(min-1).
Is there vacuum?
Yes : Go to step 24.
No : Go to step 14.
Is the vacuum hose OK?
Yes : Go to step 16.
No : Repair the vacuum hose.
11-197
- Turn the ignition switch ON (II).
- At the harness side, measure voltage between EVAP canister purge valve 2P connector terminals No. 1 and No. 2.
Is there any voltage?
Yes : Replace the EVAP canister purge valve.
No : Go to step 19.
- At the harness side, measure voltage between EVAP canister purge valve 2P connector terminal No. 1 and body ground.
Is there battery voltage?
Yes : Go to step 20.
No : Repair open in the wire between No. 4 ACG (10A) fuse in the under-dash fuse/relay box and the EVAP canister purge valve.
- Turn the ignition switch OFF.
- Reconnect the EVAP canister purge valve 2P connector.
- Turn the ignition switch ON (II).
- Measure voltage between ECM/PCM connector terminal B21 and body ground.
Is there battery voltage?
Yes : Substitute a known-good ECM/PCM and recheck (see page 11-5). If the symptom/indication goes away, replace the original ECM/PCM.
No : Repair open in the wire between the EVAP canister purge valve and the ECM/PCM (B21).
- Reconnect the vacuum hose to the EVAP control canister.
- Remove the fuel fill cap.
- Disconnect the purge air hose (A) from the EVAP canister and connect a vacuum/pressure gauge 0 - 100 mm Hg (0 - 4 in. Hg) (B) to EVAP canister (C).
- Start the engine and raise speed to 3,000 rpm
(min-1).
Does vacuum appear on gauge within 2 minute?
Yes : When vacuum is appear, evaporative emission controls are OK. Check the EVAP two way valve test (see page 11-198).
No : Replace the EVAP canister.
EVAP Two Way Valve Test11-198
- Remove the fuel cap.
- Disconnect the vapor line from the EVAP two way valve (A). Connect it to a T-fitting (B) from the vacuum gauge (C) and the vacuum pump (D) as shown.
- Apply vacuum slowly and continuously while watching the gauge.
The vacuum should stabilize momentarily at 0.8 - 2.1 kPa (6 - 16 mmHg, 0.2 - 0.6 in.Hg).
If the vacuum stabilizes (valve opens) below 0.8 kPa (6 in.Hg), or above 2.1 kPa (16 mmHg, 0.6 in.Hg), install a new valve and retest.
- Move the vacuum pump hose from the vacuum fitting to the pressure fitting, and move the vacuum gauge hose from the vacuum side to the pressure side (A) as shown.
- Slowly pressurize the vapor line while watching the gauge. The pressure should stabilize momentarily above 1.0 kPa (8 mmHg, 0.3 in.Hg).
If the pressure momentarily stabilizes (valve opens) above 1.0 kPa (8 mmHg, 0.3 in.Hg), the valve is OK. If the pressure stabilizes below 1.0 kPa (8 mmHg, 0.3 in.Hg), install a new valve and retest. EVAP Canister Replacement11-199
Except KZ model:
KZ model:
|
Fuel and Emissions11-1
Evaporative Emission Control System 11-191 |