Power Windows 22A-143
|
Body Electrical22A-1
Power Windows 22A-143 |
Power Windows 22A-143
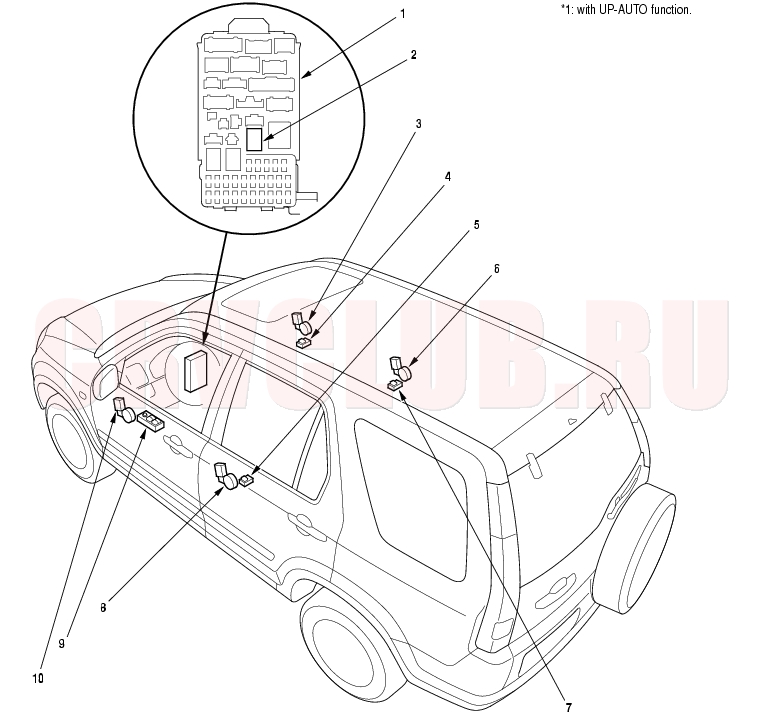
Component Location Index
NOTE: LHD type is shown, RHD type is similar.
Test, page 22A-62 Test, page 22A-175 Test, page 22A-170 ; Replacement, page 22A-170 Test, page 22A-170 ; Replacement, page 22A-170 Test, page 22A-175 Test, page 22A-170 ; Replacement, page 22A-170 Test, page 22A-175 Input Test, page 22A-164 ; Test, page 22A-168 ; Replacement, page 22A-164 *1 Resetting the Power Window Control Unit, page 22A-176 Test, page 22A-172
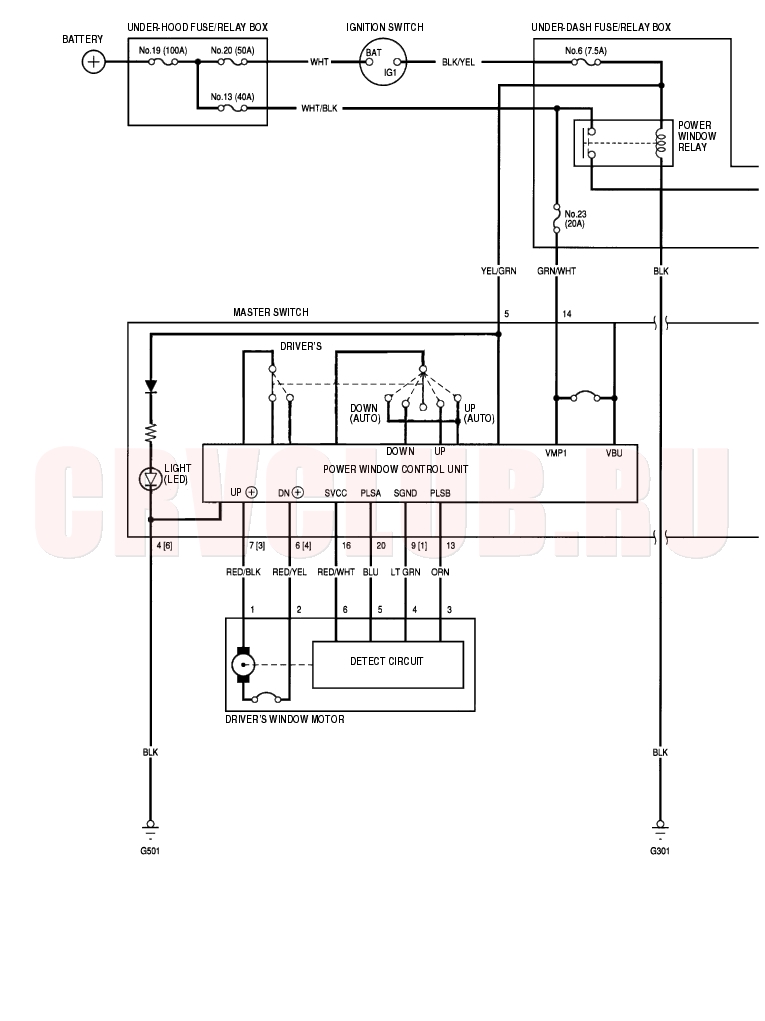
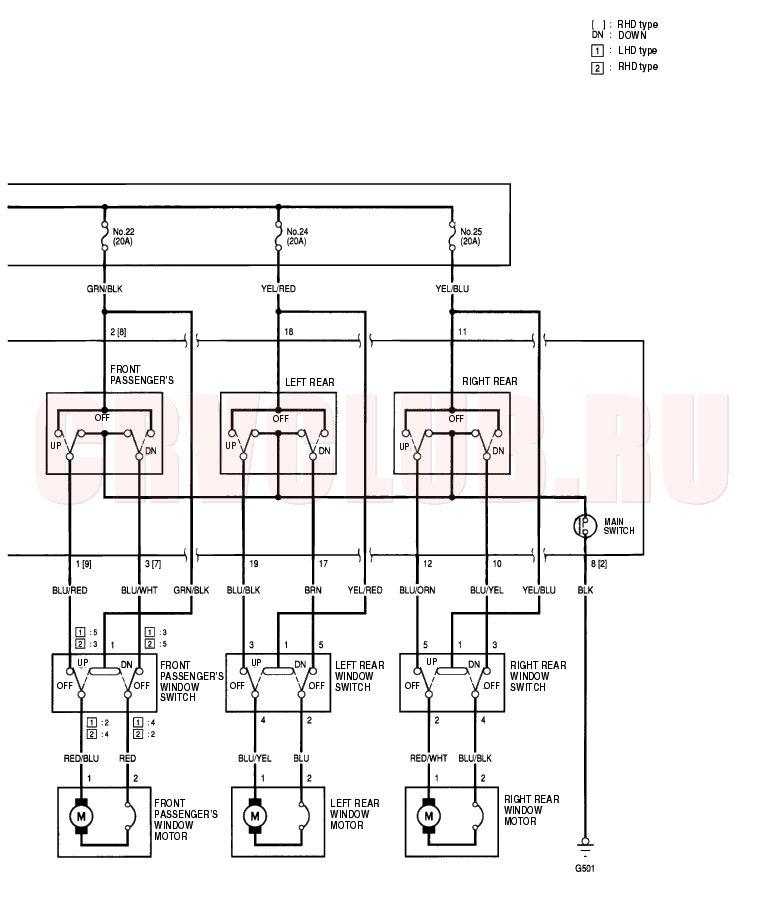
Circuit Diagram - With UP-AUTO Function 22A-144
22A-145
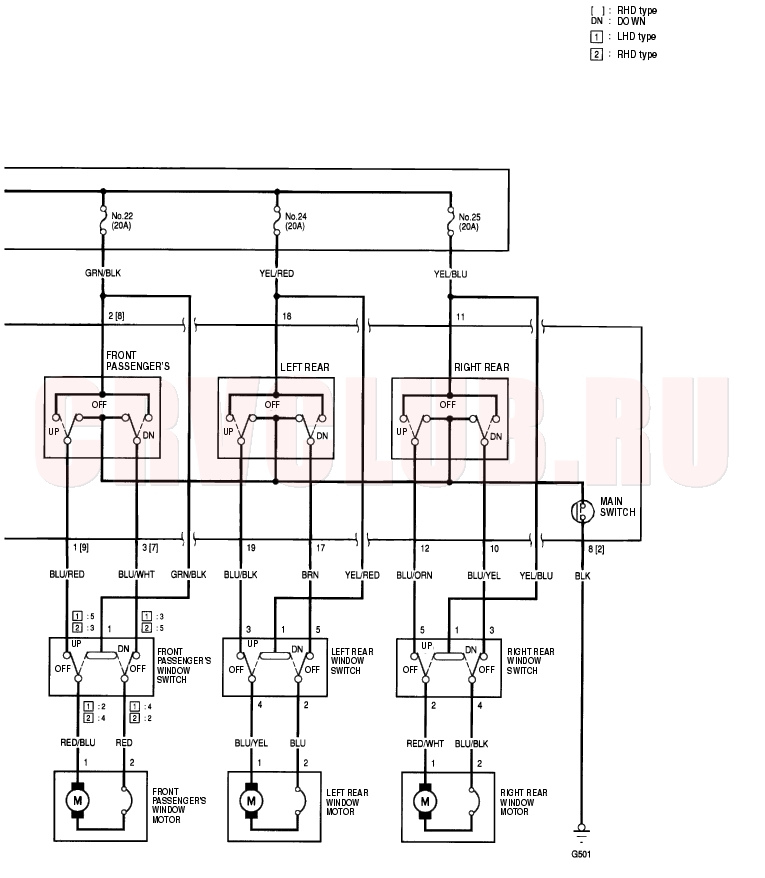
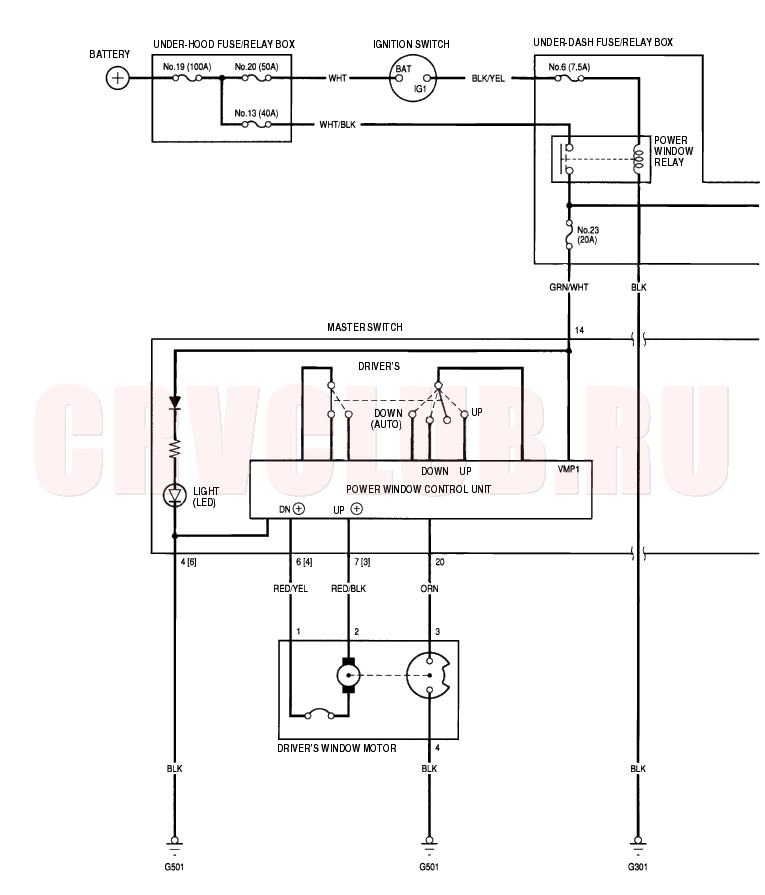
Circuit Diagram - Without UP-AUTO Function 22A-146
22A-147
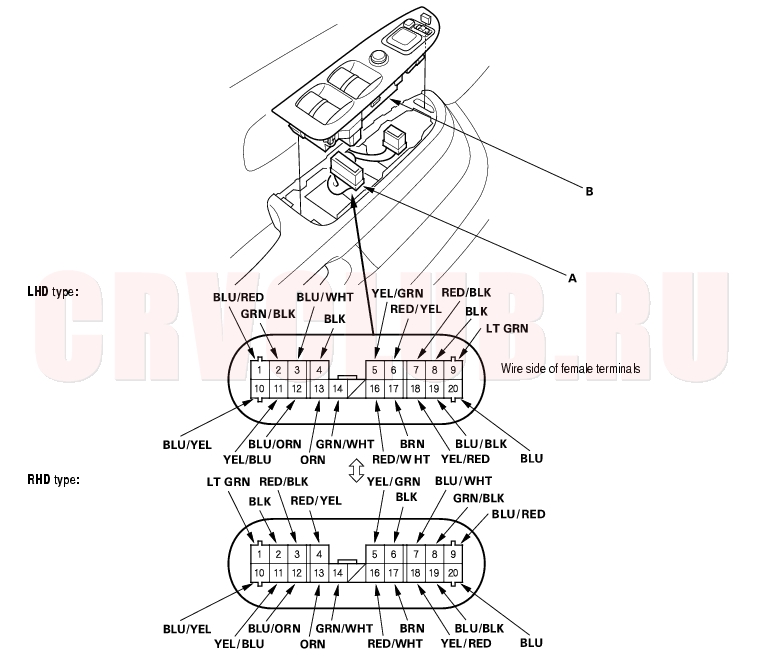
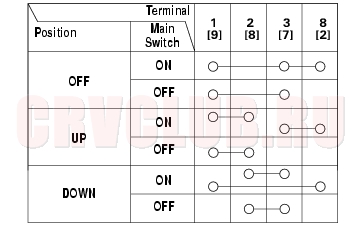
Master Switch Input Test - With UP-AUTO Function 22A-148
NOTE: The power window control unit is built into the power window master switch, and it only controls the driver's window operations.
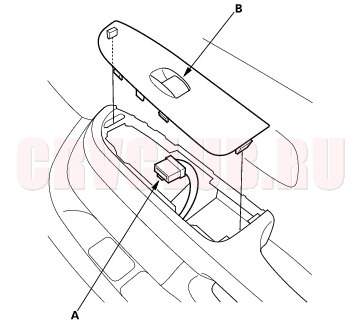
- Remove the switch panel from the door panel (see page 20-9) .
- Disconnect the 20P connector (A) from the master switch (B).
- Inspect the connector and socket terminals to be sure they are all making good contact.
- If the terminals are bent, loose or corroded, repair them as necessary, and recheck the system.
- If the terminals look OK, make the following input tests at the connector.
- If a test indicates a problem, find and correct the cause, then recheck the system.
- If all the input tests prove OK, go to step 4.
22A-149
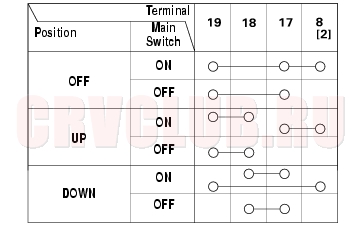
- Reconnect the 20P connector to the switch, and perform the following input tests.
- If any test indicates a problem, find and correct the cause, then recheck the system.
- If all the input tests prove OK, go to step 5.
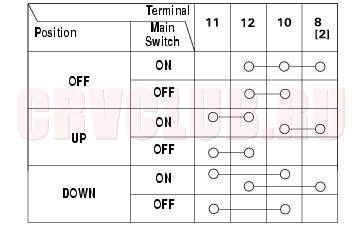
- Disconnect the 20P connector from the switch connector, and make these input tests at the connector.
- If any test indicates a problem, find and correct the cause, then recheck the system.
- If all the input tests prove OK, the control unit must be faulty; replace the power window master switch.
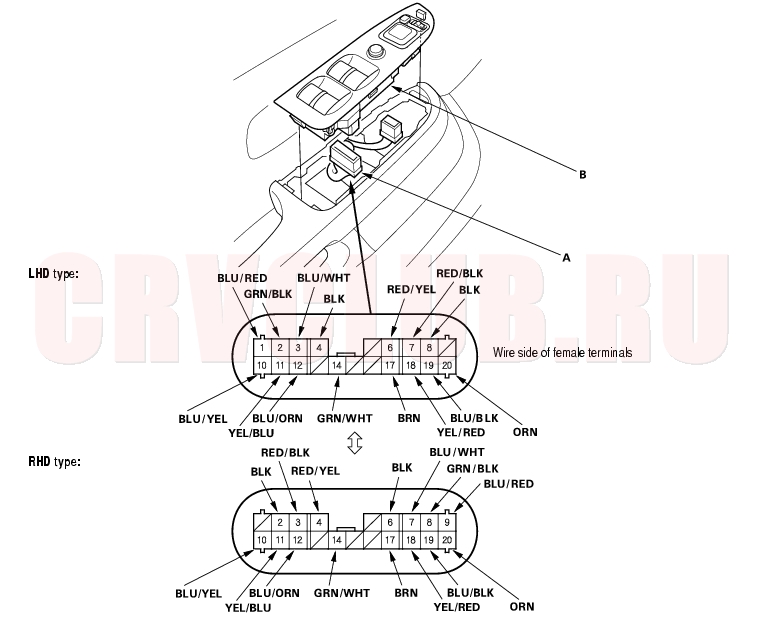
Master Switch Input Test - Without UP-AUTO Function 22A-150
NOTE: The power window control unit is built into the power window master switch, and it only controls the driver's window operations.
- Remove the switch panel from the door panel (see page 20-9) .
- Disconnect the 20P connector (A) from the master switch (B).
- Inspect the connector and socket terminals to be sure they are all making good contact.
- If the terminals are bent, loose or corroded, repair them as necessary, and recheck the system.
- If the terminals look OK, make the following input tests at the connector.
- If a test indicates a problem, find and correct the cause, then recheck the system.
- If all the input tests prove OK, go to step 4.
22A-151
- With the connector still disconnected, make these input tests at the connector.
- If any test indicates a problem, find and correct the cause, then recheck the system.
- If all the input tests prove OK, go to step 5.
- Reconnect the 20P connector to the switch, and perform the following input tests.
- If any test indicates a problem, find and correct the cause, then recheck the system.
- If all the input tests prove OK, the control unit must be faulty; replace the power window master switch.
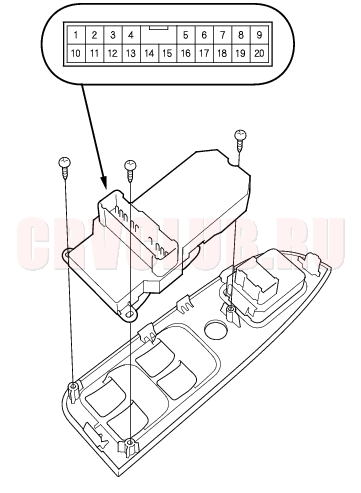
Master Switch Test/Replacement 22A-152
Driver's Switch:
The driver's switch is combined with the control unit so you cannot isolate the switch to test it.
Instead, run the master switch input test procedures on page 22A-164 . If the tests are normal, the driver's switch must be faulty.Front Passenger's Switch:
Left Rear Switch:
Right Rear Switch:
[ ] :RHD type
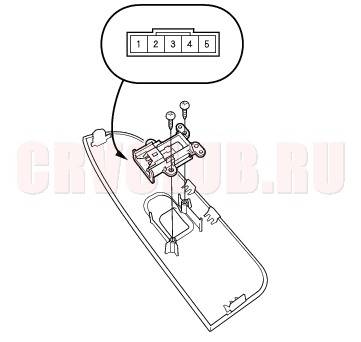
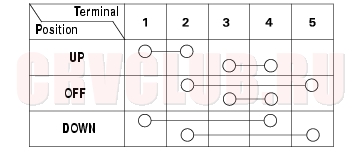
Passenger's Window Switch Test/Replacement 22A-153
- Remove the switch panel from the door panel (see page 20-9) .
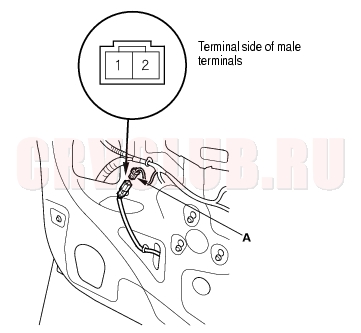
- Disconnect the 5P connector (A) from the power window switch (B).
- Remove the two screws and the passenger's power window switch.
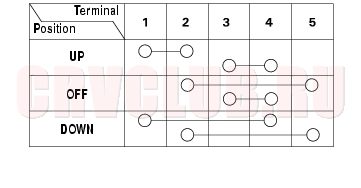
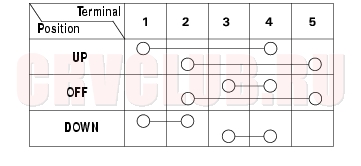
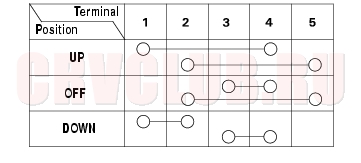
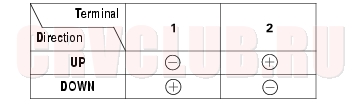
- Check for continuity between the terminals in each switch position according to the table.
Front passenger's (LHD type):
Front passenger's (RHD type):
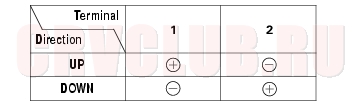
Left Rear Window:
Right Rear Window:
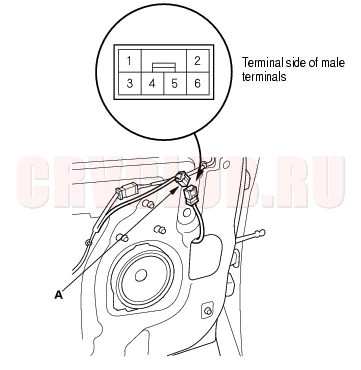
Driver's Window Motor Test - With UP-AUTO Function 22A-154
Motor Test:
- Remove the driver's door panel (see page 20-9) .
- Disconnect the 6P connector (A) from the driver's window motor.
- Test the motor in each direction by connecting battery power and ground according to the table.
NOTICE
To prevent damage to the motor, disconnect one lead as soon as the motor stops running.
Pulser Test:
- Reconnect the 6P connector to the window motor, and reconnect the 14P connector to the power window master switch.
- Check for voltage between the terminals.
- There should be battery voltage between the No. 6 (+) and No. 4 (-) terminals when the ignition switch is turned ON (II).
- Connect an analog voltmeter between the No. 5 (+) and No. 4 (-) terminals, and run the window motor down or up. The voltmeter needle should move back and forth alternately between 0 V and about 5 V (a digital voltmeter should show about 2.5 V).
- Connect an analog voltmeter between the No. 3 (+) and No. 4 (-) terminals, and run the window motor down or up. The voltmeter needle should move back and forth alternately between 0 V and about 5 V (a digital voltmeter should show about 2.5 V).
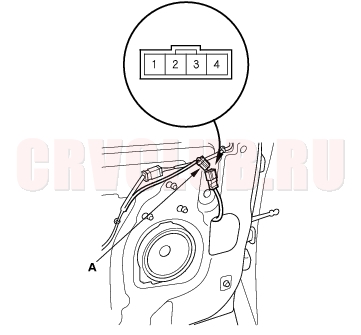
Driver's Window Motor Test - Without UP-AUTO Function 22A-155
Motor Test:
- Remove the door panel (see page 20-9) .
- Disconnect the 4P connector (A) from the driver's window motor.
NOTICE
To prevent damage to the motor, disconnect one lead as soon as the motor stops running.
Pulser Test:
- Remove the 4P conector to the driver's window motor, and reconnect the 20P connector to the power window master switch.
- Connect the test leads of a voltmeter to the No. 3 and No. 4 terminals of the driver's window motor 4P connector.
- Run the motor by connecting power and ground to the No. 1 and No. 2 terminals. The voltmeter should read about 6 V.
- If the voltage is not as specified, check for an open in the wires. If the wires are OK, replace the driver's window motor.
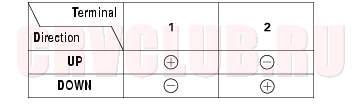
Passenger's Window Motor Test 22A-156
- Remove the passenger's door panel (see page 20-9) .
- Disconnect the 2P connector (A) from the passenger's power window motor.
- Test the motor in each direction by connecting battery power and ground according to the table.
NOTICE
To prevent damage to the motor, disconnect one lead as soon as the motor stops running.
Resetting the Power Window Control Unit 22A-157
Resetting the power window control unit is required after performing the following procedures:
Loss of battery power Loss of power from the No. 6 (7.5A) and/or the No. 23 (20A) fuses in the under-dash fuse/relay box Open circuit caused by disconnecting the 20P connector from the power window master switch Removal of the regulator, glass, or glass run channel
- Make sure the glass is installed properly.
- Close the driver's door.
- Turn the ignition switch OFF.
- Remove the No. 23 (20A) fuse in the under-dash fuse/relay box.
- Turn the ignition switch ON (II).
- After 1 second, turn the ignition switch OFF.
- After 5 seconds, install the No. 23 (20A) fuse to the under-dash fuse/relay box.
- Make sure the driver's window does not work in AUTO with the ignition switch ON (II).
- Start the engine.
- Move the driver's window all the way down using the manual DOWN function of the driver's power window switch.
- Move the driver's window all the way up using the manual UP function of the driver's power window switch, and hold it for 1 second after the window reaches the closed position.
- If the window does not work in AUTO, repeat steps 2 through 12.
|
Body Electrical22A-1
Power Windows 22A-143 |