Fan Controls10-11
|
Engine Cooling10-1
Fan Controls10-11 |
Fan Controls10-11
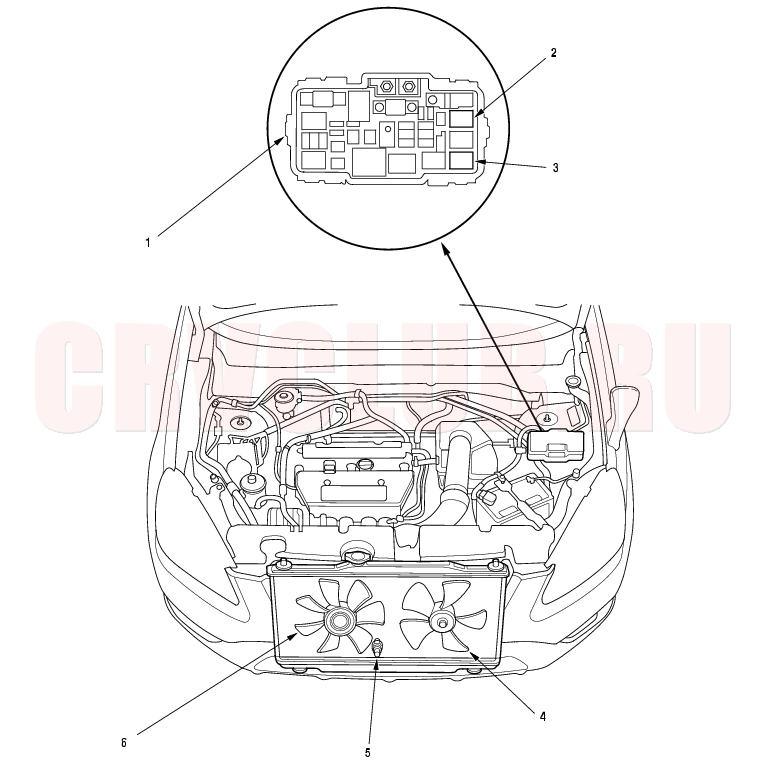
Component Location Index
Test, page 21-38 Test, page 10-14 Motor Test, page 10-4 Test, page 10-17 ; Replacement, page 10-17 Motor Test, page 10-4
Symptom Troubleshooting Index10-12
Before performing any troubleshooting procedures check:
Fuses Grounds Cleanliness and tightness of all connectors
Radiator fan does not run at all Radiator Fan Circuit Troubleshooting (see page 10-14) . Radiator fan does not run for engine cooling, but it runs with A/C on Radiator Fan Switch Circuit Troubleshooting (Open) (see page 10-16) . Radiator fan runs with ignition switch ON (II), A/C off, and engine temperature below 93°C (199°F) Radiator Fan Switch Circuit Troubleshooting (Short) (see page 10-16) .
Circuit Diagram10-13
Radiator Fan Circuit Troubleshooting10-14
- Check the No. 4 (20A) fuse in the under-hood fuse/relay box, and the No. 14 (10A) fuse in the under-dash fuse/relay box.
Is the fuse (s) OK?
Yes : Go to step 2.
No : Replace the fuse (s) and recheck.

- Remove the radiator fan relay from the under-hood fuse/relay box, and test it (see page 10-17) .
Is the relay OK?
Yes : Go to step 3.
No : Replace the radiator fan relay.
Is there battery voltage?
Yes : Go to step 4.
No : Replace the under-hood fuse/relay box.
Does the radiator fan run?
Yes : Go to step 5.
No : Go to step 6.
- Disconnect the jumper, and turn the ignition switch ON (II). Check for voltage between the No. 3 terminal of the radiator fan relay 4P socket and body ground.
Is there battery voltage?
Yes : Go to step 9.
No : Check for an open in the wire between the under-hood fuse/relay box and under-dash fuse/relay box.
10-15
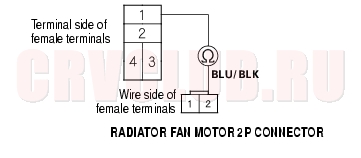
- Disconnect the radiator fan motor 2P connector.
- Check for continuity between the No. 1 terminal of the radiator fan relay 4P socket and the No. 2 terminal of the radiator fan motor 2P connector.
Is there continuity?
Yes : Go to step 8.
No : Repair open in the wire between the under-hood fuse/relay box and the radiator fan motor 2P connector terminal No. 2.
- Check for continuity between the No. 1 terminal of the radiator fan motor 2P connector and body ground.
Is there continuity?
Yes : Replace the radiator fan motor.
No : Check for an open in the wire between radiator fan motor 2P connector terminal No. 1 and body ground. If the wire is OK, check for a poor ground at G201.
- Reinstall the radiator fan relay.
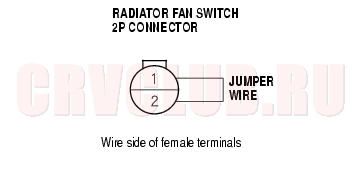
- Disconnect the radiator fan switch 2P connector.
- Connect the No. 1 and No. 2 terminals, of the radiater fan switch 2P connector with a jumper wire.
Does the radiator fan run?
Yes : Replace the radiator fan switch.
No : Go to step 12.
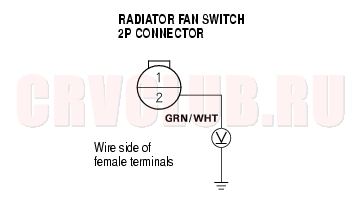
- Remove the jumper wire, and measure the voltage between the No. 2 terminal of the radiator fan switch connector and body ground.
Is there battery voltage?
Yes : Check for an open in the wire between radiator fan switch 2P connector terminal No. 1 and body ground. If the wire is OK, check for a poor ground at G201.
No : Repair open in the wire between the radiator fan switch terminal No. 2 and the under-hood fuse/relay box.
Radiator Fan Switch Circuit Troubleshooting (Open)10-16
- Disconnect the radiator fan switch 2P connector.
- Turn the ignition switch ON (II).
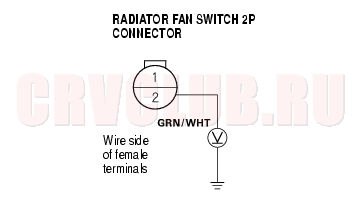
- Measure voltage between the No. 2 terminal of the radiator fan switch 2P connector and body ground.
Is there battery voltage?
Yes : Go to step 4.
No : Repair open in the wire between the radiator fan switch 2P connector terminal No. 2 and under-hood fuse/relay box.
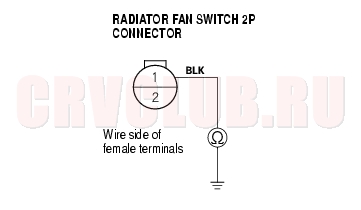
- Turn the ignition switch OFF, and check for continuity between the No. 1 terminal of the radiator fan switch 2P connector and body ground.
Is there continuity?
Yes : Replace the radiator fan switch.
No : Check for an open in the wire between the radiator fan switch 2P connector terminal No. 1 and body ground. If the wire is OK, check for a poor ground at G201.
Radiator Fan Switch Circuit Troubleshooting (Short)10-16
- Remove the radiator fan relay from the under-hood fuse/relay box, and test it (see page 10-17) .
Is the relay OK?
Yes : Go to step 2.
No : Replace the radiator fan relay.
- Remove the radiator fan switch, and test it (see page 10-17) .
Is the radiator fan switch OK?
Yes : Go to step 3.
No : Replace the radiator fan switch.
- Disconnect the negative cable from the battery.
- Disconnect Engine Control Module (ECM)/Powertrain Control Module (PCM) connector B (24P) and the under-hood fuse relay box 14P connector.
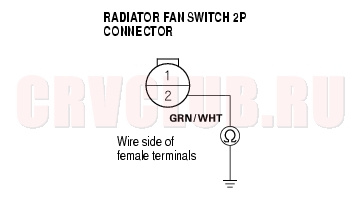
- Check for continuity between the No. 2 terminal of the radiator fan switch 2P connector and body ground.
Is there continuity?
Yes : Repair short in the wire between the radiator fan switch 2P connector terminal No. 2 and under-hood fuse/relay box.
No : Replace the under-hood fuse/relay box.
Radiator Fan Switch Test10-17
NOTE: Bleed air from the cooling system after installing the radiator fan switch (see page 10-6) .
- Remove the radiator fan switch from the radiator (see page 10-17) .
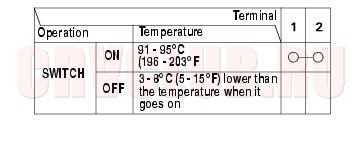
- Suspend the radiator fan switch (A) in a container of water as shown.
- Heat the water, and check the temperature with a thermometer. Do not let the thermometer (B) touch the bottom of the hot container.
- Measure the continuity between terminal No. 1 and terminal No. 2 according to the table.
Radiator Fan Switch Replacement10-17
|
Engine Cooling10-1
Fan Controls10-11 |