Transmission Housing14-198
|
A/T
Transmission Housing14-198 |
Transmission Housing14-198
Housing and Shaft Assemblies Removal
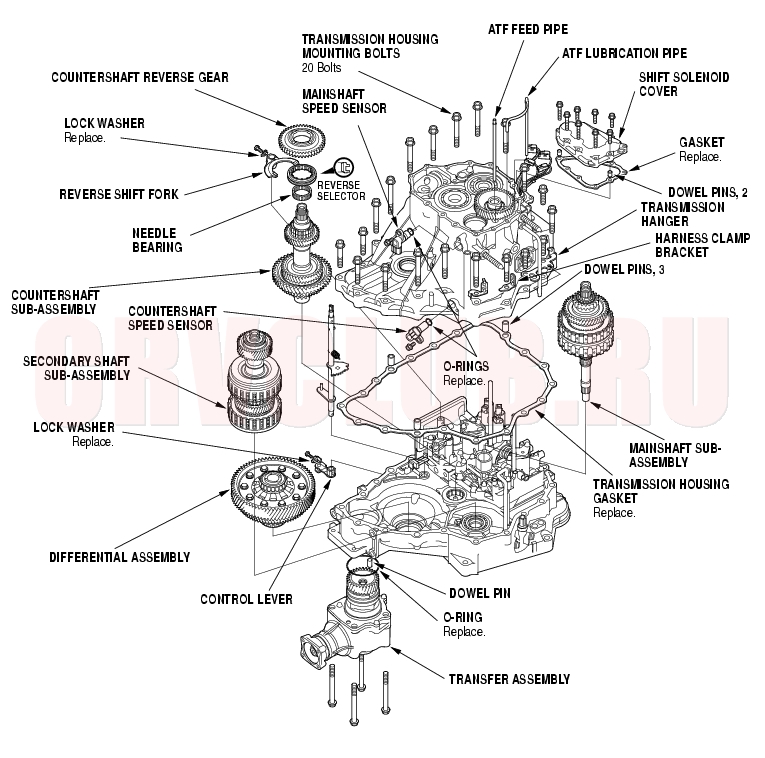
Exploded View -4WD
14-199
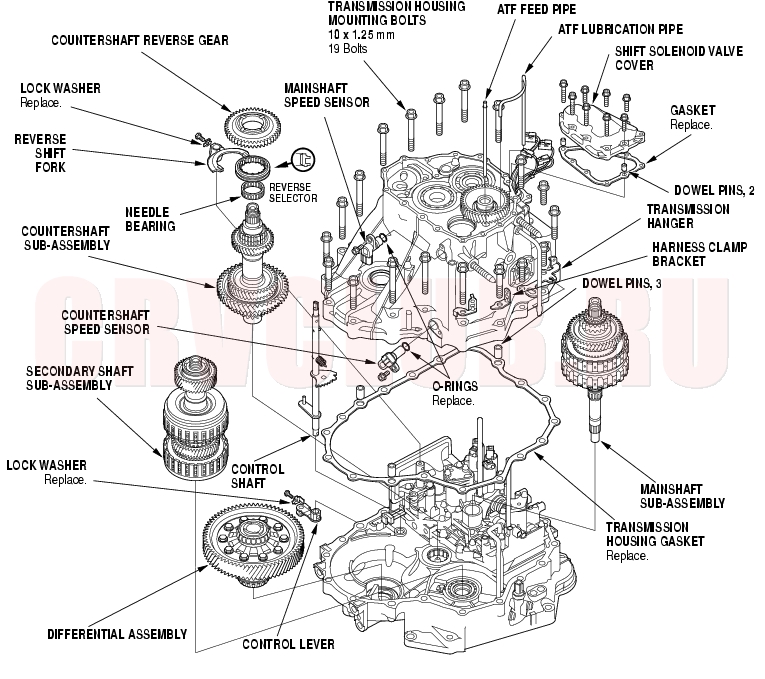
Exploded View -2WD
Housing and Shaft Assemblies Removal (cont'd)14-200
Special Tools Required
Housing puller 07HAC-PK40102 Snap ring pliers 07LGC-0010100 NOTE: Refer to the Exploded View as needed during the following procedure.
- Remove the ATF feed pipe from the idler gear shaft, and the ATF lubrication pipe from the transmission housing.
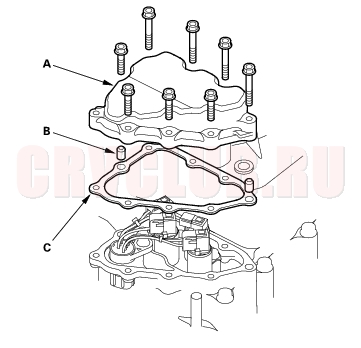
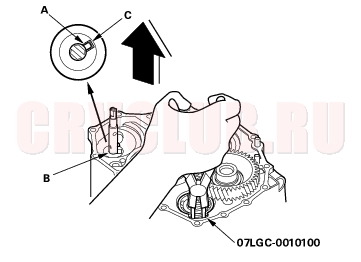
- Remove the shift solenoid valve cover (A), dowel pins (B), and gasket (C).
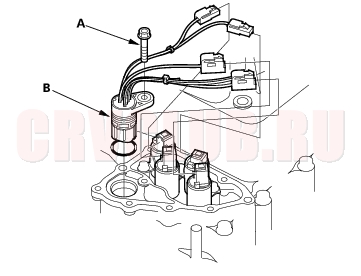
- Remove the bolt (A) securing the solenoid harness connector (B), and remove the connector.
- Disconnect the connectors from the shift solenoid valves.
- Remove the mainshaft and countershaft speed sensors.
- Remove the transmission housing mounting bolts, hanger, and harness clamp brackets.
- Align the spring pin (A) on the control shaft (B) with the transmission housing groove (C) by turning the control shaft.
- NOTE: Do not squeeze the end of the control shaft tips together when turning the shaft. If the tips are squeezed together it will cause a faulty signal or position due to the play between the control shaft and the switch.
- With expanding the snap ring of the secondary shaft bearing using the snap ring pliers, lift the transmission housing. Release the snap ring pliers, and remove the transmission housing.
- Remove the countershaft reverse gear and needle bearing.
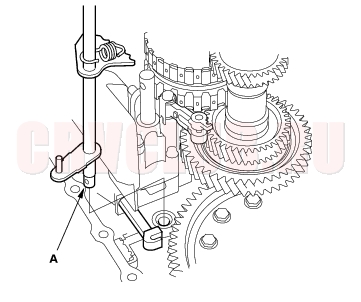
- Remove the lock bolt securing the shift fork, then remove the shift fork with the reverse selector together.
- Remove the control lever from the control shaft.
14-201
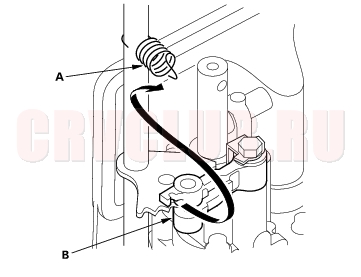
- Unhook the detent spring (A) from the detent arm (B).
- Remove the control shaft (A).
- Remove the mainshaft sub-assembly (A), countershaft sub-assembly (B), and secondary shaft sub-assembly (C) together.
- Remove the differential assembly.
- Remove the transfer assembly for 4WD model.
Bearing Removal14-202
Special Tools Required
Snap ring pliers 07LGC-0010100 Driver attachment, 78 x 90 mm 07GAD-SD40101 Handle driver 07749-0010000 Driver attachment, 42 x 47 mm 07746-0010300
- Remove the idler gear shaft when removing the mainshaft bearing and idler gear shaft bearing.
- NOTE: If you are only removing the countershaft bearing, idler gear shaft removal is not needed.
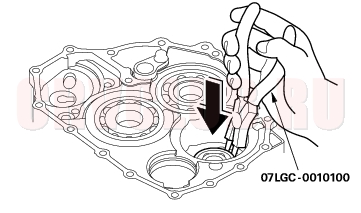
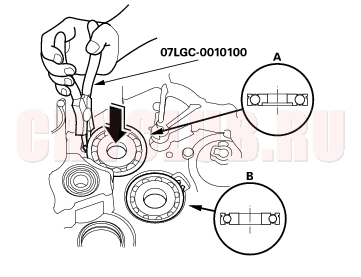
- To remove the mainshaft bearing (A) and countershaft bearing (B) from the transmission housing, expand each snap ring with the snap ring pliers, then push the bearing out.
- NOTE: Do not remove the snap ring unless it's necessary to clean the grooves in the housing.
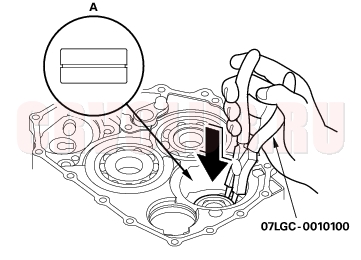
- Expand the snap ring of the idler gear shaft bearing with the snap ring pliers, then push the bearing out.
Bearing Installation14-203
Special Tools Required
Snap ring pliers 07LGC-0010100 Driver attachment, 78 x 90 mm 07GAD-SD40101 Handle driver 07749-0010000 Driver attachment, 42 x 47 mm 07746-0010300
- Install the bearings in the direction shown.
- Expand each snap ring with the snap ring pliers, and install the mainshaft bearing (A) and countershaft bearing (B) part-way into the housing.
- Release the pliers, then push the bearing down into the housing until the snap ring snaps in place around it.
- Expand the snap ring of the idler gear shaft (A) with the snap ring pliers, and install the bearing part-way into the housing.
- Release the pliers, then push the bearing down into the housing until the snap ring snaps in place around it.
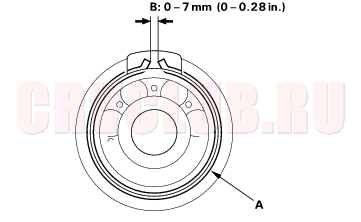
- After installing the bearings verify that the snap rings (A) are seated in the bearing and housing grooves, and that the ring end gaps (B) are correct.
- Install the idler shaft.
Reverse Idler Gear Removal and Installation14-204
Removal
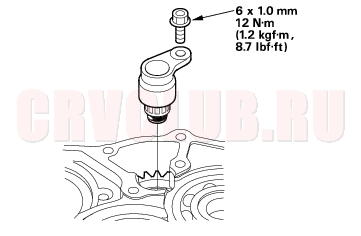
- Remove the bolt (A) securing the reverse idler gear shaft holder.
- Install a 5 x 0.8 mm bolt (B) in the reverse idler gear shaft, and pull it to remove the reverse idler gear shaft (C) and gear shaft holder (D) together.
- Remove the reverse idler gear.
Installation
- Install the reverse idler gear in the transmission housing.
- Coat the reverse idler gear shaft (A), needle bearing (B), and new O-rings (C) with lithium grease lightly.
- Assemble the new O-rings and needle bearing on the reverse idler gear shaft, then install the reverse idler gear shaft in the reverse idler gear shaft holder (D). Align the D-shaped cut out (E) of the shaft with the D-shaped area (F) of the holder.
- Install the reverse idler gear shaft/holder assembly on the transmission housing.
|
A/T
Transmission Housing14-198 |