Seats20-102
|
Body20-1
Seats20-102 |
Seats20-102
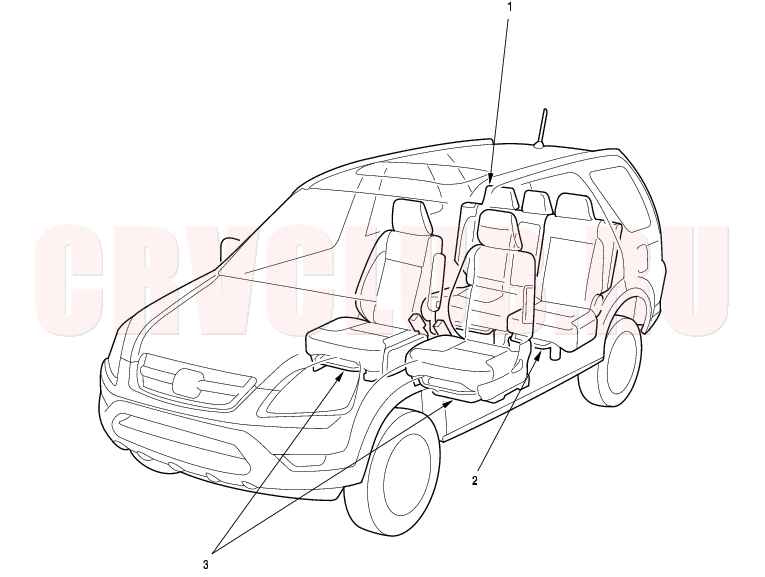
Component Location Index
Removal/Installation, page 20-114 ; Armrest Replacement, page 20-115 ; Armrest Cover Replacement, page 20-116 ; Seat Cover Replacement, page 20-117 ; Lock Control Cable Replacement, page 20-127 ; Seat-back Latch Lever replacement, page 20-128 Removal/Installation, page 20-114 ; Seat Cover Replacement, page 20-123 ; Seat-back Latch Lever Replacement, page 20-128 Removal/Installation, page 20-103 ; Center Table Replacement, page 20-106 ; Armrest Replacement, page 20-107 ; Disassembly/Reassembly-with manual height adjustable, page 20-108 ; Disassembly/Reassembly-without manual height adjustable, page 20-109 ; Seat Cover Replacement, page 20-110
Front Seat Removal/Installation20-103
For some models: SRS components are located in this area. Review the SRS component locations (see page 23-14) , and the precautions and procedures (see page 23-16) ) in the SRS section before performing repairs or service.
When prying with a flat-tip screwdriver, wrap it with protective tape to prevent damage. Take care not to scratch the body or tear the seat covers. Put on gloves to protect your hands. LHD is shown, RHD is symmetrical.
- If equipped, make sure you have the anti-theft code for the radio, then write down the frequencies for the preset buttons.
- If equipped with a side airbag, disconnect the negative battery cable, and wait at least 3 minutes before beginning work.
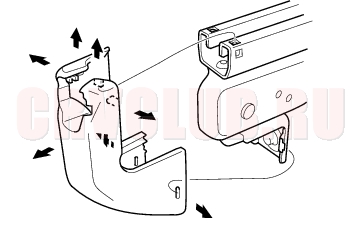
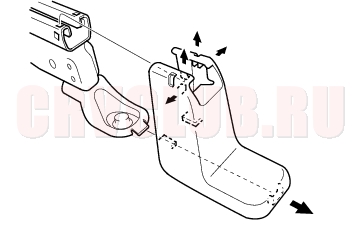
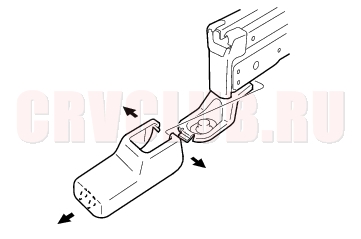
- Remove the front seat track end covers from the front of both seat tracks.
Front Seat Removal/Installation (cont'd)20-104
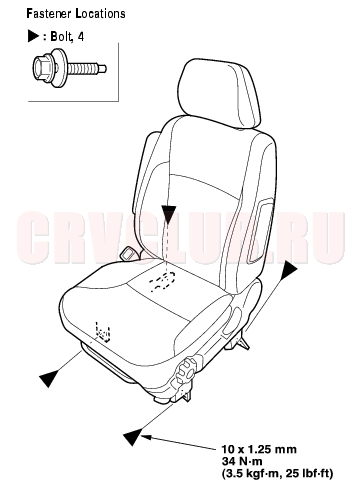
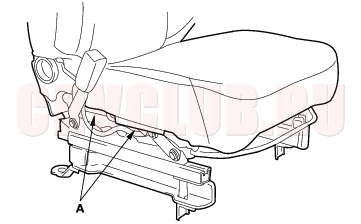
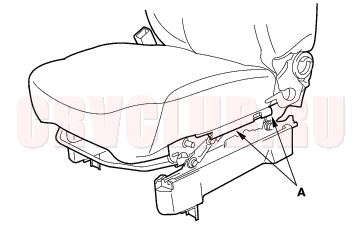
- Remove the bolts securing the front seat.
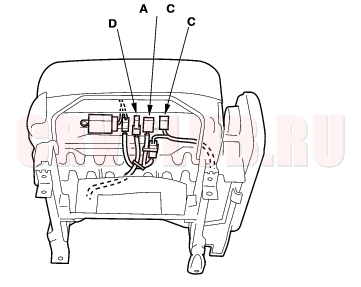
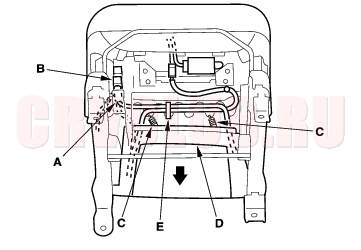
- For some models: Lift up the front seat, disconnect the seat sub harness connector (A) or the seat belt switch connector (B), the seat belt buckle tensioner connector (C), and the side airbag connector (D). RHD is shown, LHD is symmetrical.
20-105
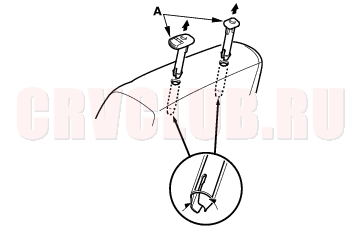
- Remove the headrest.
- With the help of an assistant, carefully remove the front seat through the front door opening.
- Install the seat in the reverse order of removal, and note these items:
- Make sure each connector is plugged in properly.
- If equipped with a side airbag, reconnect the negative cable to the battery.
- If equipped, enter the anti-theft code for the radio, then enter the customer's radio station presets.
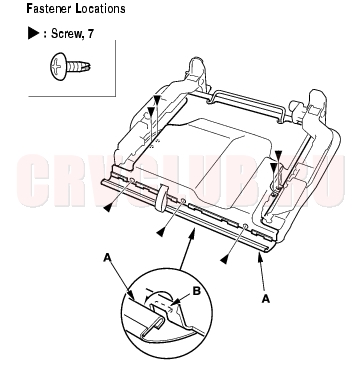
Front Seat Center Table Replacement20-106
Take care not to scratch the dashboard, tear the seams or damage the seat covers. When prying with a flat-tip screwdriver, wrap it with protective tape to prevent damage. Put on gloves to protect your hands. A/T models are shown, and M/T models are similar.
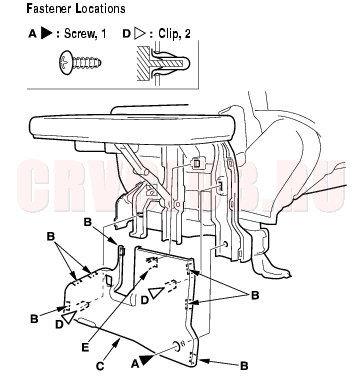
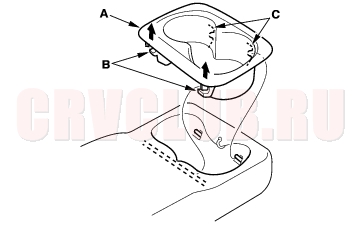
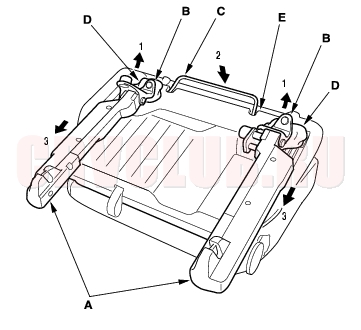
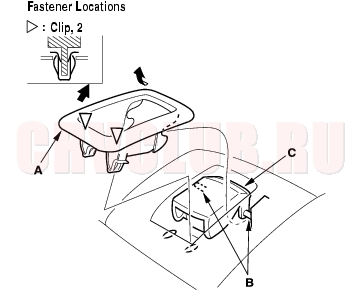
- Set up the table.
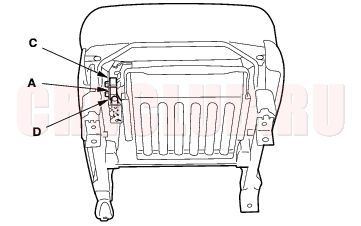
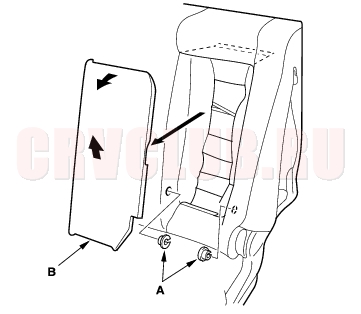
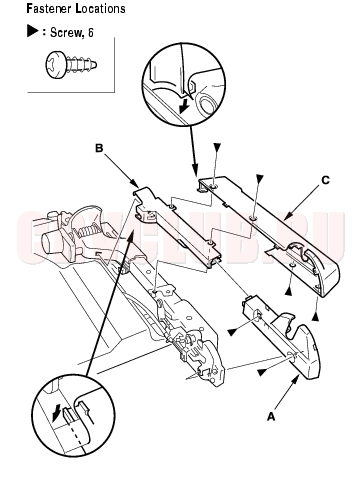
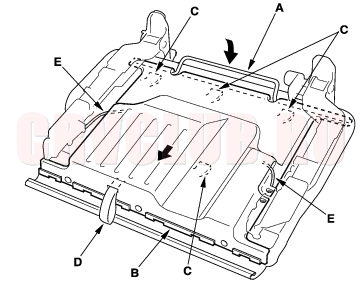
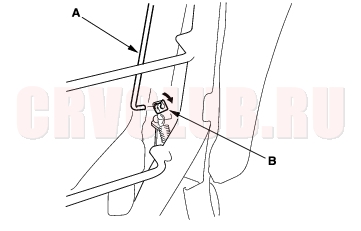
- Remove the screw (A), release the tabs (B), and pull the outer cover (C) back to detach the clips (D) and hooks (E), then remove it.
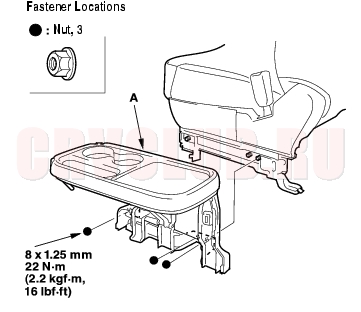
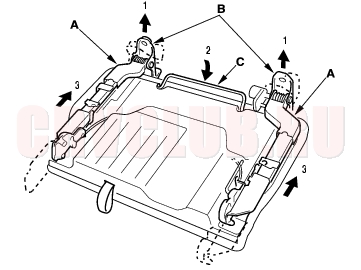
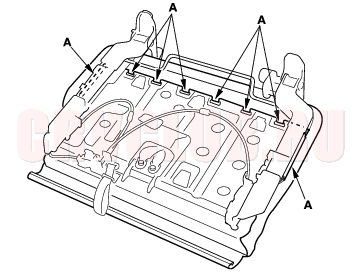
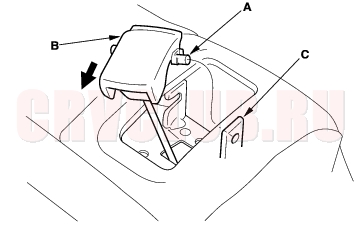
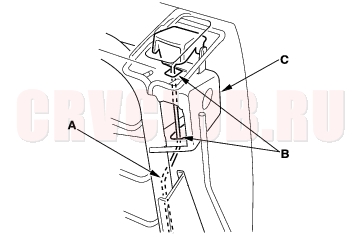
- Remove the nuts, then remove the center table (A).
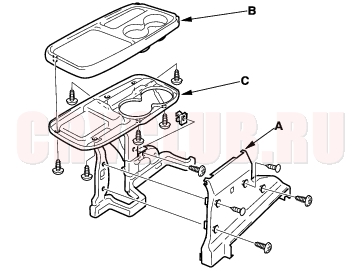
- Remove the inner cover (A) and the center table cover (B) from the center table frame (C).
- Install the table in the reverse order of removal, and note these items:
- Replace any damaged clips.
- Push the clip, hook, and tab portions into place securely.
Front Seat Armrest Replacement20-107
For Some Models
NOTE: Take care not to tear the seams or damage the seat covers.
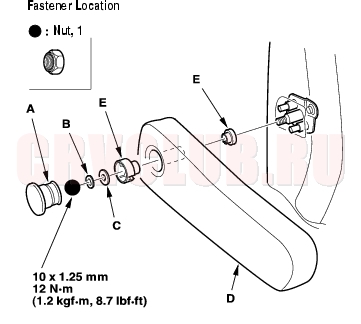
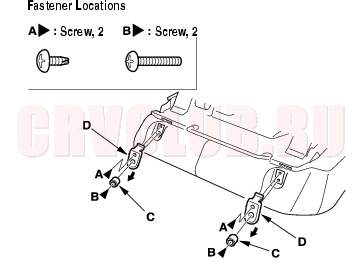
- Remove the cap (A).
- Remove the nut, the washer (B), and the wave washer (C), then remove the armrest (D). If necessary, remove the bushings (E) from the armrest.
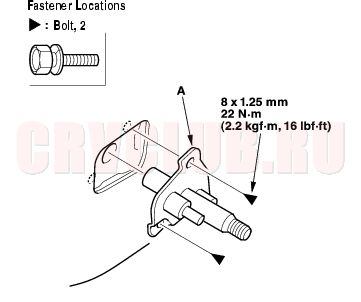
- Remove the bolts, then remove the armrest bracket (A).
- Install the armrest in the reverse order of removal.
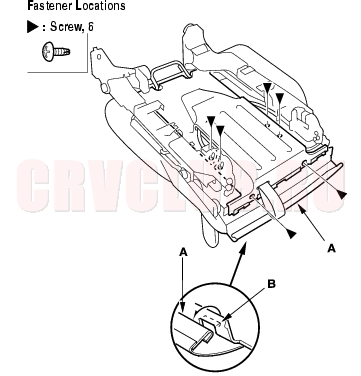
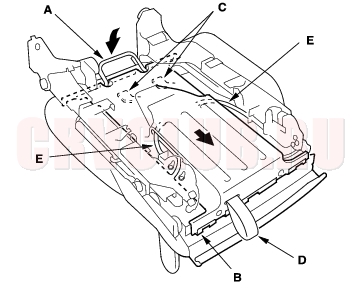
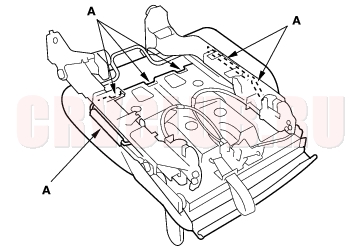
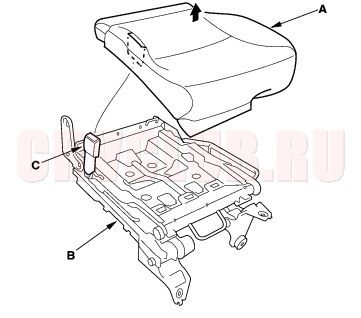
Front Seat Disassembly/Reassembly - With Manual Height Adjustable20-108
For some models: SRS components are located in this area. Review the SRS component locations (see page 23-14) , and the precautions and procedures (see page 23-16) in the SRS section before performing repairs or service.
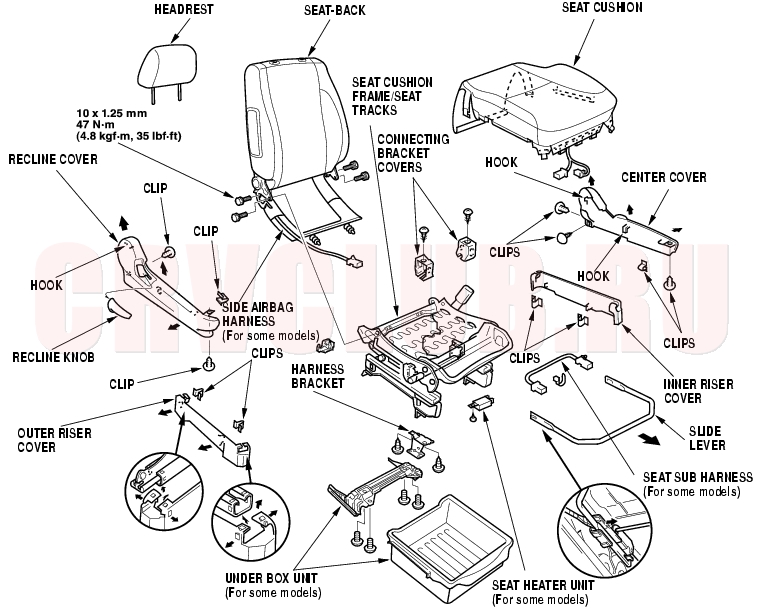
Take care not to tear the seams or damage the seat covers. Put on gloves to protect your hands. When prying with a flat-tip screwdriver, wrap it with protective tape to prevent damage. The left side seat is shown, the right side seat is symmetrical. Disassemble the seat as shown. For seat cushion removal and installation procedures, refer to Front Seat Cover Replacement (see page 20-112) .
Reassemble the seat in the reverse order of disassembly, and note these items:
Apply multipurpose grease to the moving portion of the seat track. To prevent wrinkles in the seat cushion cover, stretch the material evenly over the pad.
Front Seat Disassembly/Reassembly - Without Manual Height Adjustable20-109
For some models: SRS components are located in this area. Review the SRS component locations (see page 23-14) , and the precautions and procedures (see page 23-16) in the SRS section before performing repairs or service.
Take care not to tear the seams or damage the seat covers. Put on gloves to protect your hands. When prying with a flat-tip screwdriver, wrap it with protective tape to prevent damage. The right side seat is shown, the left side seat is symmetrical. Disassemble the seat as shown. For seat cushion removal and installation procedures, refer to Front Seat Cover Replacement (see page 20-112) .
Reassemble the seat in the reverse order of disassembly, and note these items:
Apply multipurpose grease to the moving portion of the seat track. To prevent wrinkles in the seat cushion cover, stretch the material evenly over the pad.
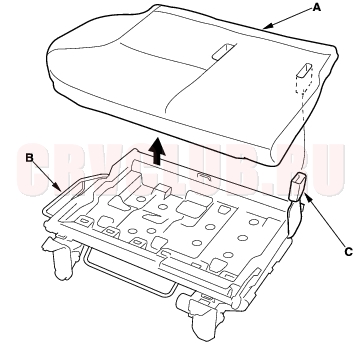
Front Seat Cover Replacement20-110
For some models: SRS components are located in this area. Review the SRS component locations (see page 23-14) , and the precautions and procedures (see page 23-16) in the SRS section before performing repairs or service.
Take care not to tear the seams or damage the seat covers. On the passenger's seat with side airbag, do not touch the OPDS sensor in the seat-back pad, and keep it away from oil. Oil can corrode the sensor causing it to fail. Put on gloves to protect your hands. Seat-back Cover
- Remove the front seat (see page 20-103) .
- If equipped, remove the armrest (see page 20-107) .
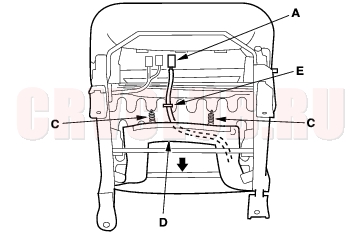
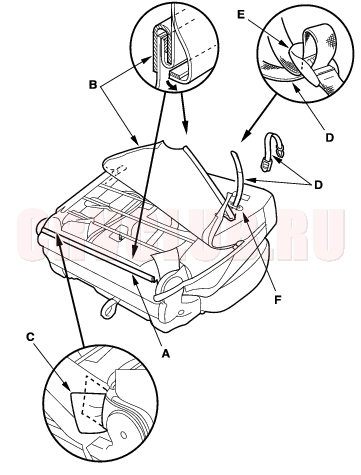
- With side airbag: From under the seat cushion, detach the side airbag connector clip (A), and from under the passenger's eat cushion on some RHD models, detach the seat sub harness connector clip (B). Release the hook springs (C), pull the seat cushion cover (D) back, then remove the harness bands (E). The passenger's seat on RHD model is shown, and the passenger's seat on LHD model is symmetrical except it has no OPDS unit.
- Fold the seat-back forward.
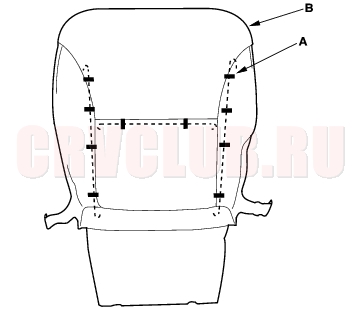
- With side airbag: Release the hooks (A), and unzip the seat-back cover (B).
20-111
- Turn over the seat back cover (A), release the inside springs (B) and hooks (C). Pull the side airbag harness, and if equipped, the OPDS unit harness out through the holes (D) in the seat-back cover.
- With side airbag: Remove the side airbag (see (see page 23-137) , and release the hooks (A) from the airbag module holder (B).
- Pull out the headrest guides (A) while pinching the end of the guides, and remove them.
- Pull back the seat-back cover all the way around, then remove it.
- Install the cover in the reverse order of removal, and note these items:
- To prevent wrinkles when installing a seat-back cover, make sure the material is stretched evenly over the pad before securing the clips, hooks, and inside springs.
- Make sure the side airbag harness is routed properly.
- If necessary, reinitialize the OPDS control unit (see page 23-30) .
Front Seat Cover Replacement (cont'd)20-112
Seat Cushion Cover
- Remove the front seat (see page 20-103) .
- Remove these items from the front seat:
- Center table (see page 20-106)
- Recline cover, driver's seat (see page 20-108) , passenger's seat (see page 20-109)
- Center cover, driver's seat (see page 20-108) , passenger's seat (see page 20-109)
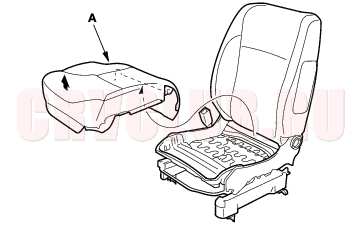
- From under the seat cushion, detach the side airbag connector clip, and from under the passenger's seat, on some RHD models, detach the OPDS unit connector clip. Release the hook springs from the seat cushion frame spring, then pull the cover back, and remove the harness bands.
- Release the hook, and unzip the seat-back cover. Pull the side airbag harness and the OPDS harness (passenger's seat on some RHD models) out through the hole in the seat-back cover.
- Remove the clip, and release the hooks (A).
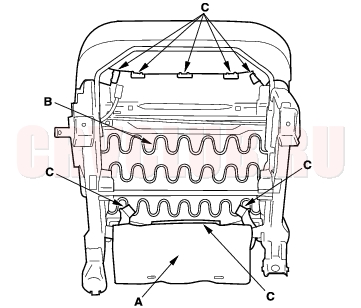
- From under the seat cushion, release the seat cushion cover (A) from the seat cushion frame spring (B), and release the hooks (C).
20-113
- Remove the seat cushion cover (A) with the seat cushion pad from the seat cushion frame.
- Pull back the edge of the seat cushion cover all the way around, and release the clips (A), then remove the seat cushion cover (B).
- Install the cover in the reverse order of removal, and note these items:
- To prevent wrinkles when installing a seat cushion cover, make sure the material is stretched evenly over the pad before securing the clips and hooks.
- Make sure the side airbag harness and OPDS harness (passenger's seat) are routed properly.
- Replace any clips you removed with new ones (A). Install them with commercially available upholstery ring pliers (B).
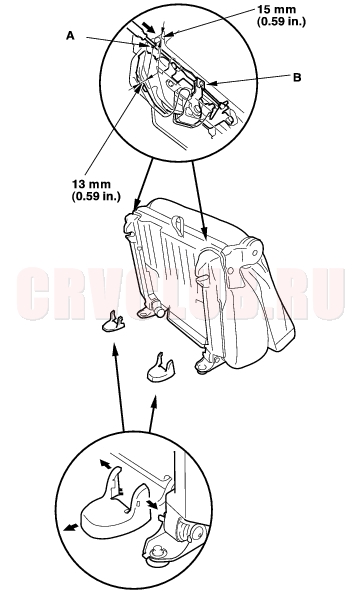
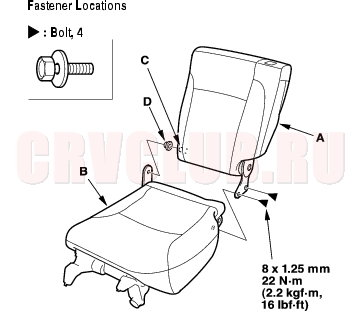
Rear Seat Removal/Installation20-114
When prying with a flat-tip screwdriver, wrap it with protective tape to prevent damage. Take care not to scratch the body or rear the seat covers. Right rear seat is shown, and left rear seat is similar.
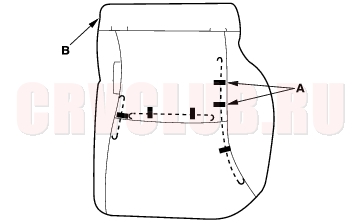
- Remove the headrests. Fold the seat-back forward, and slide the rear seat backward fully.
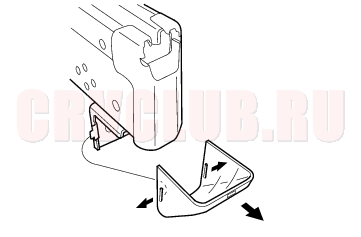
- Remove the front seat track end covers from the front of both seat tracks.
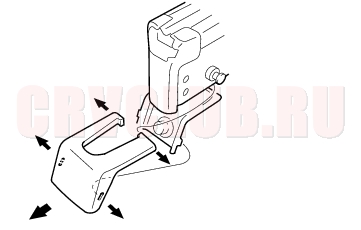
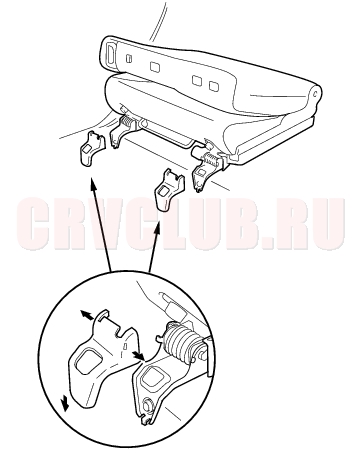
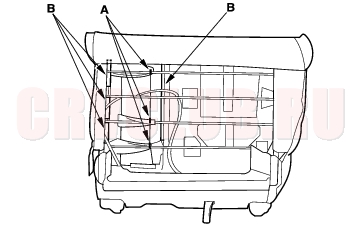
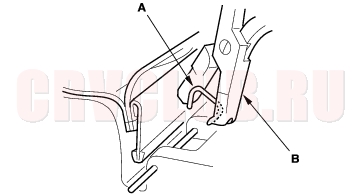
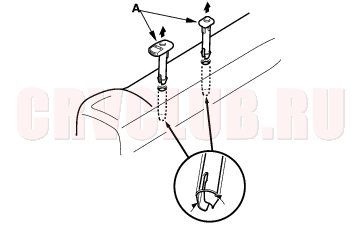
- Unlock the rear seat and tip it up, then remove the rear seat track end covers from the back of both seat tracks. If the seat cannot be unlocked by pulling the strap, make the holes (A) in the back of both seat tracks as shown. Insert a flat-tip screwdriver over 100 mm (3.94 in.) through holes, and push both levers (B) to unlock the seat.
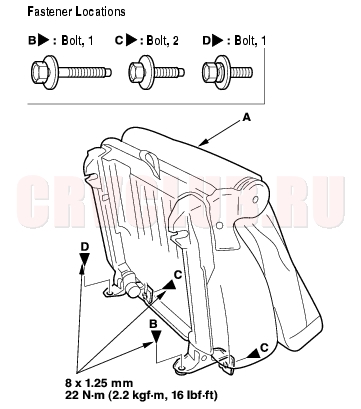
20-115
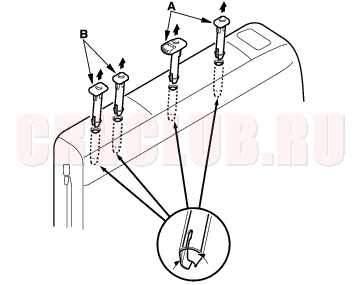
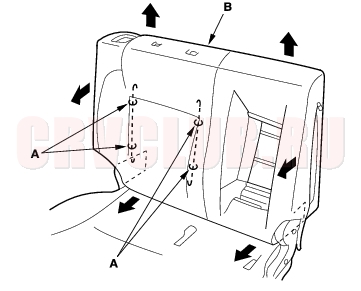
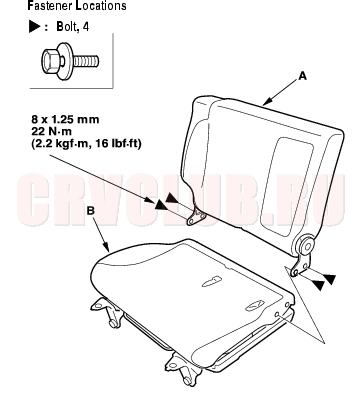
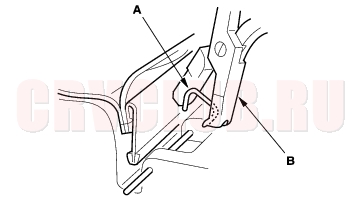
- While holding the rear seat (A) up, remove the mounting bolt (B, C, D).
- With the help of an assistant, remove the rear seat (A) through the door opening.
- Install the rear seat in the reverse order of removal.
Rear Seat Armrest Replacement20-115
NOTE: Take care not to tear the seams or damage the seat covers.
- Remove the clip (A) from the right portion of the armrest pivot.
- Remove the armrest.
- Slide the armrest (A) toward the right, side.
- Remove the left pivot shaft (B) from the collar (C), and remove the right pivot shaft (D) from the collar (E) by pulling the armrest back.
- Install the armrest in the reverse order of removal.
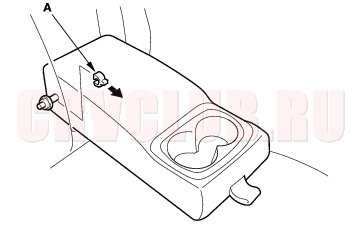
Rear Seat Armrest Cover Replacement20-116
Take care not to tear the seams or damage the seat covers. Put on gloves to protect your hands.
- Remove the armrest (see page 20-115) .
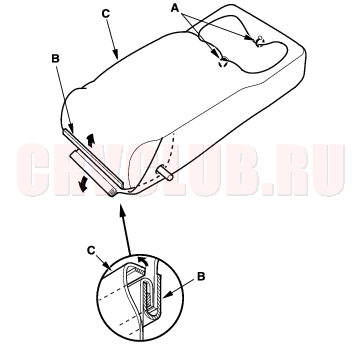
- Remove the beverage holder (A).
- Pull up on the rear edge of the holder to release the hooks (B).
- Release the front hooks (C), then remove the holder.
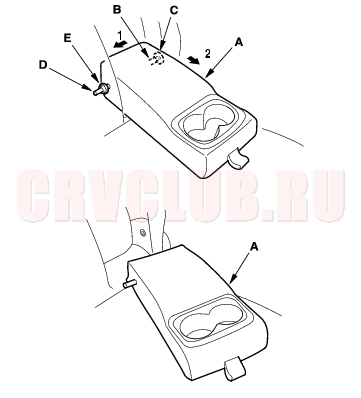
- Release the clips (A) from the beverage holder opening, release the rear hook (B), then pull back the edge of the armrest cover (C) all the way around and remove it.
- Install the cover in the reverse order of removal, and note these items:
- To prevent wrinkles when installing a seat cushion cover, make sure the material is stretched evenly over the pad before securing the clips and hooks.
- Replace any clips you removed with new ones (A). Install them with commercially available upholstery ring pliers (B).
Right Rear Seat Cover Replacement20-117
Take care not to tear the seams or damage the seat covers. Put on gloves to protect your hands. Seat-back Cover
- Remove the right rear seat (see page 20-114) .
- Remove the armrest (see page 20-115) .
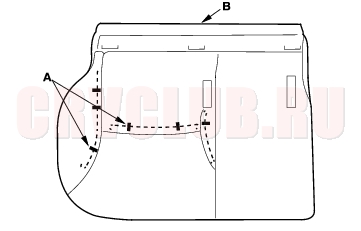
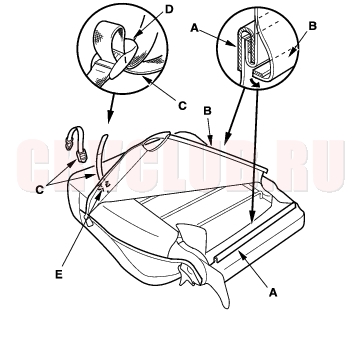
- Release the bottom hook (A), unzip the seat-back cover (B), then fold back the cover. From between the left recline adjuster and the pad, remove a piece of cloth (C).
- Loosen the seat-back strap (D) with the adjuster (E), and separate it into two pieces. Pull the strap secured on the seat-back frame inside the seat-back cover through the slot (F).
- Release the hook strips (A) from the edge of the armrest back cover (B).
- From the front of the seat-back, remove the armrest collars (A) and armrest back cover (B).
Right Rear Seat Cover Replacement (cont'd)20-118
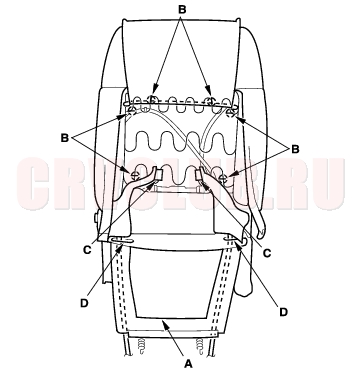
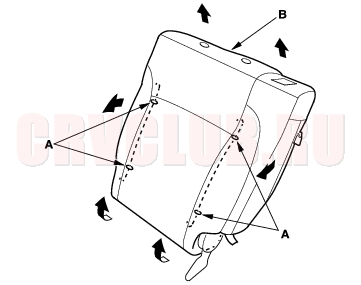
- Release the clips (A) and hook strips (B) from the back of the seat-back.
- Pull out the headrest guides (A), and if equipped, center headrest guides (B) while pinching the end of the guides, and remove them.
- Pull back the edge of the seat-back cover all the way around, and release the clips (A), then remove the seat-back cover (B).
- Install the seat-back cover in the reverse order of removal, and note these items:
- To prevent wrinkles when installing a seat-back cover, make sure the material is stretched evenly over the pad before securing the hook and clips.
- Replace the any clips (A) you removed with new ones using commercially available upholstery ring pliers (B).
20-119
Seat Cushion Cover
- Remove the right rear seat (see page 20-114) .
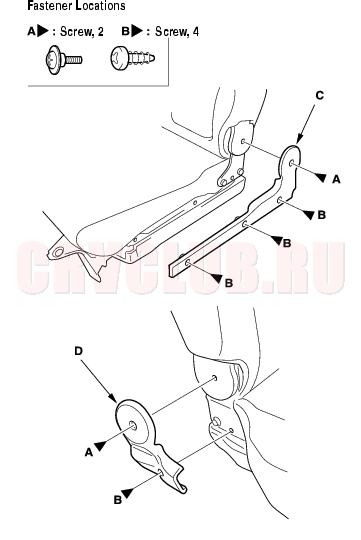
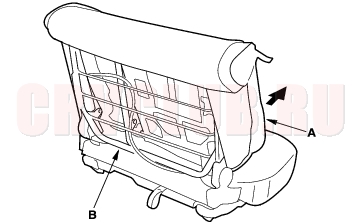
- Remove the screws (A, B), then remove the recline cover (C) and the center cover (D).
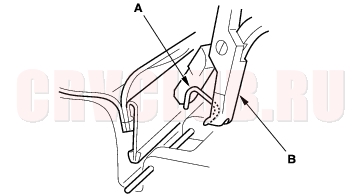
- Remove the bolts searing the seat-back (A) and seat cushion (B), then separate them.
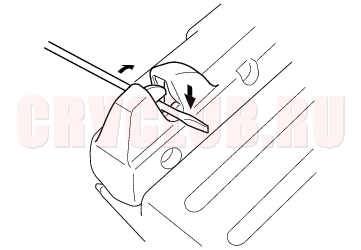
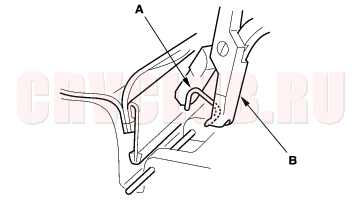
- To allow the seat cushion to slide, use a screwdriver to move the latch.
Right Rear Seat Cover Replacement (cont'd)20-120
- Slide both seat tracks (A) backward fully.
- Raise both foot brackets (B), and hold them.
- Push the slide lever (C) down.
- While holding both foot brackets, slide both seat tracks backward fully.
- Place a shop towel (D) between the brackets and the under cover (E).
- NOTE: While sliding both seat tracks, keep both foot brackets raised securely so as not to make them return with their spring tensions.
- Remove the screws, then remove the latch cover (A), outer seat track cover B (B), and outer seat track cover A (C), the left seat track is shown, the right seat track is similar.
20-121
- Remove the screws (A, B), then remove both dampers (C) and both damper covers (D).
- Slide both seat tracks (A) forward fully.
- Raise both foot brackets (B), and hold them.
- Push the slide lever (C) down.
- While holding both foot brackets, slide both seat tracks forward fully.
- NOTE: While sliding both seat tracks, keep both foot brackets raised securely so as not to make them return with their spring tensions.
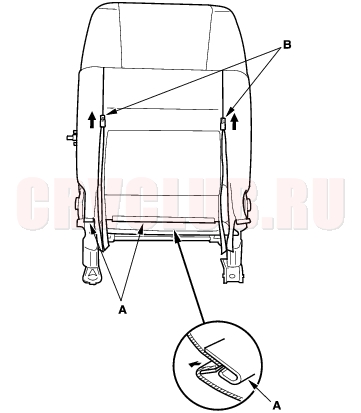
- Pull back the rear edge of the seat cushion cover (A) to release it from the hooks (B), and remove the screws.
- While pushing the slide lever (A) down, remove the under cover (B) by pulling it to release the hooks (C). Pass the strap (D) through a slot, and both side cables (E) through each side slit in the cover. Take care not to band any cable.
Right Rear Seat Cover Replacement (cont'd)20-122
- Release all of the hook strips (A).
- Remove the rear seat belt buckle and center seat belt/detachable anchor (see step 3 on page 23-10 .
- Remove the seat cushion cover (A) with the seat cushion pad from the seat cushion frame (B). Pass the center seat belt buckle (C) through a hole in the seat cushion cover.
- Pull back the edge of the seat cushion cover all the way around, and release the clips (A), then remove the seat cushion cover (B).
- Install the cover in the reverse order of removal, and note these items:
- To prevent wrinkles when installing a seat cushion cover, make sure the material is stretched evenly over the pad before securing the hook and clips.
- Replace any clips (A) you removed with new ones using commercially available upholstery ring pliers (B).
Left Rear Seat Cover Replacement20-123
Take care not to tear the seams or damage the seat covers. Put on gloves to protect your hands. Seat-back Cover
- Remove the left rear seat (see page 20-114) .
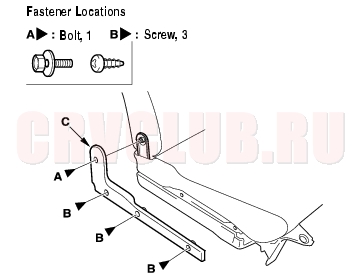
- Remove the screws holder (A, B), then remove the recline cover (C).
- Remove the bolt (A) and screw (B), then remove the center cover (C).
- Remove the bolts securing the seat-back (A) and seat cushion (B), pull the center pivot (C) out from the pivot bracket then separate them. If necessary, remove the bushing (D).
- Release the bottom hook (A), unzip the seat-back cover (B), then fold back the cover. Loosen the seat-back strap (C) with the adjuster (D), and separate it into two pieces. Pull the strap secured on the seat-back frame in inside of the seat-back cover through the slot (E).
Left Rear Seat Cover Replacement (cont'd)20-124
- Pull out the headrest guides (A, B) while pinching the end of the guides, and remove them.
- Remove the latch cover (see page 20-128) .
- Pull back the edge of the seat-back cover all the way around, and release the clips (A), then remove the seat-back cover (B).
- Install the seat-back cover in the reverse order of removal, and note these items:
- To prevent wrinkles when installing a seat-back cover, make sure the material is stretched evenly over the pad before securing the hook and clips.
- Replace any clips (A) you removed with new ones using commercially available upholstery ring pliers (B).
20-125
Seat Cushion Cover
- Remove the left rear seat (see page 20-114) .
- Remove the seat-back.
- To allow the seat cushion to slide, use a screwdriver to move the latch (see step 4 on page 20-119 ).
- Slide both seat tracks backward fully (see step 5 on page 20-120 ).
- NOTE: While sliding the outer seat track, keep the outer foot bracket raised securely so as not to make it return with its spring tension.
- Remove the outer seat track cover (see step 6 on page 20-120 ).
- Remove the screws (A) and release the clips (B), then remove the inner seat track end cover B (C) and inner seat track end cover A (D).
- Remove both dampers and both damper covers (see step 7 on page 20-121 ).
- Slide both seat tracks forward fully (see step 8 on page 20-121 ).
- NOTE: While sliding the outer seat track, keep the outer foot bracket raised securely so as not to make it return with its spring tension.
- Pull back the rear edge of the seat cushion cover (A) to release it from the hooks (B), and remove the screws.
Left Rear Seat Cover Replacement (cont'd)20-126
- While pushing the slide lever (A) down, remove the under cover (B) by pulling it to release the hooks (C). Pass the strap (D) through a slot, and both side cables (E) through each side slit in the cover. Take care not to bend any cable.
- Release all of the hook strips (A).
- Remove the seat cushion cover (A) with the seat cushion pad from the seat cushion frame (B). Pass the seat belt buckle (C) through a hole in the seat cushion cover.
- Pull back the edge of the seat-back cover all the way around, and release the clips (A), then remove the seat cushion.
20-127
- Install the cover in the reverse order of removal, and note these items:
- To prevent wrinkles when installing a seat-back cover, make sure the material is stretched evenly over the pad before securing the hook and clips.
- Replace any clips (A) you removed with new ones using commercially available upholstery ring pliers (B).
Right Rear Seat-back Lock Control Cable Replacement20-127
Take care not to tear the seams or damage the seat covers. Put on gloves to protect your hands.
- Remove the armrest (see page 20-115) .
- Release the bottom hook, unzip the seat-back cover, then fold back the cover (see step 3 on page 20-117 ).
- Release the hook strips from the edge of the armrest back cover (see step 5 on page 20-117 ).
- Remove the armrest back cover (see step 6 on page 20-117 ).
- Release the hook strips at the armrest portions from the back of the seat-back (see step 7 on page 20-118 ).
- Pull up the bottom of the seat-back pad (A) half-way apart from the seat-back frame (B).
Right Rear Seat-back Lock Control Cable Replacement (cont'd)20-128
- Disconnect the seat-back lock control cable (A) from the inner recline adjuster (B) and the outer recline adjuster (C). Release the clamps (D), then remove the cable.
- Install the cable in the reverse order of removal, and note these items:
- After reconnecting the cable, adjust its tension with its adjusting nuts (D).
- Replace anu clamps you removed with new ones.
- To prevent wrinkles when installing a seat-back cover, make sure the material is stretched evenly over the pad before securing the hooks.
Rear Seat-back Latch Lever Replacement20-128
Take care not to teat the seams or damage the seat covers. Put on gloves to protect your hands. The right rear seat is shown, and the left rear seat is symmetrical.
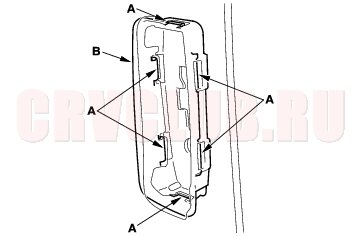
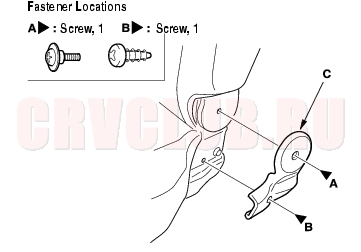
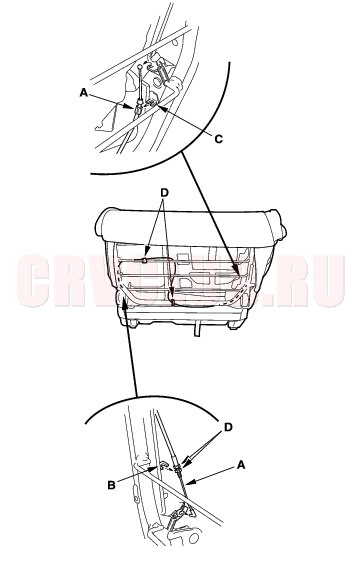
- Remove the latch cover (A).
- Pull up the rear edge of the latch lever cover to release the clips.
- Release the cover from the pivot pins (B) of the latch lever (C) while pulling the latch lever.
- Release the bottom hook, unzip the seat-back cover, then fold back the cover, right rear seat (see step 3 on page 20-117 ), left rear seat (see step 5 on page 20-123 ).
20-129
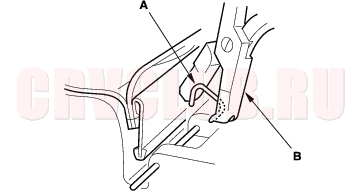
- Disconnect the lock knob rod (A) from the outer recline adjuster (B).
- Release the pivot pin (A) of the latch lever (B) from the seat-back frame (C), then remove the latch lever by pulling it up.
- Install the lever in the reverse order of removal, and note these items:
- Make sure the lock knob rod (A) is passed through the holes (B) in the seat-back frame (C) correctly when reinstalling the latch lever.
- To prevent wrinkles, make sure the material is stretched evenly over the pad before securing the clips.
- Replace any damaged clips with new ones.
|
Body20-1
Seats20-102 |