Dashboard20-87
|
Body20-1
Dashboard20-87 |
Dashboard20-87
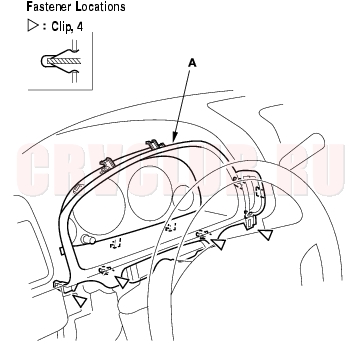
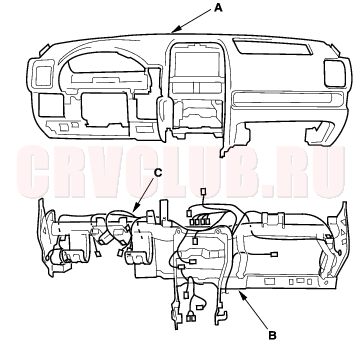
Instrument Panel Removal/Installation
When prying with a flat-tip screwdriver, wrap it with protective tape, and apply protective tape around the related parts to prevent damage. Take care not to scratch the dashboard and related parts. LHD is shown, RHD is symmetrical.
- Remove the driver's dashboard lower cover (see page 20-88) .
- Remove the steering column upper cover (see page 17-24) .
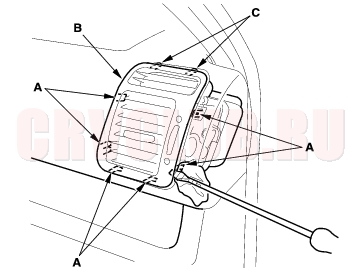
- Gently pull out the instrument panel (A) along the bottom to release the clips.
- Remove the instrument panel (A).
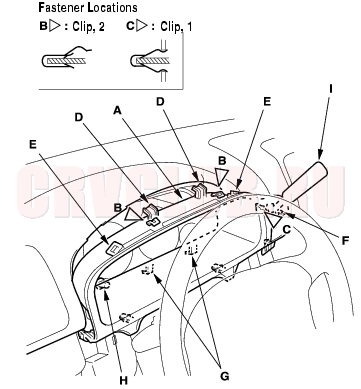
- Gently pull out the upper portion of the instrument panel to release the clips (B, C) and hooks (D, E, F, G).
- Gently pull out on the panel being careful not bend the trip/reset (H) and dash lights brightness controller (for some models).
- On A/T model, slip the shift knob (I) through the hole in the instrument panel.
- Install the panel in the reverse order of removal.
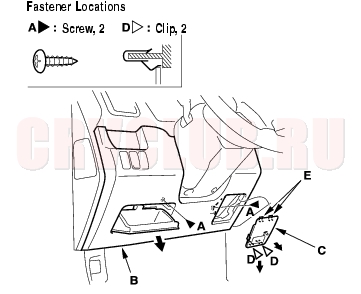
Driver's Dashboard Lower Cover Removal/Installation20-88
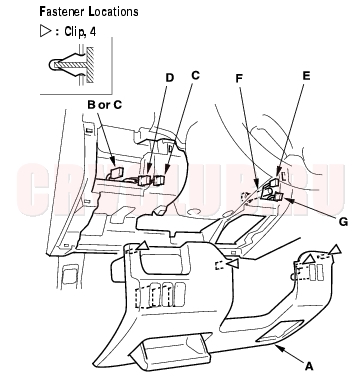
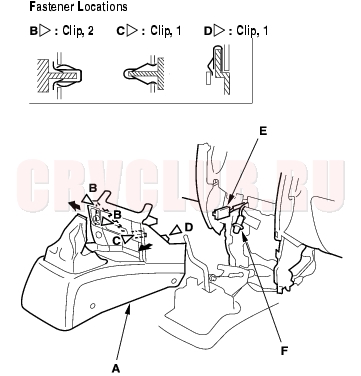
Take care not to scratch the dashboard and related parts. LHD is shown, RHD is symmetrical.
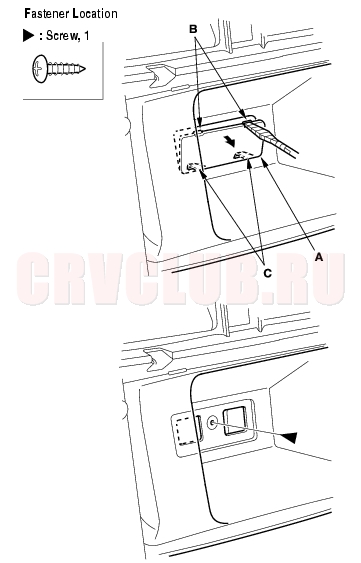
- Remove the screws (A) from the driver's dashboard lower cover (B).
- Pull out the bottom of the fuse lid (C) to release the clips (D), and pull it down to release the hooks (E).
- Remove the screw from the fuse lid opening.
- Open the pocket, then remove the screw.
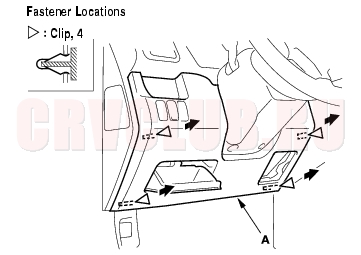
- Pull out the bottom of the driver's dashboard lower cover (A) to release the clips.
- Remove the driver's dashboard lower cover (A).
- Pull out the upper portions of the cover to release the clips.
- If equipped, disconnect the headlight adjuster switch connector (B), cruise control main switch connector (C), sunroof switch connector (D), in-car temperature sensor connector (E), air hose (F), and seat heater switch connector (G).
- Install the cover in the reverse order of removal, and make sure that each connector is plugged in properly, and the air hose is connected properly.
Driver's Dashboard Under Cover Removal/Installation20-89
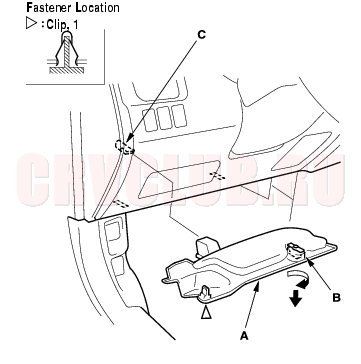
Take care not to scratch the dashboard and related parts. LHD is shown, RHD is symmetrical.
- Remove the driver's dashboard under cover (A).
- Turn the lock knob (B) 90°.
- Gently pull down the rear edge to release the clip.
- Pull the cover away to release it from the clip (C).
- Install the cover in the reverse order of removal.
Dashboard Center Panel Removal/Installation20-89
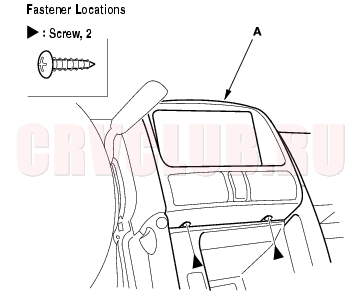
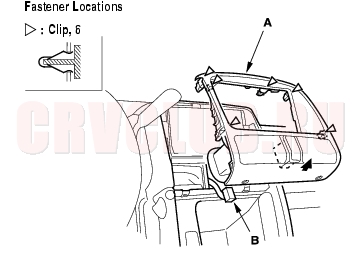
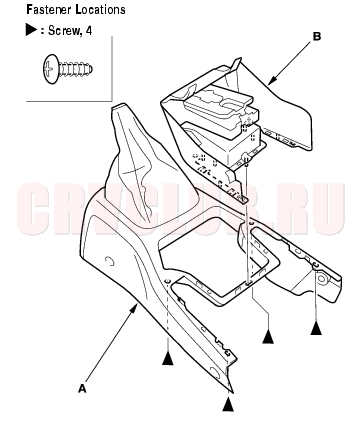
Take care not to scratch the dashboard and related parts. LHD is shown, RHD is symmetrical.
- Remove the screws from the bottom of the dashboard center panel (A).
- Pull out on the bottom of the dashboard center panel (A) to make creat a gap between the dashboard and panel. Gently pull out along the panel to release the clips, then remove the panel. Disconnect the hazard warning switch connector (B).
- Install the panel in the reverse order of removal, and make sure the hazard warning switch connector is plugged in properly.
Dashboard Center Tray Removal/Installation20-90
Put on gloves to protect your hands. When prying with a flat-tip screwdriver, wrap it with protective tape, and apply protective tape around the related parts to prevent damage. Take care not to scratch the dashboard and related parts. LHD is shown, RHD is symmetrical.
- Remove the dashboard center panel (see page 20-89) .
- Using a flat-tip screwdriver, pry out the upper portion of the lid (A) to release the hooks (B), and release the bottom hooks (C), then remove the lid. Remove the screw.
- Hold the screw mounting portion of the dashboard center tray (A) by hand, and pull out the tray to release the clips (B, C) and hooks (D), then remove it.
- Install the tray in the reverse order of removal.
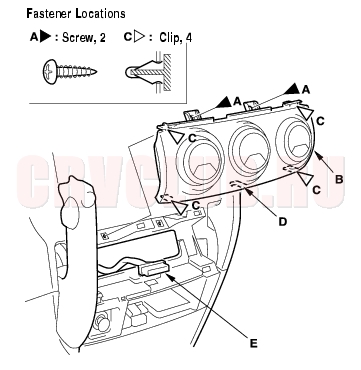
Heater Control Panel Removal/Installation20-91
Take care not to scratch the dashboard and related parts. LHD is shown, RHD is symmetrical.
- Remove the dashboard center tray (see page 20-90) .
- Pull the parking brake lever.
- Remove the screws (A), and pull out the heater control panel (B) to release the clips (C) and hook (D). Disconnect the heater control unit connector (E), then remove the heater control panel.
- Install the panel in the reverse order of removal, and make sure the heater control unit connector is plugged in properly.
Dashboard Center Lower Cover Removal/Installation - A/T20-91
SRS components are located in this area. Review the SRS component locations (see page 23-14) and precautions and procedures (see page 23-16) in the SRS section before performing repairs or service.
Take care not to scratch the dashboard and related parts. LHD is shown, RHD is symmetrical.
- Remove these items:
- Passenger's dashboard under cover (see page 20-95)
- Heater control panel
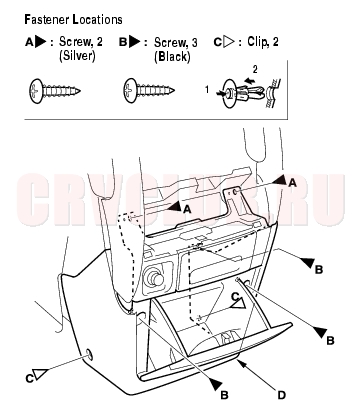
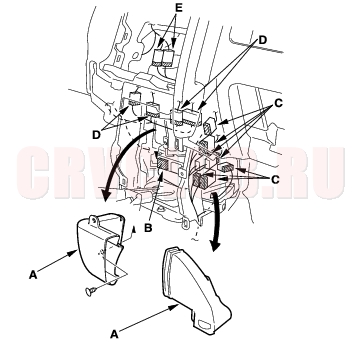
- Open the pocket. Remove the screws (A, B) and clips (C) from the dashboard center lower cover (D).
Dashboard Center Lower Cover Removal/Installation - A/T (cont'd)20-92
- Remove the dashboard center lower cover (A).
- Pull out the parking brake lever portion of the cover to release the clips (B).
- Pull out the cover to release the clips (C, D).
- Disconnect the cigaret lighter connector (E) and ashtray light bulb socket (F) (for some models).
- If necessary, remove the pocket (A) from the dashboard center lower cover (B).
- Remove the bolts.
- Release the stops (C) from the cover.
- Pull out the hinges (D) from the cover.
- Install the cover in the reverse order of removal, and note these items:
- Replace any damaged clips.
- Make sure the cigaret lighter connector is plugged in properly and the ashtray light bulb socket is connected properly.
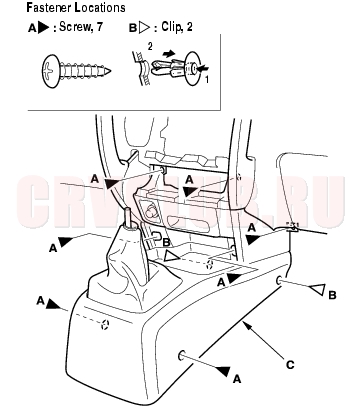
Dashboard Center Lower Cover Removal/Installation - M/T20-93
SRS components are located in this area. Review the SRS component locations (see page 23-14) , and precautions and procedures (see page 23-16) in the SRS section before performing repairs or service.
When prying with a flat-tip screwdriver, wrap it with protective tape, and apply protective tape around the related parts to prevent damage. Take care not to scratch the dashboard and related parts. LHD is shown, RHD is symmetrical.
- Remove these items:
- Front seat center table (see page 20-106)
- Passenger's dashboard under cover (see page 20-95)
- Heater control panel (see page 20-91)
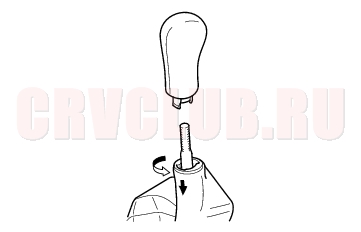
- Remove the shift knob.
- Using a flat-tip screwdriver, pry out the inside edge of the caps (A) to release the hooks (B), and pull out the caps to release the hooks (C), then remove the caps from both sides.
- Remove the screws (A) and clips (B) from the dashboard center lower cover (C).
Dashboard Center Lower Cover Removal/Installation - M/T (cont'd)20-94
- Remove the dashboard center lower cover (A).
- Pull out the parking brake lever portion of the cover to release the clips (B).
- Pull out the cover to release the clips (C, D).
- Disconnect the cigaret lighter connector (E) and ashtray light bulb socket (F) (for some models).
- If necessary, remove the screws, then separate the center console (A) and center lower cover (B).
- Install the cover in the reverse order of removal, and note these items:
- Replace any damaged clips.
- Make sure the cigaret lighter connector is plugged in properly and the ashtray light bulb socket is connected properly.
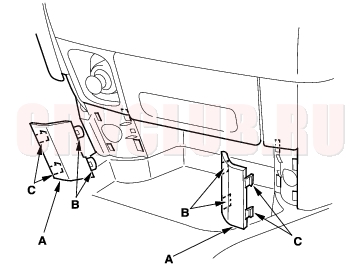
Passenger's Dashboard Under Cover Removal/Installation20-95
Take care not to scratch the dashboard and related parts. LHD is shown, RHD is symmetrical.
- Remove the passenger's dashboard under cover (A).
- Gently pull down the rear edge to release the clips.
- Pull the cover away to release the pins (B) from the holders (C).
- Install the cover in the reverse order of removal.
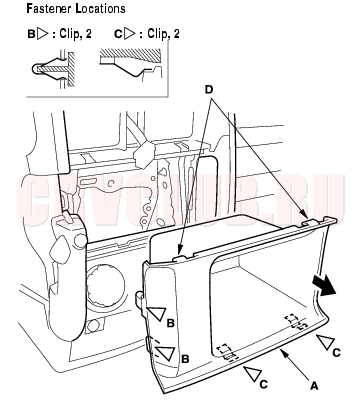
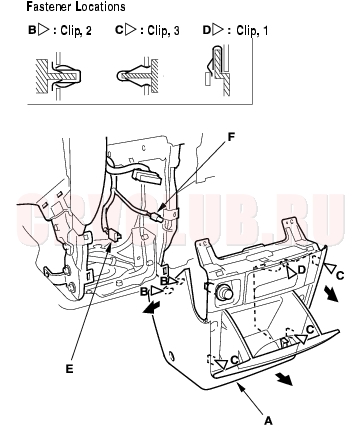
Glove Box Removal/Installation20-95
SRS components are located in this area. Review the SRS component locations (see page 23-14) , and the precautions and procedures (see page 23-16) in the SRS section before performing repairs or service.
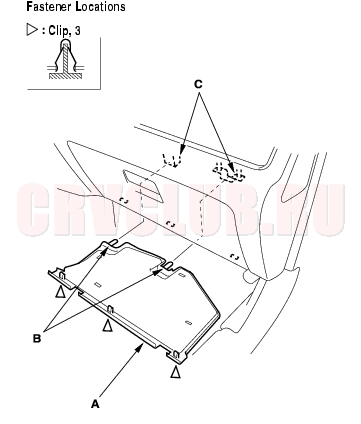
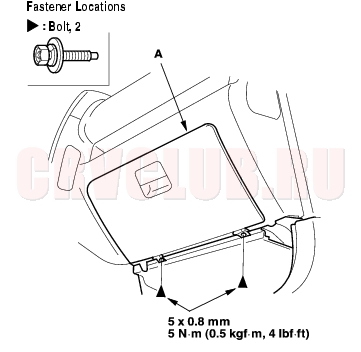
Take care not to scratch the dashboard and related parts. LHD is shown, RHD is symmetrical.
- While holding the glove box (A), remove the glove box stop (B) on each side.
- Remove the bolts, then remove the glove box (A).
- Install the glove box in the reverse order of removal.
Dashboard Side Vent Removal/Installation20-96
- Wrap a flat-tip screwdriver with protective tape, and apply protective tape around the related parts to prevent damage. Carefully insert a flat-tip screwdriver next to the clip (A), and detach the clips by prying on the side vent (B). Take care not to scratch the dashboard and related parts.
- Remove the vent by releasing the hooks (C).
- Reinstall the hook portions of the vent first, then push the clip portions into place securely.
Dashboard Removal/Installation20-96
SRS components are located in this area. Review the SRS component locations (see page 23-14) , and the precautions and procedures (see page 23-16) in the SRS section before performing repairs or service.
When prying with a flat-tip screwdriver, wrap it with protective tape, and apply protective tape around the related parts to prevent damage. Have an assistant help you when removing and installing the dashboard. Take care not to scratch the dashboard, body and other related parts. Put on gloves to protect your hands.
- If equipped, make sure you have the anti-theft code for the radio, then write down the frequencies for the preset buttons.
- Disconnect the negative battery cable, and wait at least three minutes before beginning work.
- Remove these items:
- Driver's dashboard lower cover (see page 20-88)
- Driver's dashboard under cover (see page 20-89)
- Glove box (see page 20-95)
- Passenger's dashboard under cover (see page 20-95)
- Dashboard center lower cover, A/T (see page 20-91) , M/T (see page 20-93)
- Passenger's side vent (see page 20-96)
- Front pillar trim, both sides (see page 20-76)
- Kick panels, both sides (see page 20-76)
- Steering column (see page 17-24)
- Parking brake lever (see page 19A-42)
- A/T model only: Disconnect the A/T control cable (see page 14-157)
20-97
Driver's side:
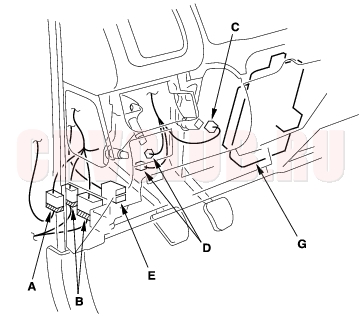
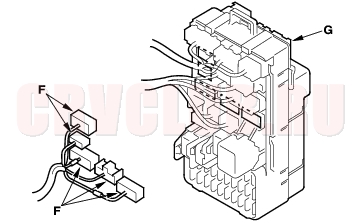
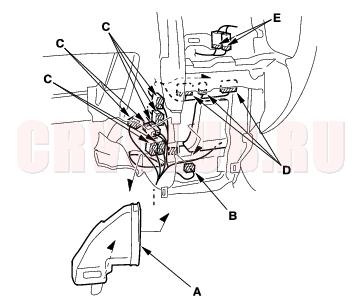
- Front under the dash, disconnect the interior wire harness connector (A), driver's door wire harness connectors (B), brake switch connector (C) and clutch switch connector (D) (on MT model). Remove the relay (E) from the bracket, and disconnect the engine compartment wire harness connectors (F) from the under-dash fuse/relay box (G). LHD is shown, RHD is similar.
Middle portion:
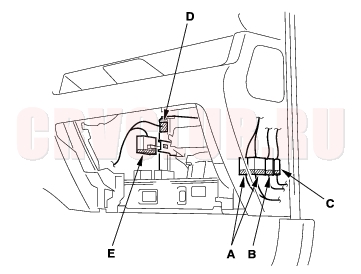
- Remove the rear heater joint ducts (A). Disconnect the SRS control unit connector (B), floor wire harness connectors (C), engine compartment wire harness connectors (D), and heater sub harness connectors (E).
Dashboard Removal/Installation (cont'd)20-98
Passenger's side:
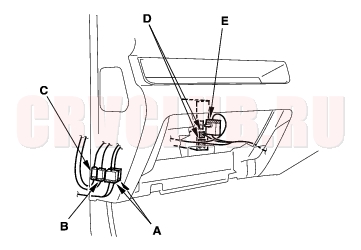
- From under the dash, disconnect the passenger's door wire harness connectors (A), roof antenna connector (B), antenna lead (C), ECM/PCM connector (D), and engine wire harness connector (E).
- Detach all of the harness and connector clips.
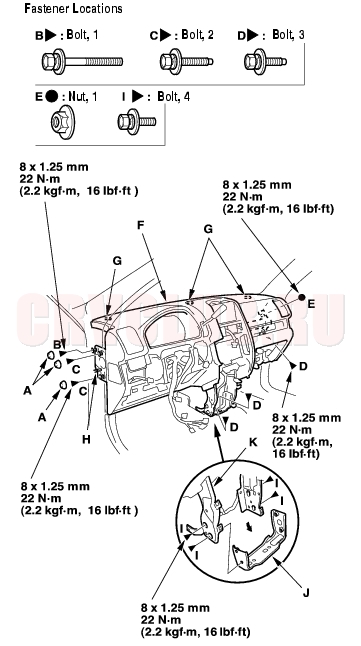
- From outside the driver's door, remove the caps (A), then remove the bolts (B, C, D) and nut (E), and lift up on the dashboard (F) to release it from the guide pins (G, H) on the body. When pulling the dashboard out, remove the canter frame mounting bolts (I), then remove the center bracket (J) from the center frame (K). LHD is shown, RHD is symmetrical.
- Carefully remove the dashboard through the front door opening.
- A/T model only: Remove the center bracket from the center frame.
20-99
- Install the dashboard in the reverse order of removal, and note these items:
- Make sure the dashboard fits onto the guide pins correctly.
- Apply liquid thread lock to the center frame mounting bolts before reinstallation.
- Reinstall the center bracket on the center frame, and slightly tighten the mounting bolts. Reinstall the dashboard on the body. After tightening both dashboard mounting bolts and nut, tighten the center bracket mounting bolts and center frame mounting bolts.
- Before tightening the bolts, make sure each wire harness is not pinched.
- Make sure the connectors are plugged in properly, and the antenna lead is connected properly.
- Reconnect the negative cable to battery.
- If equipped, enter the anti-theft code for the radio, then enter the customer's radio station presets.
Steering Hanger Beam Replacement20-99
Have an assistant help you when removing and installing the steering hanger beam. Take care not to scratch the dashboard. Put on gloves to protect your hands. LHD is shown, RHD is symmetrical.
- Remove the dashboard (see page 20-96)
- Remove these items from the dashboard:
- Instrument panel (see page 20-87)
- Gauge assembly (see page 22A-74)
- Shift lever, A/T (see page 14-152)
- AVN unit, for some models (see page 22B-26)
- Audio unit (see page 22A-118)
- Passenger's airbag (see page 23-136)
- Sunlight sensor, auto A/C (see page 21-91)
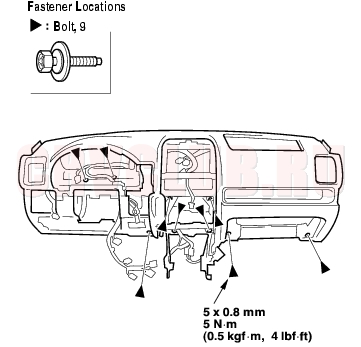
- Remove the bolts from the dashboard.
Steering Hanger Beam Replacement (cont'd)20-100
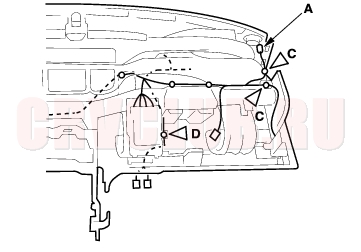
- Detach the harness clips.
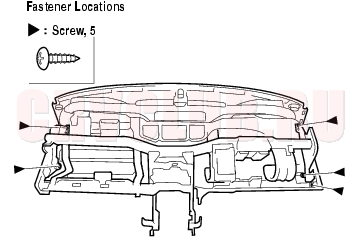
- From the back of the dashboard, remove the screws.
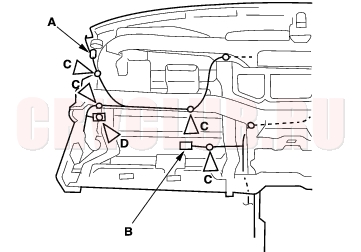
- From the back of the dashboard, disconnect the tweeter connectors (A) (for some models) from both sides and the glove box light connector (B) (for some models), and detach the harness clips (C) and harness holders (D).
20-101
|
Body20-1
Dashboard20-87 |