Seat Belts23-3
|
Restraints23-1
Seat Belts23-3 |
Seat Belts23-3
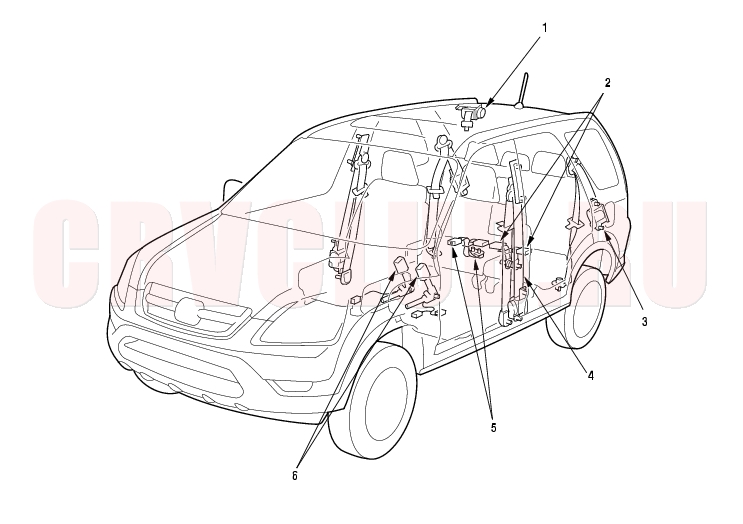
Component Location Index
Replacement, step 1 on page 23-9 ; Inspection, page 23-12 Replacement, step 1 on page 23-11 Replacement, page 23-8 ; Inspection, page 23-12 Replacement, page 23-4 ; Inspection, page 23-12 REAR CENTER SEAT BELT/DETACHABLE ANCHOR and RIGHT REAR SEAT BELT BUCKLE
Replacement, step 1 on page 23-10 Replacement, step 1 on page 23-6
Front Seat Belt Replacement23-4
For some models: SRS components are located in this area. Review the SRS component locations (see page 23-14) and the precautions and procedures (see page 23-16) in the SRS section before performing repairs or service.
NOTE: Check the front seat belts for damage, and replace them if necessary. Be careful not to damage them during removal and installation.
Front Seat Belt
- Make sure you have the anti-theft code for the radio, then write down the frequencies for the preset buttons (for some models).
- Disconnect the negative battery cable, and wait at least 3 minutes before beginning work.
- Slide the front seat forward fully.
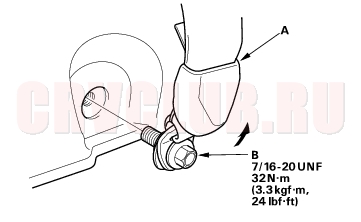
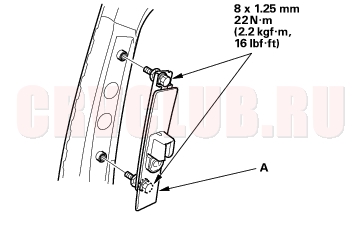
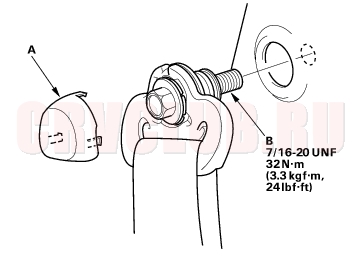
- Pull the lower anchor cover (A) back, and remove the lower anchor bolt (B).
- Remove the center pillar lower trim panel (see page 20-76) .
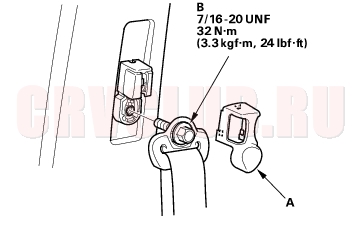
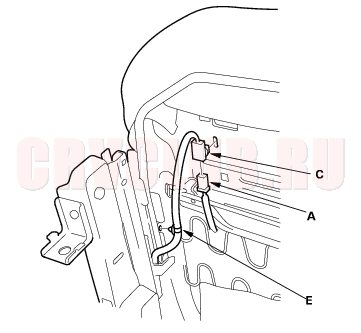
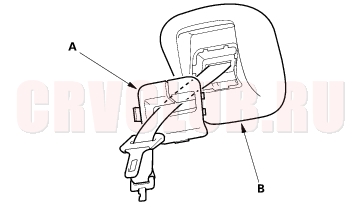
- Remove the upper anchor cover (A), and remove the upper anchor bolt (B).
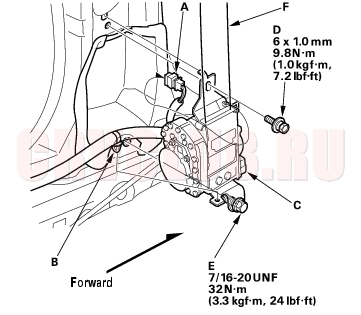
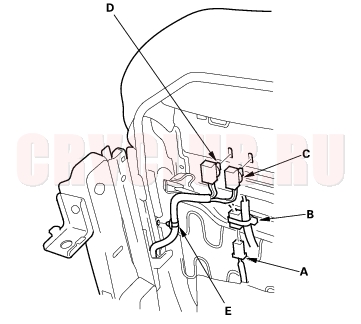
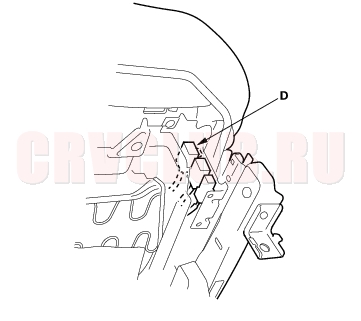
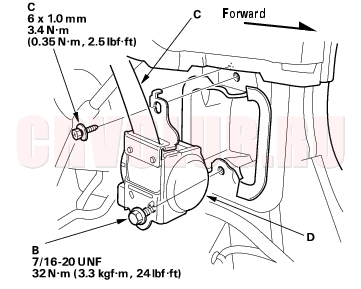
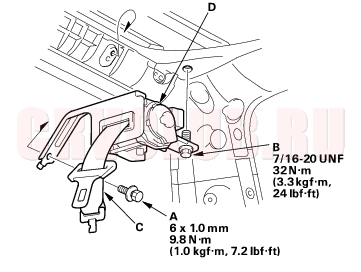
- Disconnect the seat belt tensioner connector (A), and detach the harness clip (B) from the retractor (C). Remove the upper retractor mounting bolt (D), and the lower retractor bolt (E), then remove the front seat belt (F) and retractor.
23-5
- Remove the center pillar upper trim (see page 20-76) .
- Remove the shoulder anchor adjuster (A).
- Install the seat belt in the reverse order of removal, and note these items:
- Apply liquid thread lock to the upper anchor bolt before reinstallation.
- Check that the retractor locking mechanism functions (see page 23-12) .
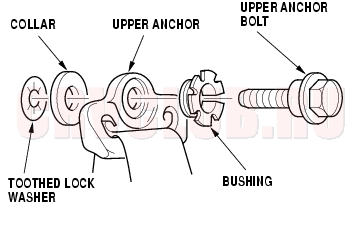
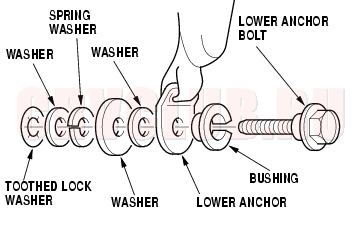
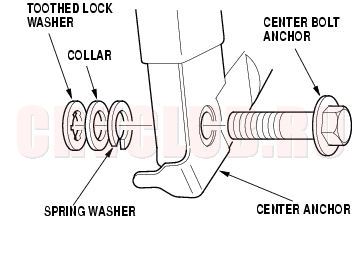
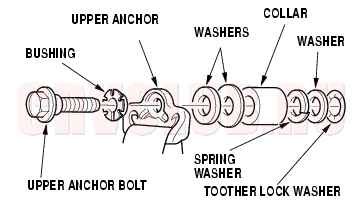
- Assemble the washers, collar, and bushing on the upper and lower anchor bolts as shown.
- Before installing the anchor bolts, make sure there are no twists or kinks in the seat belt.
- Make sure the seat belt tensioner connector is plugged in properly.
- Reconnect the negative cable to the battery.
- Enter the anti-theft code for the radio, then enter the customer's radio station presets (for some models).
- Upper anchor bolt construction:
- Lower anchor bolt construction:
Front Seat Belt Replacement (cont'd)23-6
Seat Belt Buckle
- If equipped with a seat belt buckle tensioner or front seat side airbag, make sure you have the anti-theft code for the radio, then write down the frequencies for the preset buttons.
- If equipped with a seat belt buckle tensioner or front seat side airbag, disconnect the negative battery cable, and wait at least 3 minutes before beginning work.
- Remove the front seat (see page 20-103) .
- If equipped, remove the center table (see page 20-106) .
- If equipped, remove the seat under box (see page 20-109) .
- Remove the center cover, with manual height adjustable (see page 20-108) , without manual height adjustable (see page 20-109) .
- If equipped with a seat-belt switch and/or seat belt buckle tensioner, disconnect the seat subharness connector (A) (driver's with seat heater), and remove the harness band (B) (driver's with seat heater and seat belt buckle tensioner), and detach the seat belt switch connector clip (C), seat belt buckle tensioner connector clip (D), and harness clip (E). LHD is shown, RHD is symmetrical.
- With seat belt buckle tensioner (driver's):
- With seat belt buckle tensioner (passenger's):
- Without seat belt buckle tensioner (driver's):
23-7
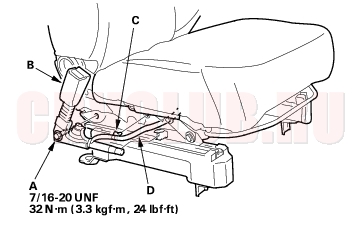
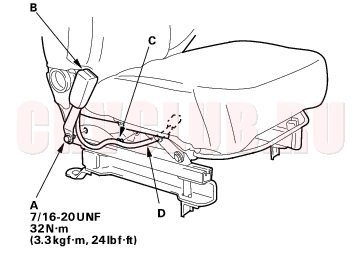
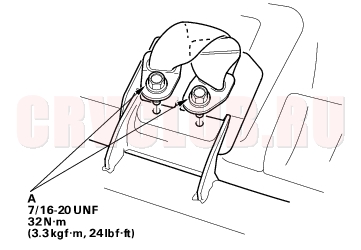
- Remove the center anchor bolt (A), and remove the seat belt buckle (B).
- With seat belt buckle tensioner:
- Without seat belt buckle tensioner:
- Detach the harness clip (C), and pull the seat belt switch/tensioner harness (D) out through the hole on the seat track.
- Install the buckle in the reverse order of removal, and note these items:
- If equipped with a seat belt buckle tensioner, apply liquid thread lock to the center anchor bolt before reinstallation.
- Assemble the washers on the center anchor bolt as shown.
- If equipped with a seat belt buckle tensioner or front seat side airbag, reconnect the negative cable to the battery.
- If equipped with a seat belt buckle tensioner or front seat side airbag, enter the anti-theft code for the radio, then enter the customer's radio stations presets.
- With seat belt buckle tensioner:
- Without seat belt buckle tensioner:
Rear Seat Belt Replacement23-8
NOTE: Check the rear seat belts for damage, and replace them if necessary. Be careful not to damage them during removal and installation.
Rear Seat Belt
- Fold the rear seat up.
- Pull the carpet (A) back as necessary, and remove the lower anchor bolt (B).
- Remove the rear side trim panel (see page 20-77) .
- Remove the upper anchor cap (A), and remove the upper anchor bolt (B).
- Remove the retractor mounting self-tapping ET screw (A), and the retractor bolt (B), then remove the rear seat belt (C) and retractor (D).
23-9
- Install the seat belt in the reverse order of removal, and note these items:
- If the threads on the retractor mounting self-tapping ET screw are worn out, use an oversized self-tapping ET screw made specifically for this application.
- Check that the retractor locking mechanism functions as described (see page 23-12) .
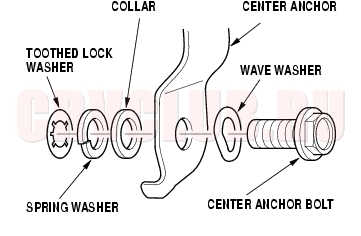
- Assemble the washers, collar, and bushing on the upper anchor bolt as shown.
- Before installing the anchor bolt, make sure there are no twists or kinks in the seat belt.
- Upper anchor bolt construction:
Center Rear Seat Belt (Detachable Anchor)
- Remove the cap (A) from the retractor cover (B).
- Remove the headliner (see page 20-77) .
- Remove the retractor mounting bolt (A) and retractor bolt (B), then remove the center seat belt (C) and retractor (D).
- Install the center seat belt and retractor in the reverse order of removal, and check that the retractor locking mechanism functions (see page 23-12) .
Rear Seat Belt Replacement (cont'd)23-10
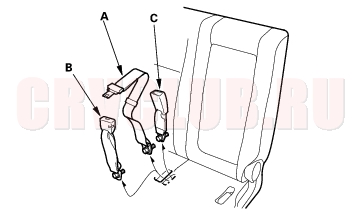
Rear Center Seat Belt/Detachable Anchor
and Right Rear Seat Belt Buckle
- Remove the rear seat (see page 20-114) .
- Remove the under cover from the rear seat (see page 20-119) .
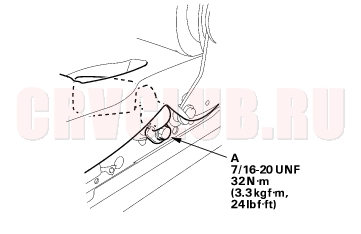
- Remove the center anchor bolts (A) from under the seat cushion.
- Pull the rear center seat belt (A) or rear center seat belt detachable anchor (B) and right rear seat belt buckle (C) out.
- Install the center belt and buckle in the reverse order of removal, and note these items:
- Assemble the washers on the center anchor bolt as shown.
- Make sure there are no twists or kinks in the center belt and seat belt buckle.
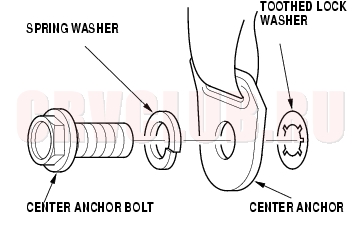
- Center anchor bolt construction:
23-11
Rear Center Seat Belt Buckle and Left Rear Seat Belt Buckle
- Fold the rear seat up (one side).
- Remove the center cover, right rear seat (see page 20-119) , left rear seat (see page 20-123) .
- Remove the center anchor bolt (A).
- Pull the rear center seat belt buckle (A) (right rear seat) or left rear seat belt buckle (left rear seat) out.
- Install the buckle in the reverse order of removal, and note these items:
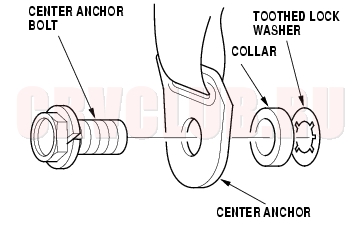
- Assemble the collar and washer on the center anchor bolt as shown.
- Make sure there are no twists or kinks in the seat belt buckle.
- Center anchor bolt construction:
Inspection23-12
For front seat belt retractor with seat belt tensioner, review the SRS component locations (see page 23-14) and the precautions and procedures (see page 23-16) in the SRS section before performing repairs or service.
Retractor
- Before installing the retractor, check that the seat belt can be pulled out freely.
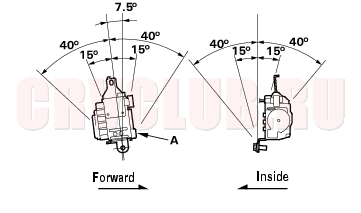
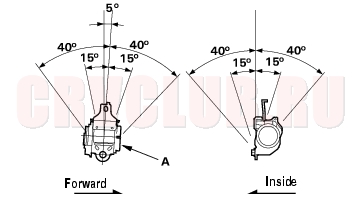
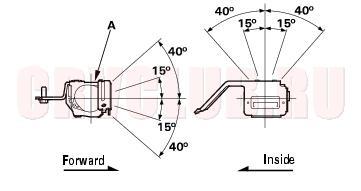
- Make sure that the seat belt does not lock when the retractor (A) is leaned slowly up to 15° from the mounted position. The seat belt should lock when the retractor is leaned over 40°. Do not attempt to disassemble the retractor.
- Front:
- Rear:
- Rear center:
- Replace the seat belt with a new assembly if there is any abnormality. Do not disassemble any part of the seat belt for any reason.
23-13
In-vehicle
- Check that the seat belt is not twisted or caught on anything.
- After installing the anchors, check for free movement on the anchor bolts. If necessary, remove the anchor bolts and check that the washers and other parts are not damaged or improperly installed.
- Check the seat belts for damage or discoloration.
Clean with a shop towel if necessary. Use only soap and water to clean.
- NOTE: Dirt build-up in the metal loops of the upper anchors can cause the seat belts to retract slowly.
Wipe the inside of the loops with a clean cloth dampened in isopropyl alcohol.- Check that the seat belt does not lock when pulled out slowly. The seat belt is designed to lock only during a sudden stop or impact.
- Make sure that the seat belt will retract automatically when released.
- For rear passenger's seat belt, check the seat belt retractor locking mechanism ALR (automatic locking retractor). This function is for securing child seats:
- Pull the seat belt all the way out to engaga the ALR. The seat belt should retract with a ratcheting sound, but not extend. This is normal.
- To disengaga the ALR, release the seat belt and allow it to fully retract, then pull the seat belt out part-way. The seat belt should retract and extend normally.
- Replace the seat belt with a new assembly if there is any abnormality. Do not disassemble any part of the seat belt for any reason.
|
Restraints23-1
Seat Belts23-3 |