Tailgate20-135
|
Body20-1
Tailgate20-135 |
Tailgate20-135
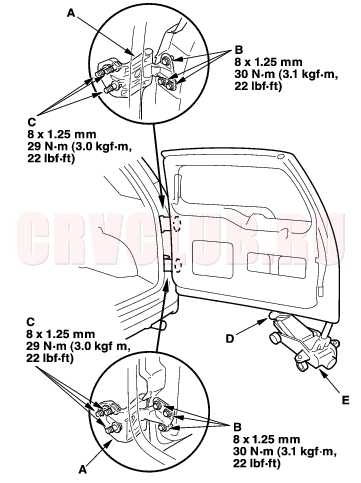
Tailgate Adjustment
NOTE: Check for a flush fit with the body, then check for equal gaps between the top, both sicles, and bottom tailgate edges and the body. Check that the tailgate and body edges are parallel. Before adjusting, replace the mounting bolts.
- Place the vehicle on a firm, level surface when adjusting the tailgate.
- Remove the tailgate support strut from each side (see page 20-137) .
- Adjust at the hinges (A):
- Loosen the tailgate mounting bolts (B) slightly, and move the tailgate in or out until it's flush with the body.
- Remove the right taillight (see page 22A-98) and rear bumper (see page 20-131) .
- Loosen the hinge mounting bolts (C) slightly, and move the tailgate left or right , up or down as necessary to equalize the gaps.
- Place a shop towel (D) on the jack (E) to prevent damage to the tailgate when adjusting the tailgate.
- Tighten each bolts securely.
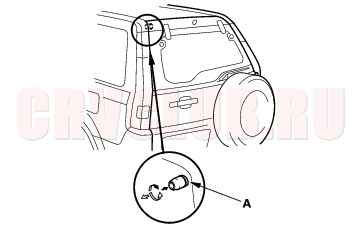
- Check that the tailgate and body edges are parallel. If necessary, adjust the tailgate cushions (A) to make the left of the tailgate flush with the body.
- Reinstall the support strut securely.
- Apply body paint to the hinge mounting bolts and around the hinges.
- Reinstall all removing removed parts.
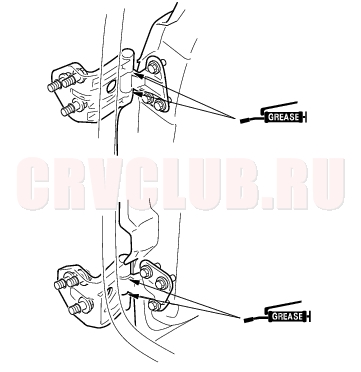
- Grease the location of the tailgate hinges is indicated by the arrows.
- Check for water leaks (see step 9 on page 20-59 ).
Tailgate Striker Adjustment20-136
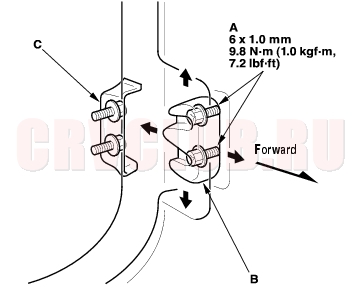
Make sure the tailgate latches securely without slamming it. If necessary, adjust the striker (A): The striker nuts are fixed, but the striker can be adjusted slightly up or down, and in or out.
- Remove the rear portion of the left rear side trim panel, as necessary (see page 20-77) .
- Loosen the screws (B), then insert a shop towel (C) between the body and striker.
- Lightly tighten the screws.
- Wrap the striker with a shop towel, then adjust the striker by tapping it with a plastic hammer (D). Do not tap the striker too hard.
- Loosen the screws, and remove the shop towel.
- Lightly tighten the screws.
- Hold the outer handle out, and push the tailgate against the body to be sure the striker allows a flush fit. If the tailgate latches properly, tighten the screws and recheck.
- Install the left rear side trim panel.
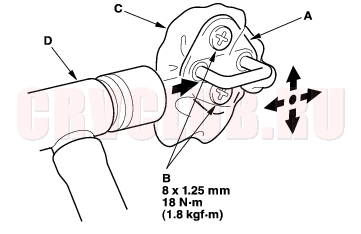
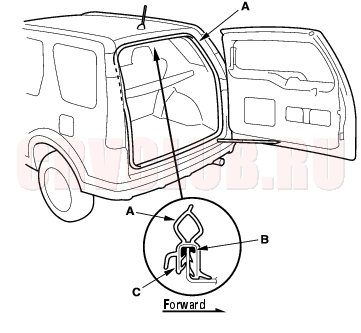
Tailgate Wedge Adjustment20-136
- Loosen the bolts (A) and move the tailgate wedge (B) up or down to align it with the tailgate wedge striker (C). Move the tailgate wedge in or out to center it. Then lightly tighten the bolts and recheck.
- Hold the tailgate door handle out and push the tailgate against the body to be sure the tailgate wedge allows a flush fit.
- If the tailgate latches properly, tighten the bolts and recheck.
Tailgate Support Strut Replacement20-137
Have an assistant help you when removing and installing the support strut. Take care not to scratch the body and tailgate.
- Remove the bolt securing the body side end of the tailgate support strut, then release it from the bracket (see page 20-131) .
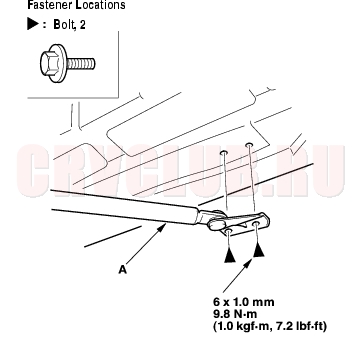
- Remove the bolts, then remove the support strut (A).
- Install the support strut in the reverse order of removal.
Tailgate Weatherstrip Replacement20-137
- Remove the tailgate weatherstrip (A) by pulling out on it.
- Clean the bonding surface around the tailgate flange with alcohol.
- Apply sealant (Cemedine P/N 08712-0004, or equivalent) (B) in the groove around all of the tailgate weatherstrip.
- Locate the painted alignment mark (C) on the tailgate weatherstrip. Align the painted mark with the alignment tab in the center of the tailgate opening, and install the weatherstrip. Make sure it's seated completely and facing in the direction shown. Make sure there are no wrinkles in the weatherstrip.
- Check for water leaks.
|
Body20-1
Tailgate20-135 |