Glass20-43
|
Body20-1
Glass20-43 |
Glass20-43
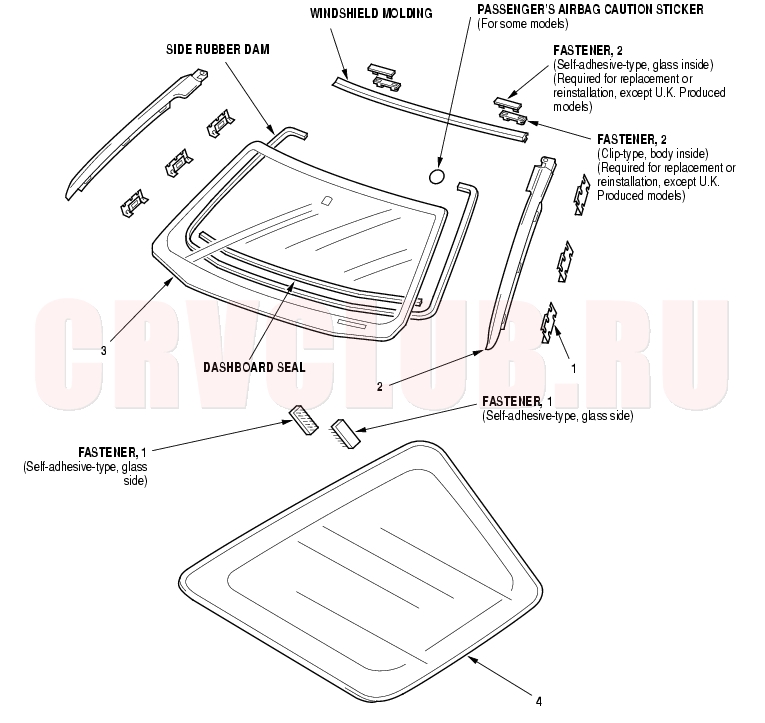
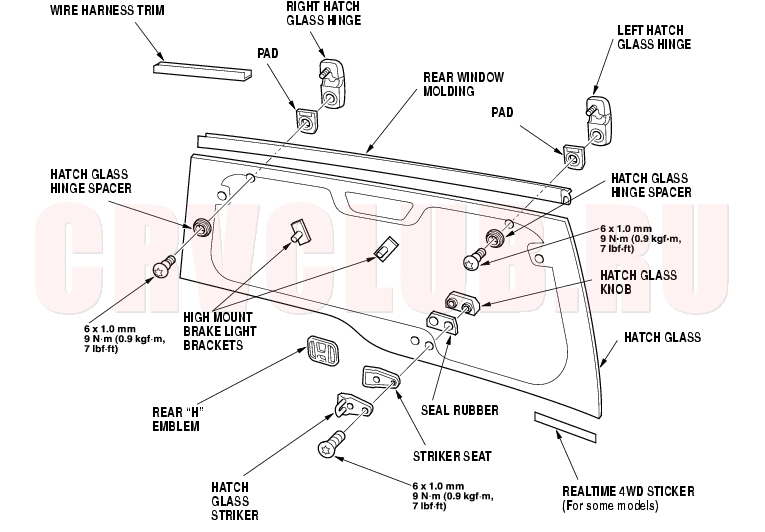
Component Location Index
Installation, page 20-50 Replacement, page 20-142 Replacement, page 20-45 Replacement, page 20-50
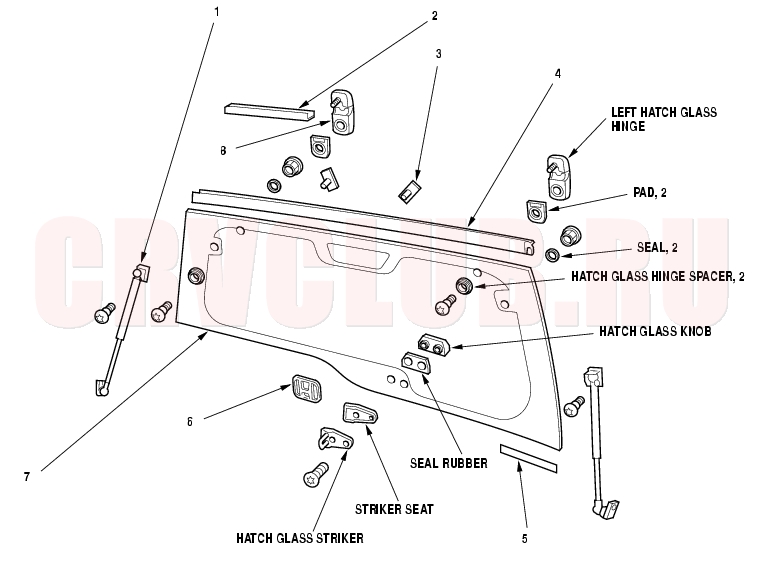
Component Location Index (cont'd)20-44
Replacement, page 20-55 Replacement, page 20-61 Replacement, page 20-61 Replacement, page 20-59 Replacement, page 20-153 Replacement, page 20-153 Replacement, page 20-55 ; Disassembly/Reassembly, page 20-57 ; Adjustment, page 20-58 ; Hatch Glass Weatherstrip Replacement, page 20-62
Windshield Replacement20-45
Put on gloves to protect your hands. Wear eye protection when removing the glass with piano wire. Use seat covers to avoid damaging the seat. Use glass adhesive set P/N 08C73-X0230N.
- Remove these items:
- Windshield side trim (see page 20-142)
- Windshield wiper arms (see page 22A-223)
- Cowl covers (see page 20-140)
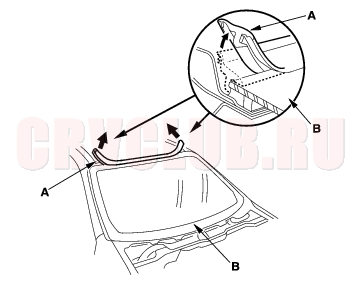
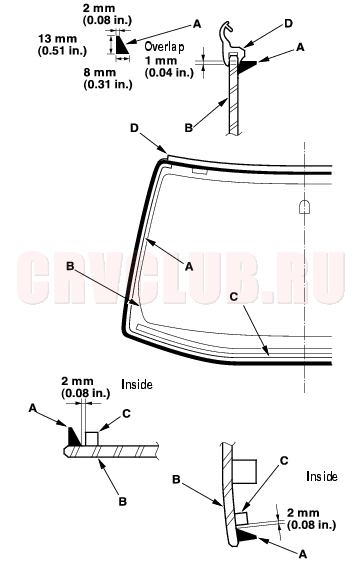
- Remove the molding (A) from the upper edge of the windshield (B). If necessary, cut the molding with a utility knife.
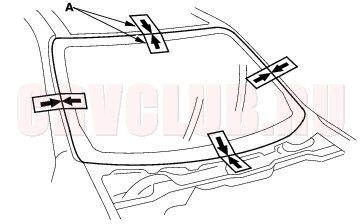
- If the old windshield is to be reinstalled, make alignment marks across the glass and body with a grease pencil.
- Pull down the front portion of the headliner (see page 20-81) . Take care not to bend the headliner excessively, or you may crease or break it.
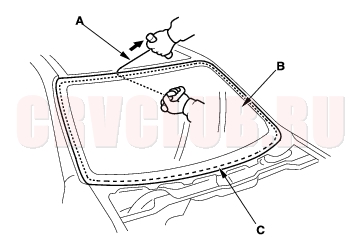
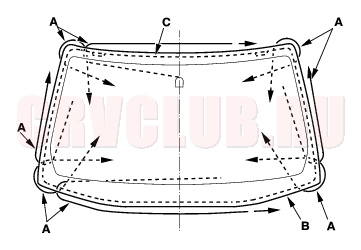
- Apply protective tape along the edge of the dashboard and body. Using an awl, make a hole through the rubber dam and adhesive from inside the vehicle at the corner portion of the windshield. Push a piece of piano wire through the hole, and wrap each end around a piece of wood.
- With a helper on the outside, pull the piano wire (A) back and forth in a sawing motion. Hold the piano wire as close to the windshield (B) as possible to prevent damage to the body and dashboard.
- Carefully cut through the rubber dam and adhesive (C) around the entire windshield.
Windshield Replacement (cont'd)20-46
- With a knife, scrape the old adhesive smooth to a thickness of about 2 mm (0.08 in.) on the bonding surface around the entire windshield opening flange:
- Do not scrape down to the painted surface of the body; damaged paint will interfere with proper bonding.
- Remove the rubber dam and fasteners from the body.
- Clean the body bonding surface with a sponge dampened in alcohol. After cleaning, keep oil, grease and water from getting on the clean surface.
- If the old windshield is to be reinstalled, use a putty knife to scrape off all of the old adhesive, the fasteners, and the rubber dam from the windshield. Clean the inside face and the edge of the windshield with alcohol where new adhesive is to be applied. Make sure the bonding surface is kept free of water, oil, and grease.
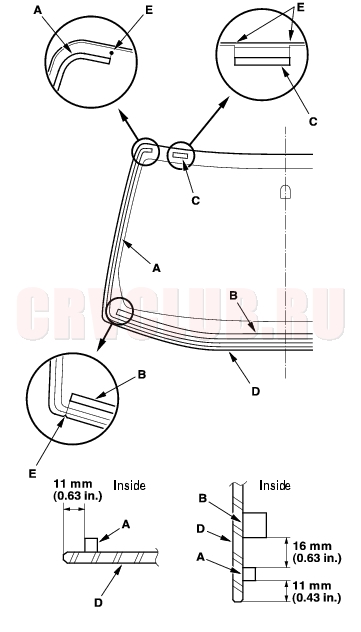
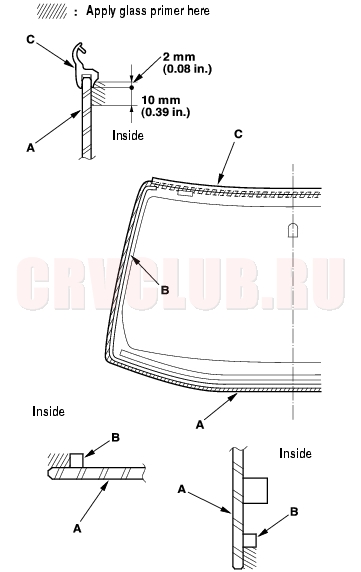
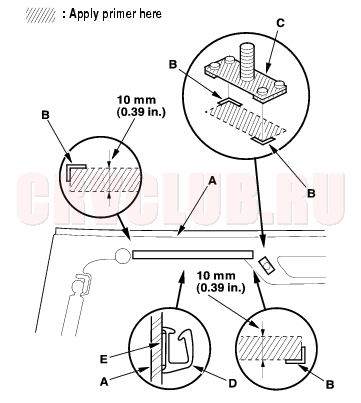
- Glue the rubber dam (A), dashboard seal (B), and fasteners (C) to the inside face of the windshield (D) as shown:
- Be sure the rubber dam, dashboard seal, and fasteners line up with the alignment marks (E).
- Be careful not to touch the windshield where adhesive will be applied.
20-47
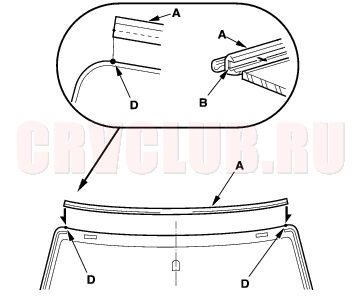
- Glue the molding (A) with adhesive tape (B) of the windshield (C):
- Be sure the molding lines up with the alignment marks (D).
- Be careful not to touch the windshield where adhesive will be applied.
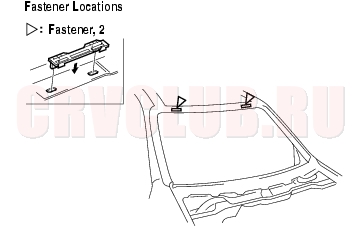
- Install the fasteners to the body.
- Set the windshield in the opening, and center it.
Make alignment marks (A) across the windshield and body with a grease pencil at the four points shown. Be careful not to touch the windshield where adhesive will be applied.
- Remove the windshield.
Windshield Replacement (cont'd)20-48
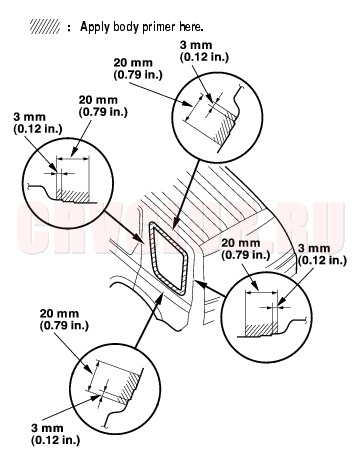
- With a sponge, apply a light coat of glass primer around the edge of the windshield (A) between the rubber dam (B) and molding (C) as shown, then lightly wipe it off with gauze or cheesecloth:
- Apply glass primer to the molding.
- Do not apply body primer to the windshield, and do not get body and glass primer sponges mixed up.
- Never touch the primed surfaces with your hands. If you do, the adhesive may not bond to the windshield properly, causing a leak after the windshield is installed.
- Keep water, dust, and abrasive materials away from the primed surface.
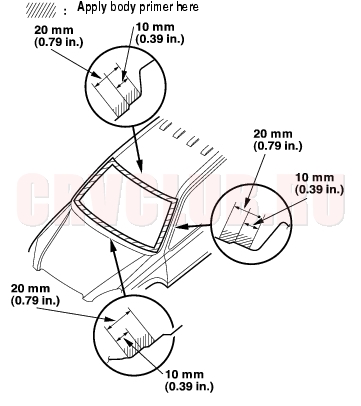
- With a sponge, apply a light coat of body primer to the original adhesive remaining around the windshield opening flange. Let the body primer dry for at least 10 minutes:
- Do not apply glass primer to the body, and be careful not to mix up glass and body primer sponges.
- Never touch the primed surfaces with your hands.
- Mask off the dashboard before painting the flange.
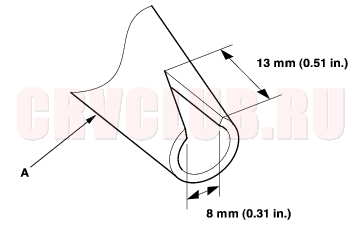
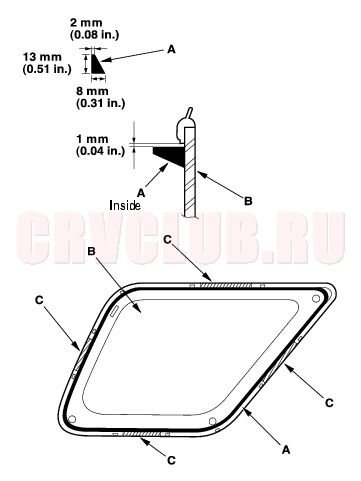
- Before filling a cartridge, cut a ''V'' in the end of the nozzle (A) as shown.
20-49
- Pack adhesive into the cartridge without air pockets to ensure continuous delivery. Put the cartridge in a caulking gun, and run a bead of adhesive (A) around the edge of the windshield (B) between the rubber dam (C) and molding (D) as shown. Apply the adhesive within 30 minutes after applying the glass primer. Make a slightly thicker bead at each corner.
- Use suction cups to hold the windshield over the opening, align it with the alignment marks made in step 14, and set it down on the adhesive. Lightly push on the windshield until its edges are fully seated on the adhesive all the way around. Do not open or close the doors until the adhesive is dry.
- Scrape or wipe the excess adhesive off with a putty knife or towel. To remove adhesive from a painted surface or the windshield, wipe with a soft shop towel dampened with alcohol.
- Let the adhesive dry for at least 1 hour, then spray water over the windshield and check for leaks. Mark leaking areas, and let the windshield dry, then seal with sealant:
- Let the vehicle stand for at least 4 hours after windshield installation. If the vehicle has to be used within the first 4 hours, it must be driven slowly.
- Keep the windshield dry for the first hour after installation.
- Reinstall all remaining removed parts. Advise the customer not to do the following things for 2 to 3 days:
- Slam the doors with all the windows rolled up.
- Twist the body excessively (such as when going in and out of driveways at an angle or driving over rough, uneven roads).
Windshield Side Trim Retainer Installation 20-50
NOTE: Take care not to scratch the body.
- Clean the body surface with alcohol where new retainers are to be applied.
- Peel the adhesive backing away from the retainer.
- Line up the retainers (A) with the alignment marks (B) on the body, and glue the retainers with adhesive tape (C).
- Apply two-part epoxy adhesive (D) around the edge of the retainers as shown.
Quarter Glass Replacement20-50
Put on gloves to protect your hands. Use seat covers to avoid damaging any surface. Use glass adhesive set P/N 08C73-X0230N.
- Remove these items (see page 20-78) :
- Quarter pillar trim
- Rear pillar trim
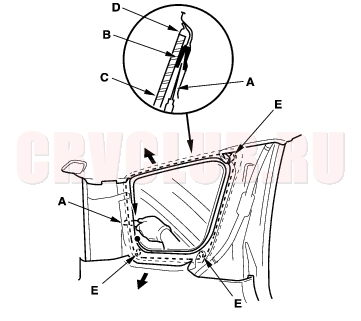
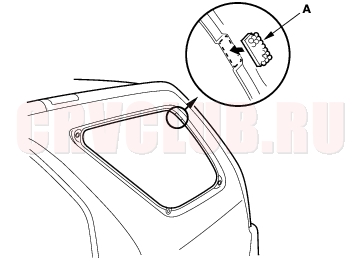
- From inside the vehicle, use a utility knife (A) to cut through the adhesive (B) all the way around:
- If the quarter glass (C) is to be reinstalled, take care not to damage the molding (D).
- If the molding is damaged, replace the quarter glass, molding and clips (E) as an assembly.
- If any of the clips are broken, the quarter glass can be reinstalled using butyl tape (refer to step 7).
- Apply protective tape along the edge of the entire quarter glass opening flange.
- Carefully remove the quarter glass, and check the molding for damage, and replace the quarter glass if necessary.
20-51
- With a putty knife, scrape the old adhesive smooth to a thickness of about 2 mm (0.08 in.) on the bonding surface around the entire quarter glass opening flange:
- Do not scrape down to the painted surface of the body; damaged paint will interfere with proper bonding.
- Remove the clips and fastener from the body.
- Clean the body bonding surface with a sponge damaged in alcohol. After cleaning, keep oil, grease, and water from getting on the surface.
- If the old quarter glass is to be reinstalled, use a putty knife to scrape off all of the old adhesive, any broken clips, and the fastener from the glass. Clean the inside face and the edge of the glass with alcohol where new adhesive is to be applied. Make sure the bonding surface is kept free of water, oil, and grease.
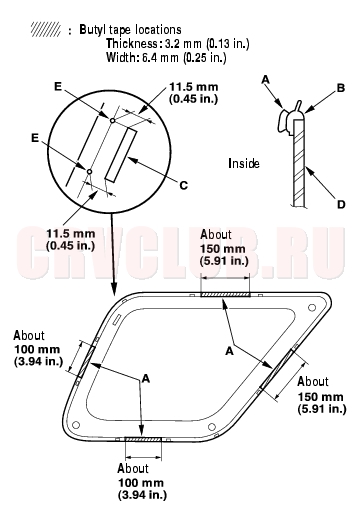
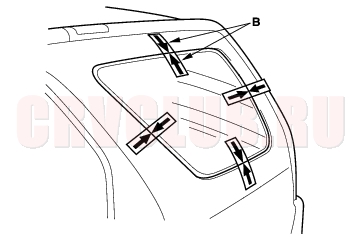
- If the old quarter glass is to be reinstalled (and either clip is broken off the molding), apply a light coat of primer (C-100, or equivalent), then apply butyl tape (A) to the molding (B) as shown. Glue the fastener (C) to the inside face of the quarter glass (D):
- Be sure the fastener lines up with the alignment marks (E).
- Be careful not to touch the quarter glass where adhesive will be applied.
- Do not peel the separator off the butyl tape.
Quarter Glass Replacement (cont'd)20-52
- If the new quarter glass is to be installed, glue the fastener (A) to the body. Be sure the fastener lines up with the body contour.
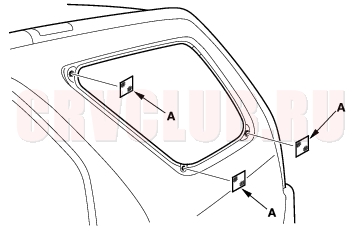
- If the old quarter glass is to be reinstalled (and either clip is broken off the molding), seal the body holes with pieces of urethane tape (A). Then set the quarter glass upright in the opening, and make alignment marks (B) across the quarter glass and body with a grease pencil at the three points shown. Be careful not to touch the quarter glass where adhesive will be applied.
- Remove the quarter glass.
20-53
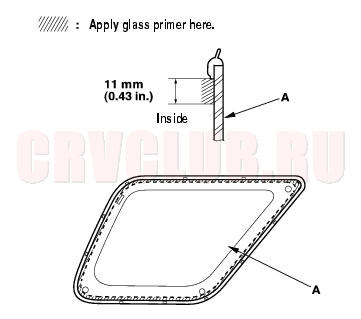
- With a sponge, apply a light coat of glass primer to the inside face of the quarter glass (A) as shown, then lightly wipe it off with gauze or cheesecloth:
- Do not apply body primer to the quarter glass, and do not get the body and glass primer sponges mixed up.
- Never touch the primed surfaces with your hands. If you do the adhesive may not bond to the quarter glass properly, causing a leak after the quarter glass is installed.
- Keep water, dust, and abrasive materials away from the primed surface.
- With a sponge, apply a light coat of body primer to the original adhesive remaining around the quarter glass opening flange. Let the body primer dry for at least 10 minutes:
- Do not apply glass primer to the body, and be careful not to mix up the glass and body primer sponges.
- Never touch the primed surfaces with your hands.
- Mask off the interior trim before painting the flange.
- Before filling a cartridge, cut a ''V'' in the end of the nozzle (A) as shown.
Quarter Glass Replacement (cont'd)20-54
- Park adhesive into the cartridge without air pockets to ensure continuous delivery. Put the cartridge in a caulking gun, and run a bead of adhesive (A) around the edge of the quarter glass (B) as shown:
- After applying the adhesive, peel the separator off the butyl tape (C).
- Apply the adhesive within 30 minutes after applying the glass primer. Make a slightly thicker bead at each corner.
- Use suction cups (A) to hold the quarter glass (B) over the opening, align the clips or the alignment marks (C) made in step 9, and set it down on the adhesive. Lightly push on the quarter glass until its edges are fully seated on the adhesive all the way around. Do not open or close the doors until the adhesive is dry.
- Scrape or wipe the excess adhesive off with a putty knife or towel. To remove adhesive from a painted surface or the quarter glass, wipe with a soft shop towel dampened with alcohol.
- Let the adhesive dry for at least 1 hour, then spray water over the quarter glass and check for leaks. Mark the leaking areas and let the quarter glass dry, then seal with sealant. Let the vehicle stand for at least 4 hours after quarter glass installation. If the vehicle has to be used within the first 4 hours, it must be driven slowly.
- Reinstall all remaining removed parts. Advise the customer not to do the following things for 2 to 3 days:
- Slam the doors with all the windows rolled up.
- Twist the body excessively (such as when going in and out of driveways at an angle or driving over rough, uneven roads).
Hatch Glass/Hatch Glass Support Strut Replacement20-55
Put on gloves to protect your hands. Take care not to scratch the tailgate. Do not damage the rear window defogger grid lines and terminals.
- Remove the tailgate side trim from both sides (see page 20-80) .
- Remove the high mount brake light (see page 22A-98) .
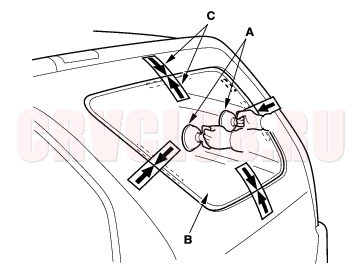
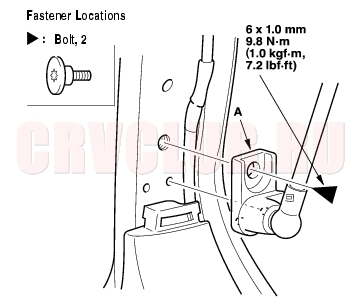
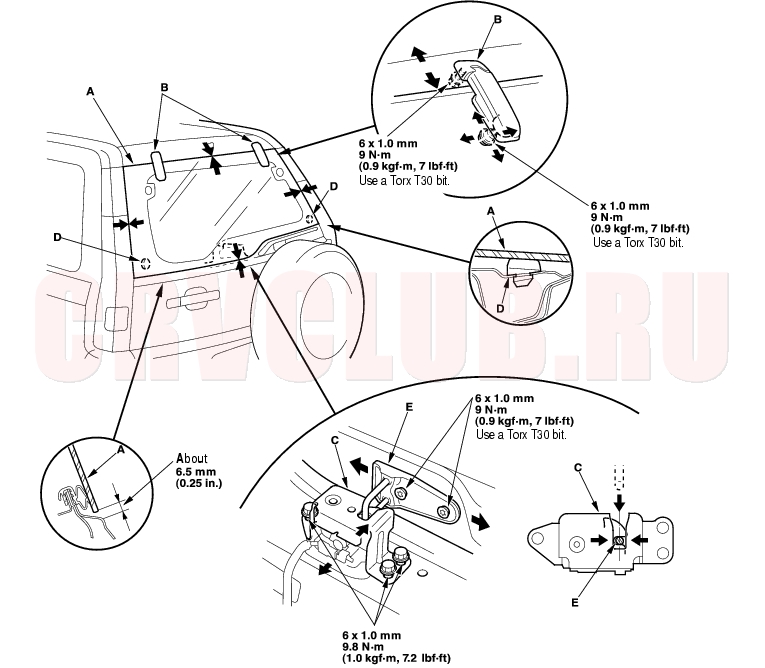
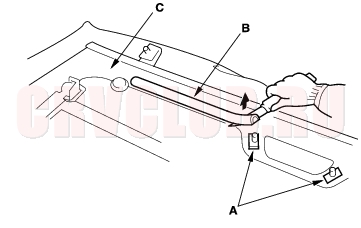
- Disconnect the rear window defogger connectors (A), and release the wire harnesses (B) and harness holders (C) from both hatch glass support strut brackets (D). On the right side, release the wire harness from the wire harness trim (E).
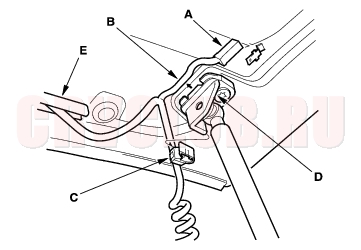
- While holding the hatch glass, using a Torx T30 bit, remove the bolts, then remove the hatch glass support strut brackets (A) from both sides.
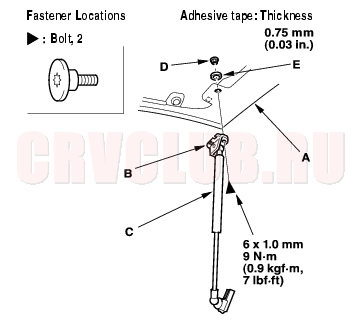
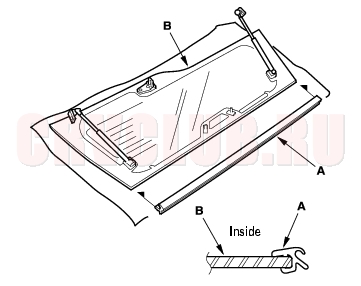
- While holding the hatch glass (A), use a Torx T30 bit to remove the bolt, then release the double-faced adhesive tape (B), remove the hatch glass support strut (C), support strut nut (D), and seal (E) from the hatch glass.
Hatch Glass/Hatch Glass Support Strut Replacement (cont'd)20-56
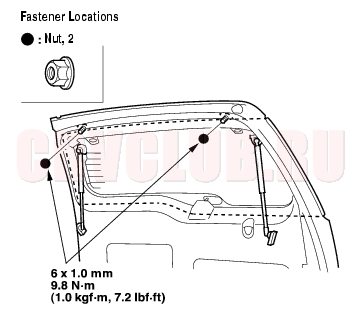
- With an assistant holding the hatch glass, remove the nuts from both sides. Unlock the hatch glass latch.
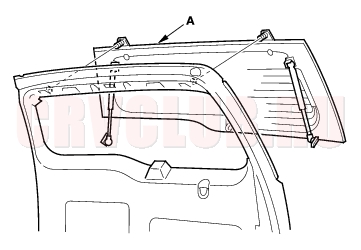
- Remove the hatch glass (A). Take care not to scratch the tailgate.
- Install the glass and support strut in the reverse order of removal, and note these items:
- Replace the removed support strut mounting bolt with a new one.
- Make sure the rear window defogger connectors are plugged in properly.
- Adjust the position of the glass (see page 20-58) .
- Check that the hatch glass opens properly and locks securely.
- Check for water leaks (see step 9 on page 20-59 ).
Hatch Glass Disassembly/Reassembly20-57
Put on gloves to protect your hands. Place the hatch glass on the protective seat to prevent damage. Do not damage the rear window defogger grid lines and terminals. Disassemble the hatch glass as shown, and note these items:
To remove the bolts, use a Torx T30 bit. To remove the rear window molding, refer to Rear Window Molding Replacement (see page 20-59) . To remove the high mount brake light bracket and wire harness trim, refer to High Mount Brake Light Bracket/Wire Harness Trim Replacement (see page 20-61) . Reassemble the hatch glass in the reverse order of removal. To install the rear ''H'' emblem and the REALTIME 4WD sticker, refer to Emblem/Sticker Replacement (see page 20-153) .
Hatch Glass Adjustment20-58
- Remove the tailgate lower trim panel (see page 20-80) .
- With the help of an assistant, remove the hatch glass support struts from both sides (see page 20-55) . Hold the hatch glass when opening and closing it.
- Slightly loosen each bolt, screw, and nut.
- Adjust the hatch glass (A) alignment in the following sequence.
- Adjust the hatch glass hinges (B) up and down, to obtain the proper gap between the hatch glass and tailgate.
- Adjust the hatch glass hinges right and left, as necessary to equalize the gap between the hatch glass and taillight on each side. Adjust the striker at the same time.
- Adjust the hatch glass latch (C) forward and rearward, to make the hatch glass fit flush with the tailgate at the bottom edge. There should be no gap between the hatch glass stops (D) and hatch glass on each side.
- Adjust the strikes (E) right and left until it's centered in the hatch glass latch.
20-59
- Tighten each bolt, screw, and nut securely.
- Check that the hatch glass opens properly and locks securely.
- Reinstall the support struts securely (see page 20-55) .
- Reinstall the tailgate lower trim panel (see page 20-80) .
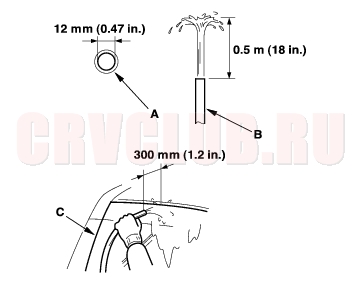
- Check for water leaks. Run water over the roof and on the sealing area as shown, and note these items:
- Use a 12 mm (0.47 in.) diameter hose (A).
- Adjust the rate of water flow as shown (B).
- Do not use a nozzle.
- Hold the hose about 300 mm (12 in.) away from the tailgate (C).
Rear Window Molding Replacement20-59
Put on gloves to protect your hands. Place the hatch glass on the protective seat to prevent damage. Do not damage the rear window defogger grid lines and terminals.
- Remove the hatch glass (see page 20-55) .
- Remove the hatch glass hinges from both sides of the hatch glass (see page 20-57) .
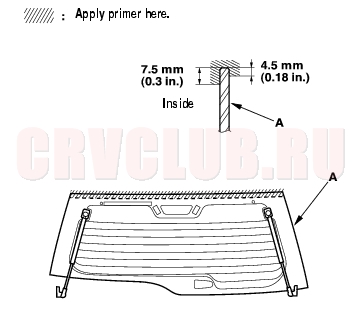
- Remove the molding (A) from the upper edge of the hatch glass (B). If necessary, cut the molding with a utility knife.
- Use a putty knife to scrape off all of the adhesive from the hatch glass. Clean the upper edge of the hatch glass with isopropyl alcohol where new molding will be installed. After cleaning, keep oil, grease, and water from getting on the surface.
Rear Window Molding Replacement (cont'd)20-60
- Apply primer (YOKOHAMA RUBBER MS-90, or equivalent) to the upper edge of the hatch glass (A). Be careful not to touch the hatch glass where primer will be applied.
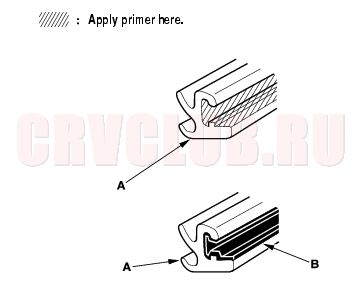
- Apply primer (SAKAI CHEMISTRY SL-8861, or equivalent) to the entire groove of the molding (A), and run a bead of urethane adhesive (B) in the groove of the molding.
- Align the edge of the molding (A) with the corner edge of the hatch glase (B), and glue the molding.
- Scrape or wipe the excess adhesive off with a putty knife or towel. To remove adhesive from the hatch glass, wipe with a soft shop towel dampened with alcohol.
- Let the adhesive dry for at least 1 hour.
- Reinstall the hatch glass hinges.
- Reinstall the hatch glass.
High Mount Brake Light Bracket/Wire Harness Trim Replacement20-61
Put on gloves to protect your hands. Place the hatch glass on the protective seat to prevent damage. Do not damage the rear window defogger grid lines and terminals.
- Remove the hatch glass (see page 20-55) .
- Cut the adhesive portions of the high-mount brake light brackets (A) and wire harness trim (B) with a utility knife, then remove them. Take care not to scratch the hatch glass (C).
- Use a putty knife to scrape off all of the old adhesive and adhesive tape from the hatch glass. Clean the inside face of the hatch glass with isopropyl alcohol where new bracket and trim are to be installed. Make sure the bonding surface is kept free of water, oil, and grease.
- Apply primer (YOKOHAMA RUBBER MS-90, or equivalent) to the inside face of the hatch glass (A):
- Be sure the primer lines up with the alignment marks (B).
- Be careful not to touch the hatch glass where primer will be applied.
- Apply primer (SAKAI CHEMISTRY SL-8861, or equivalent) to the back of the high-mount brake light brackets (C).
- Glue the brackets to the hatch glass with urethane adhesive, and glue the trim (D) to the hatch glass with the adhesive tape (E). Be sure the brackets and trim line up with the alignment marks.
- Scrape or wipe the excess adhesive off with a putty knife or towel. To remove adhesive from the hatch glass, use a soft shop towel dampened with alcohol.
- Let the adhesive dry for at least 1 hour.
- Reinstall the hatch glass.
Hatch Glass Weatherstrip Replacement20-62
Put on gloves to protect your hands. Take care not to scratch the tailgate.
- Remove the tailgate side trim from both sides (see page 20-80) .
- Remove the high mount broke light (see page 22A-98) .
- Disconnect the rear window defogger connectors, and release the wire harnesses from both sides (see step 3 on page 20-55 ).
- Remove the hatch glass support strut brackets from both sides of the tailgate (see step 4 on page 20-55 ).
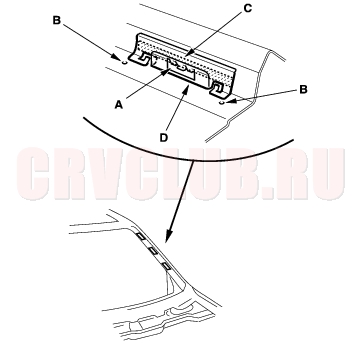
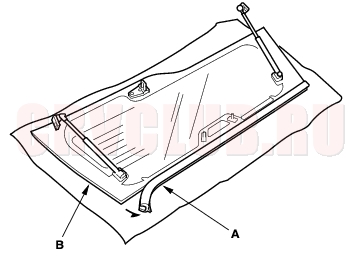
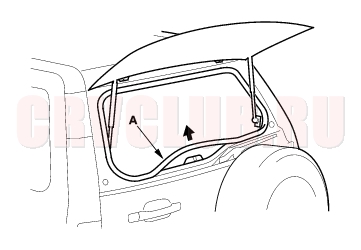
- With an assistant holding the hatch glass, remove the hatch glass weatherstrip (A) by pulling out on it.
- Clean the bonding surface around the hatch glass opening flange with alcohol.
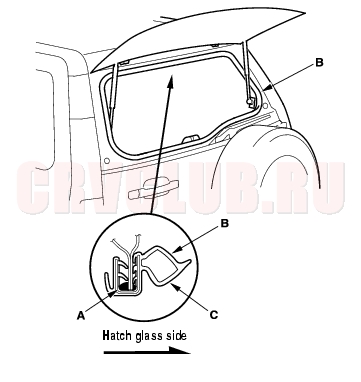
- Apply sealant (Cemedine P/N 08712-0004, or equivalent) (A) in the groove around the hatch glass weatherstrip (B).
- Locate the painted alignment mark (C) on the hatch glass weatherstrip. Align the painted mark with the alignment tab in the center of the hatch glass opening, and install the weatherstrip. Make sure it's seated completely and facing in the direction shown. Make sure there are no wrinkles in the weatherstrip.
- Check for water leaks (see step 9 on page 20-59 ).
|
Body20-1
Glass20-43 |