Immobilizer System 22A-186
|
Body Electrical22A-1
Immobilizer System 22A-186 |
Immobilizer System 22A-186
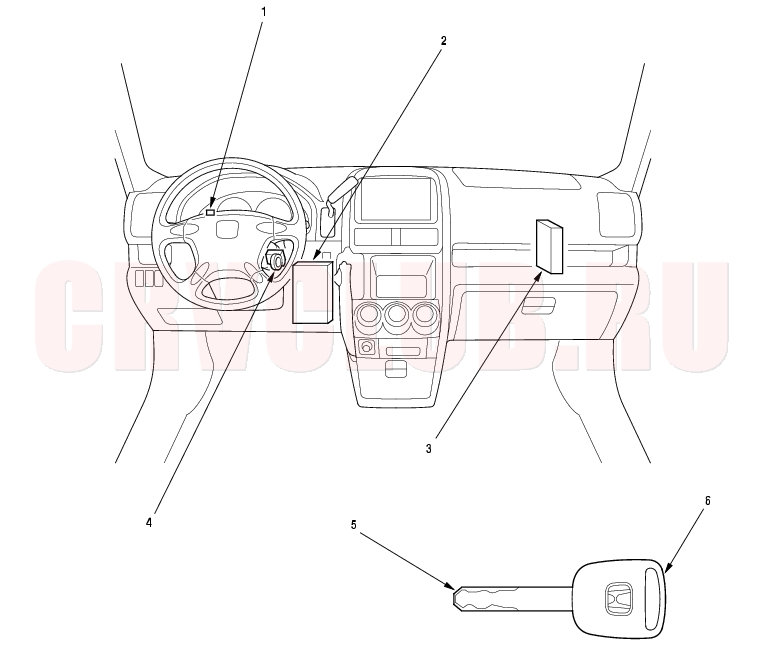
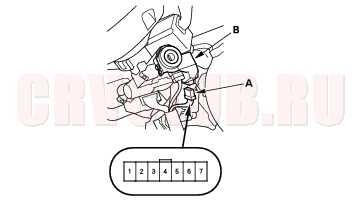
Component Location Index
NOTE: LHD type is shown, RHD type is similar.
Bulb Replacement, page 22A-75 Input Test, page 22A-269 Replacement, page 11-4 ; Substitute known-good for testing, page 11-5 Troubleshooting, page 22A-213 ; Replacement, page 22A-215
System Description 22A-187
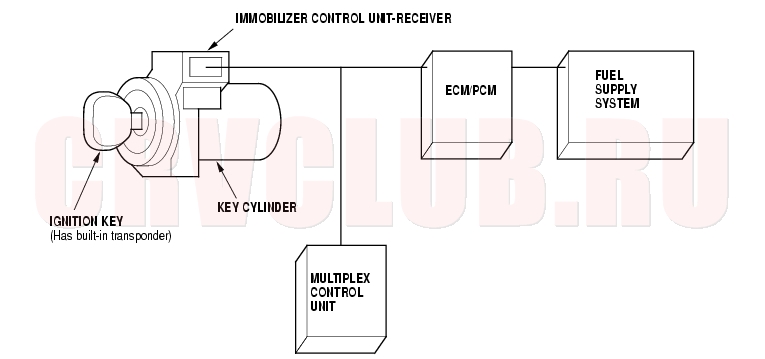
The vehicle is equipped with an immobilizer system (Type III) that will disable the vehicle unless the proper ignition key is used.
This system consists of a transponder located in the ignition key, an immobilizer control unit-receiver, an indicator light, the multiplex control unit, and the ECM/PCM.When the key is inserted in the ignition switch and turned to the (II) position, the immobilizer control unit-receiver sends power to the transponder in the ignition key. The transponder then sends a coded signal back through the immobilizer control unit-receiver to the ECM/PCM. The ECM/PCM then energizes the fuel supply system.
System Description (cont'd) 22A-188
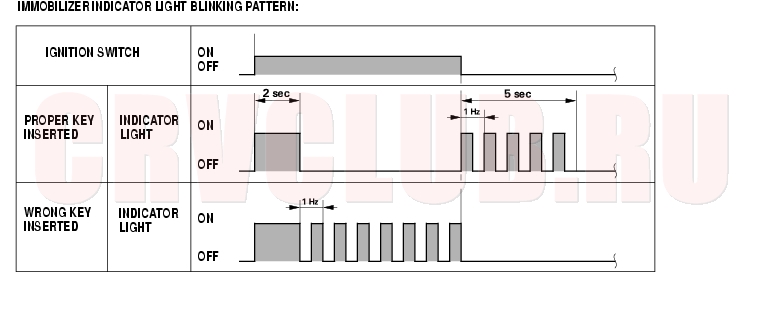
If the proper key has been used, the immobilizer indicator light will come on for about 2 seconds, then go off. If the wrong key has been used whose code was not received or recognized by the unit, the indicator light will come on for about 2 seconds, then it will blink until the ignition switch is turned OFF. The engine will crank but not start. If the ignition switch is turned OFF, the indicator will blink for about 5 seconds to signal that the unit has been set correctly, then the indicator will go off. If the customer has lost his key, and cannot start the engine, contact Honda Customer Relations.
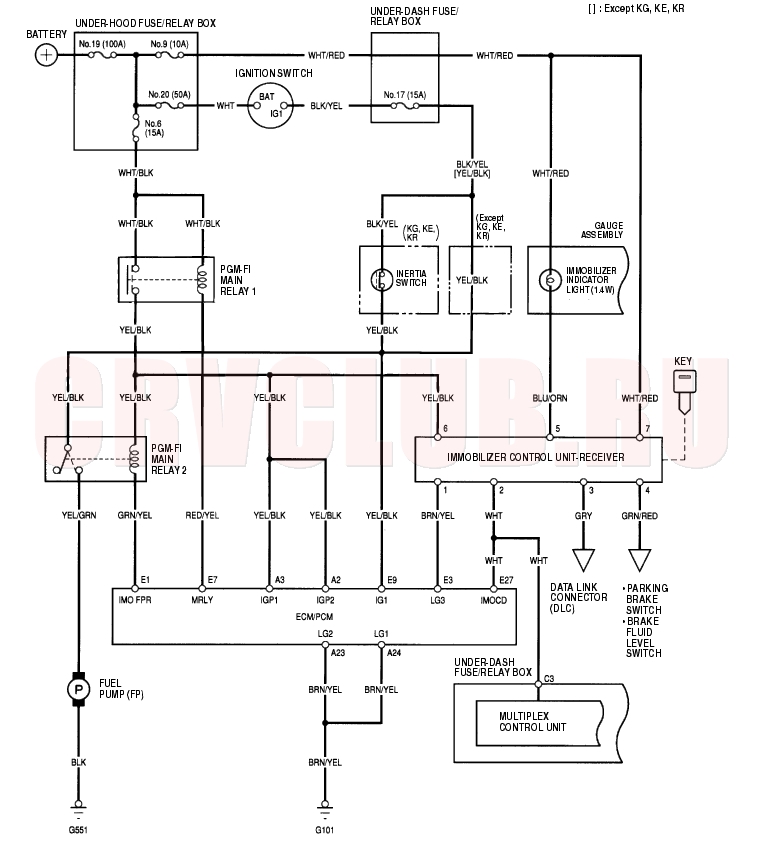
Circuit Diagram 22A-189
Troubleshooting 22A-190
Before troubleshooting the immobilizer system, troubleshoot any ECM/PCM with diagnostic trouble codes (DTCs) (see page 11-62) ,and make sure the ECM/PCM has no malfunction.
Note these items before troubleshooting:
Due to the action of the immobilizer system, the engine takes slightly more time to start than on a vehicle without an immobilizer system. When the system is normal, and the proper key is inserted, the indicator light comes on for 2 seconds, then it will go off. If the indicator starts to blink after 2 seconds, or if the engine does not start, repeat the starting procedure. If the engine still does not start, continue with this procedure.
- Turn the ignition switch ON (II) with programmed key.
- Check to see if the immobilizer indicator light comes on.
Does the indicator light blink?
Yes : Go to step 3.
No : Check for these problems:

Blown No. 9 (10A) fuse in the under-hood fuse/relay box. An open in the BLU/ORN wire between the gauge assembly and the immobilizer control unit-receiver. A faulty immobilizer indicator light. An open in the WHT/RED wire between the gauge assembly and the under-hood fuse/relay box.
- Remove the steering column covers (see page 17-24) .
- Disconnect the 7P connector from the immobilizer control unit-receiver.
- Check for voltage between the immobilizer control unit-receiver 7P connector No. 7 terminal and body ground.
Is there battery voltage?
Yes : Go to step 6.
No : Check for these problems:
Blown No. 9 (10A) fuse in the under-hood fuse/relay box. An open in the WHT/RED wire.
- Check for voltage between the immobilizer control unit-receiver 7P connector No. 6 terminal and body ground with the ignition switch 0N (II).
Is there battery voltage?
Yes : Go to step 7.
No : Check for these problems:
Blown No. 6 (15A) fuse in the under-hood fuse/relay box. Faulty PGM-FI main relay 1. An open in the YEL/BLK wire.
- Check for voltage between the immobilizer control-unit receiver 7P connector No. 4 terminal and body ground with the parking brake lever pulled, then released.
Is there 1 V or less, then 5 V or more?
Yes : Go to step 8.
No : Check for these problems:
Faulty parking brake switch or a poor body ground of the parking brake switch. Faulty brake fluid level switch. An open in the GRN/RED wire. 22A-191
- Check for continuity between the immobilizer control unit-receiver 7P connector No. 1 terminal and body ground.
Is there voltage?
Yes : Go to step 9.
No : Check for these problems:
Poor ground (G101). Faulty ECM/PCM. An open in the BRN/YEL wire.
- Check for continuity between the immobilizer control unit-receiver 7P connector No. 2 terminal and ECM/PCM terminal E27.
Is there continuity?
Yes : Go to step 10.
No : Repair open in the WHT wire.
- Disconnect the negative cable from the battery.
- Disconnect the ECM/PCM connector E.
- Check for continuity between the immobilizer control unit-receiver 7P connector No. 2 terminal and body ground.
Is there continuity?
Yes : Repair short to ground in the WHT wire.
No : Go to step 13.
- Check for continuity between the immobilizer control unit-receiver 7P connector No. 4 terminal and the multiplex control unit (under-dash fuse/relay box connector terminal C3).
Is there continuity?
Yes : Replace the immobilizer control unit-receiver. After replacing the immobilizer control unit-receiver, rewrite the unit with a Honda PGM-Tester.
No : Repair open in the WHT wire. If the harness is OK, check to see if there is any Diagnostic Trouble Code (DTC) for the multiplex control unit. If it is, troubleshoot the multiplex control unit (see page 22A-261), then recheck.
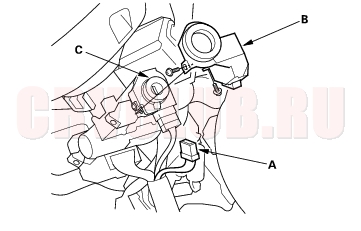
Immobilizer Control Unit-Receiver Replacement 22A-191
- Remove the dashboard lower cover.
- Remove the steering column covers (see page 17-24) .
- Disconnect the connector (A) from the immobilizer control unit-receiver (B).
- Remove the two screws and the immobilizer control unit-receiver from the ignition key cylinder (C).
- Install the immobilizer control unit-receiver in the reverse order of removal.
- After replacement, register the immobilizer control unit-receiver with PGM-Tester, then check the immobilizer system.
|
Body Electrical22A-1
Immobilizer System 22A-186 |