Exterior Trim20-139
|
Body20-1
Exterior Trim20-139 |
Exterior Trim20-139
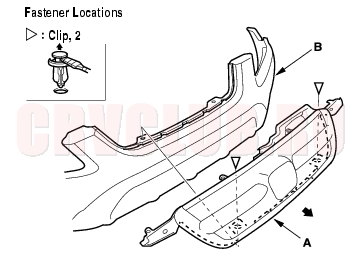
Front Grille Replacement
NOTE: Put on gloves to protect your hands.
- Remove the front bumper (see page 20-130) .
- Remove the clips, and remove the front grille (A) from the front bumper (B) by pulling it out. Take care not to scratch the front bumper.
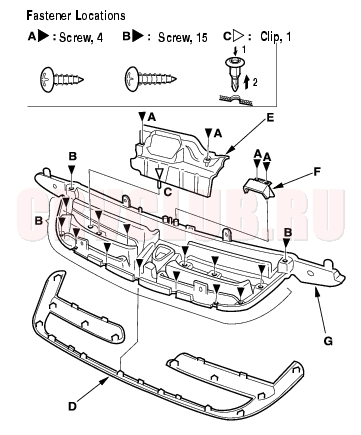
- If necessary, remove the screws (A, B) and clips (C), then remove the grille molding (D), mist cover plate (E), and front grille absorber (F) from the front grille (G).
- Install the grille in the reverse order of removal, and replace any damaged clips.
Cowl Covers Replacement20-140
NOTE: LHD is shown RHD is symmetrical except the windshield washer tubes.
- Remove the windshield wiper arms (see page 22A-223) .
- Using a clip remover, detach the clips (A), then remove the hood rear seal (B), and detach the clips (C) from the cowl covers. Take care not to scratch the cowl covers.
- Detach the clips (D, E) and release the hook (F) by carefully pulling the passenger's cowl cover (G) upward. Pull the cover forward to release the hooks (H), pull the hinge cover (I) out from the front fender (J) and disconnect the windshield washer tube (K), then remove the cover. On RHD models, disconnect the windshield washer tube (L) routed from the washer reservoir to remove the passenger's cowl cover at this time. Take care not to scratch the body.
- Detach the clips (D, E) by carefully pulling the driver's cowl cover (M) upward, and pull the cover forward to release the hooks (N). Pull the hinge cover (O) out from the front fender (P), and disconnect the windshield washer tube (L) routed from the washer reservoir then remove the cover. Take care not to scratch the body.
20-141
- If necessary, release the clips, then remove the insulators (A, B) from both cowl covers (C, D).
- Install the cover in the reverse order of removal, and note these items:
- Replace any damaged clips.
- Make sure the washer tubes are connected securely.
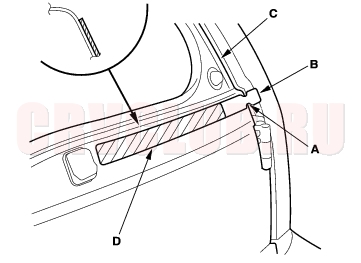
Windshield Side Trim Replacement20-142
When prying with a flat-tip screwdriver, wrap it with protective tape, and apply protective tape around the related parts to prevent damage. Put on gloves to protect your hands.
- Remove the roof side front trim.
- Remove the nut, and detach the windshield side trim (A) from the retainer (B) by pulling the trim up. Take care not to scratch the body.
- Install the windshield side trim in the revers order of removal.
Roof Side Front Trim Replacement20-142
NOTE: Put on gloves to protect your hands.
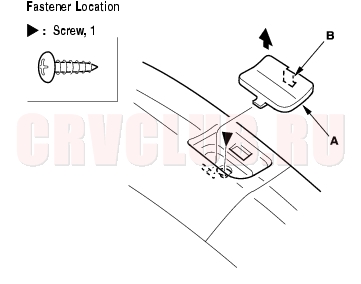
- Using a flat-tip screwdriver wrapped with protective tape, pry up on the front lid (A) of the roof side front trim to detach the hook (B), and remove the screw.
- Using a flat-tip screwdriver wrapped with protective tape, pry up on the middle lid (A) of the roof side front trim (B) to detach the hooks (C), and remove the bolts.
20-143
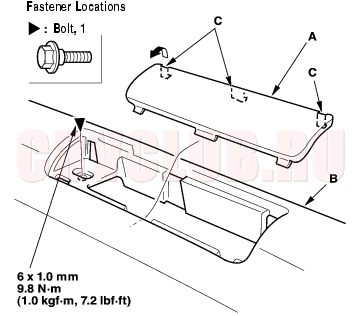
- Using a flat-tip screwdriver wrapped with protective tape, pry up on the rear lid (A) of the roof side front trim (B) to detach the hooks (C), and remove the bolts.
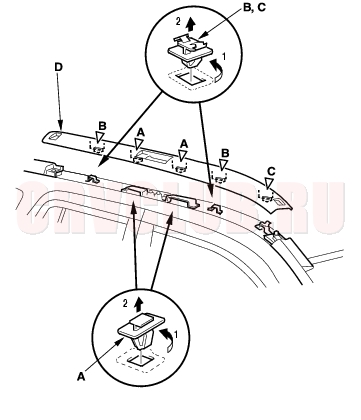
- Release the pin (A) by pulling the front portion of the roof side front trim (B) up, and hold it.
- Release the trim from the clips (C, D, E), and release the hooks (F) by sliding the trim rearward, and remove the trim. Take care not to scratch the other trim and body.
- Replace any damaged clips (A, B, C).
- Remove the clips (A, B, C) from the body, and install them on the roof side front trim (D).
- Fit the clips (A, B, C) into the holes in the body, then push on the trim until the clips snap into place.
- Install the bolts, and install the lids.
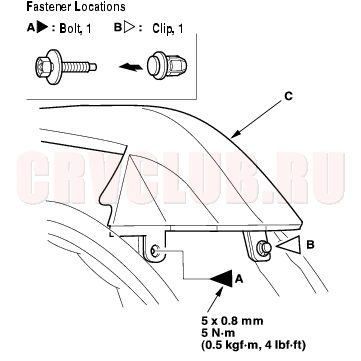
Roof Side Rear Trim Replacement20-144
NOTE: Put on gloves to protect your hands.
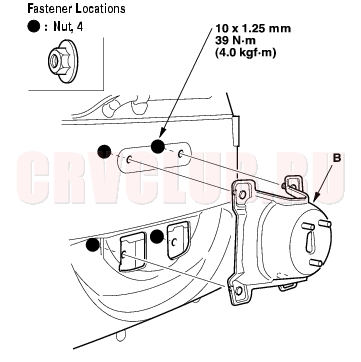
- Remove the taillight (see page 22A-98) .
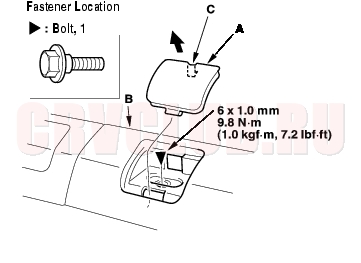
- Remove the bolt (A) and clip (B) from the rear portion of the roof side rear trim (C).
- Using a flat-tip screwdriver wrapped with protective tape, pry up on the rear lid of the roof side front trim to detach the hook, and remove the screw (see page 20-142) .
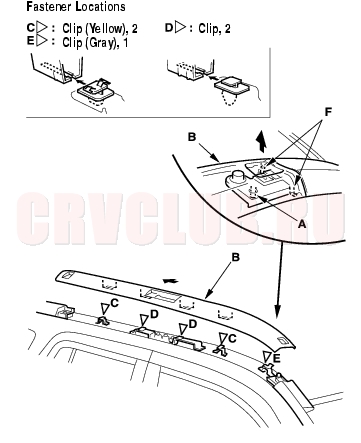
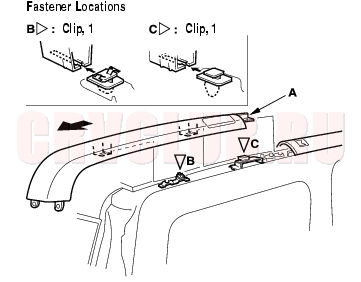
- Remove the roof side rear trim (A) from the clips (B, C) by sliding the trim rear ward, then remove the trim. Take care not to scratch the body.
- Replace any damaged clips (A, B).
- Remove the clips (A, B) from the body, and install them on the roof side rear trim (C).
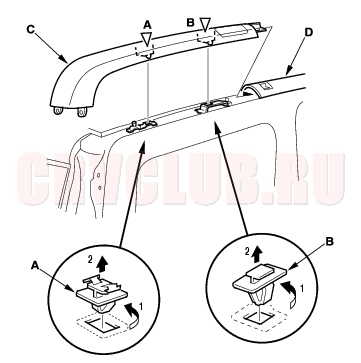
- Insert the roof side rear trim in the roof side front trim (D), and fit the clips (A, B) into the holes in the body, then push on the trim until the clips snap into place.
- Install the bolt clip, and install the lid.
- Reinstall the taillight.
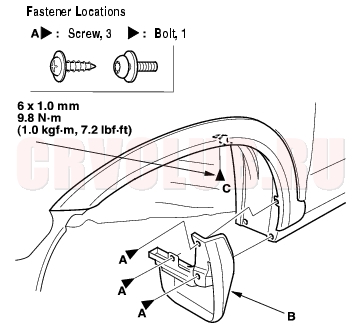
Front Wheel Arch Protector Replacement20-145
Take care not to scratch the body. Put on gloves to protect your hands.
- Remove the screw, then detach the wheel arch portion of the front bumper outward (see page 20-130) .
- On the back of the wheel arch, remove the screws (A), then remove the front splash guard (B). With a Torx T30 bit, remove the bolt (C).
- Remove the front inner fender (see page 20-155) .
- Remove the front wheel arch protector (A) while pinching the clips from inside the front fender.
- Install the protector in the reverse order of removal, and replace any damaged clips.
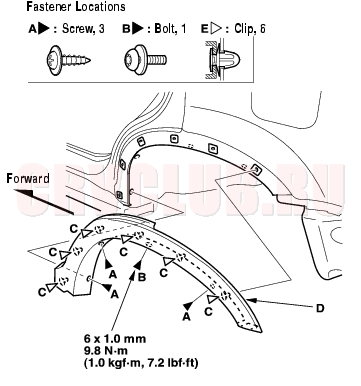
Rear Wheel Arch Protector Replacement20-146
NOTE: Take care not to scratch the body.
- Remove the screw, and detach the wheel arch portion of the rear bumper outward (see page 20-131) , then open the rear door.
- From the wheel arch, remove the screws (A). With a Torx T30 bit, remove the bolt (B).
- Remove the rear wheel arch protector (D) while pinching the clips (E) from inside the rear fender.
- Install the protector in the reverse order of removal, and replace any damaged clips.
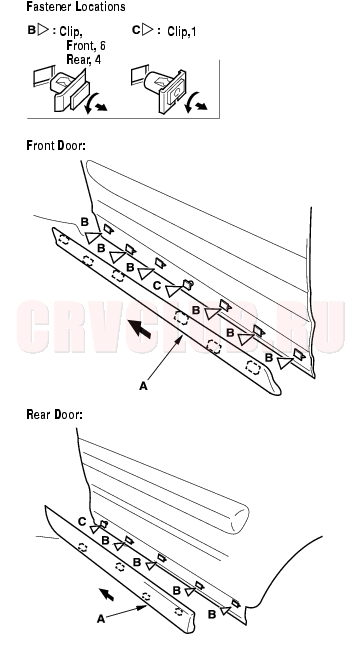
Door Moldings Replacement20-147
Wrap the blade of your putty knife or flat-tip screwdriver with protective tape to prevent damage to the door. Be careful not to pry too far or you may bend the molding. Put on gloves to protect your hands.
- Prepare to release the molding clips from inside the vehicle:
- To remove the front door molding, remove the front door panel (see page 20-9) and plastic cover.
- To remove the rear door molding, remove the rear door panel (see page 20-21) and plastic cover.
- Release the clips and gently pry the front door molding (A) or rear door molding (B) away from the door while removing the adhesive tape (C, D).
Adhesive tape C: 3M5311 or equivalent
Thickness 1.2 mm (0.047 in.), Width 5 mm (0.2 in.)
Adhesive tape D: 3M5311 or equivalent
Thickness 1.2 mm (0.047 in.), Width 8 mm (0.3 in.)
- Install the moldings in the reverse order of removal, and replace any damaged clips and adhesive tape.
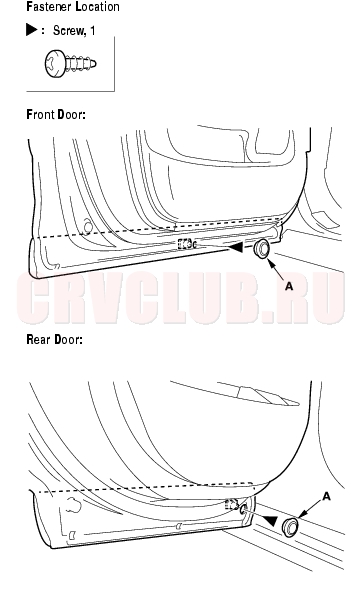
Door Lower Trim Replacement20-148
Take care not to scratch the door. Put on gloves to protect your hands.
- Open the front or rear door fully, remove the maintenance cap (A) from the door, then remove the screw.
- For rear door lower trim removal, close the rear door half-way.
- Slide the door lower trim (A) forward and remove it. Clips (B, C) will stay in the body.
- Remove the clips (B, C) from the body.
- Replace any damaged clips.
- Reinstall the clips (B, C) on the door lower trim, then secure the middle clip (front door) (C) or the front clip (rear door) (C) with the screw you removed in step 1. Make sure the clips are not upside down.
- Hold the trim up, and fit all the clips into the holes in the door, then push on the trim until the clips snap into place.
- Install the maintenance cap on the door.
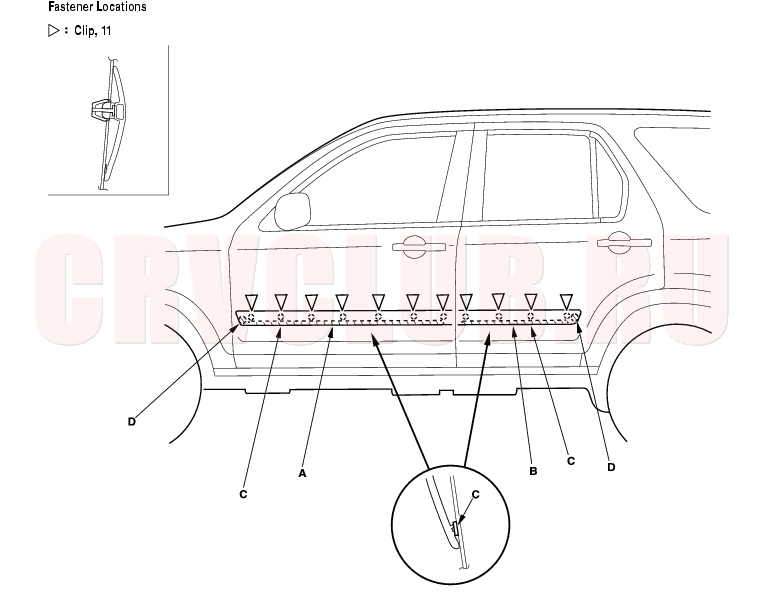
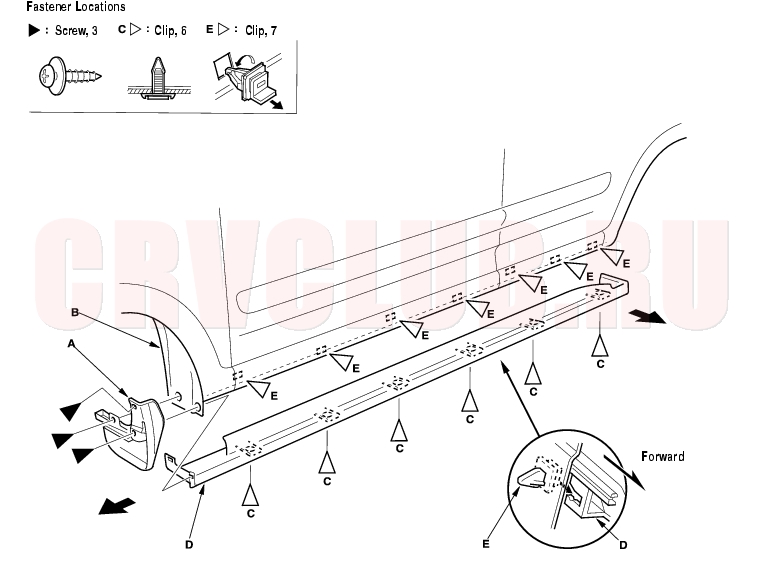
Side Sill Panel Replacement20-149
- Remove the side sill panel.
- Remove the splash guard (A).
- Pull the inner fender (B) back as necessary, and remove the expansion clip (C).
- Slide the side sill panel (D) forward, and remove it. The side clips (E) will stay in the body.
- Remove the side clips from the body.
- Replace any damaged clips.
- Install the side clips on the side sill panel.
- Hold the panel up, and fit all the side clips into the holes in the body, then push on the panel until the clips snap into place.
- Install all the expansion clips.
- Reinstall the inner fender and splash guard.
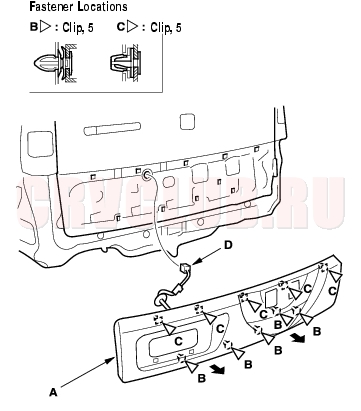
Tailgate Lower Trim Replacement20-150
Take care not to scratch the tailgate. Put on gloves to protect your hands.
- Remove these items:
- License plate (for some models)
- Tailgate lower trim panel (see page 20-80)
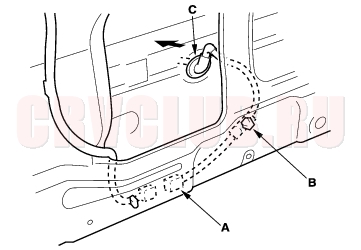
- Remove the spare tyre holder (A).
- Open the tailgate, then remove the bolt securing the tailgate lower trim.
- For some models: Disconnect the license light connector (A), detach the harness clip (B), then pull out the grommet (C).
- Pull out along the bottom of the tailgate lower trim (A) to detach the lower clips (B). While pinching the upper clips (C) from inside the tailgate, remove the tailgate lower trim. If equipped, pull the license light harness (D) out from inside the tailgate.
20-151
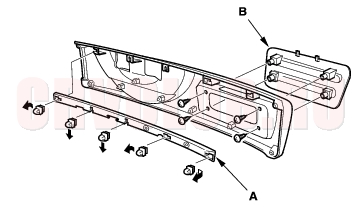
- If necessary, remove the clips as shown, and remove the stiffener (A). And if applicable, remove the screws to remove the license cover (B).
- Install the trim in the reverse order of removal, and note these items:
- Replace all the spare tyre holder mounting nuts as new ones.
- Replace any damaged clips.
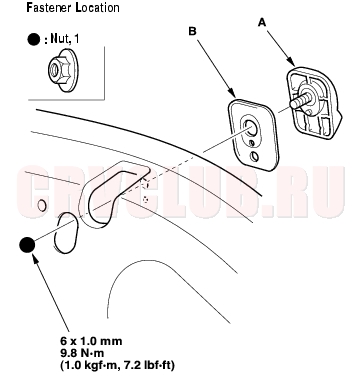
Rear Window Wiper Lifter Replacement20-151
- Remove the tailgate lower trim panel (see page 20-80) .
- Remove the nut from inside the tailgate, then remove the rear window wiper lifter (A) and the seal (B).
- Install the lifter in the reverse order of removal.
Rear Window Wiper Protection Tape Replacement20-152
- Slowly peel up the old rear window wiper protection tape.
- Clean the tailgate bonding surface with a sponge dampened in alcohol. After cleaning, keep oil, grease, and water from getting on the surface.
- Peel the adhesive backing from the rear window wiper protection tape.
- Align the notch (A) of the application tape (B) with the edge of the tailgate (C) and align the top edge of the application tape with the edge of the tailgate, then press the rear window wiper protection tape (D) into place.
- Remove the application tape.
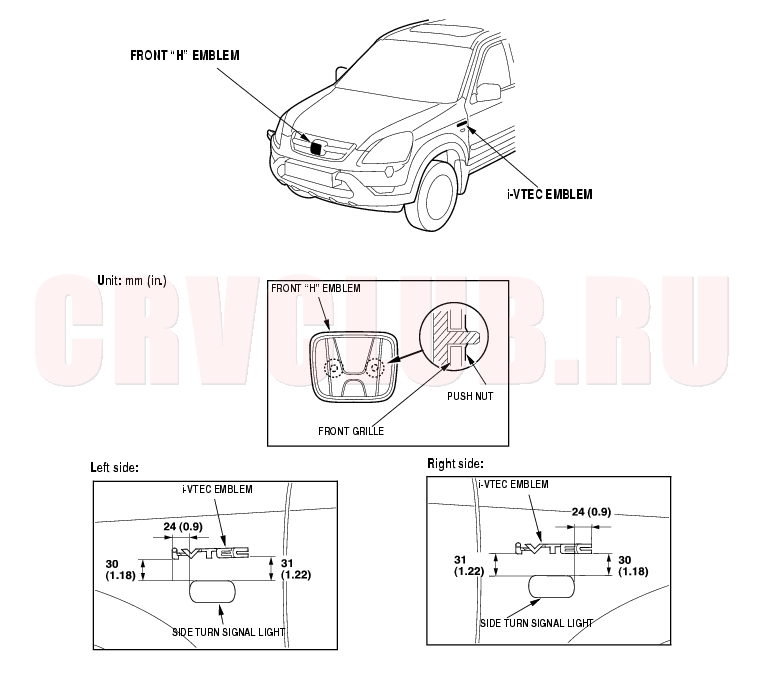
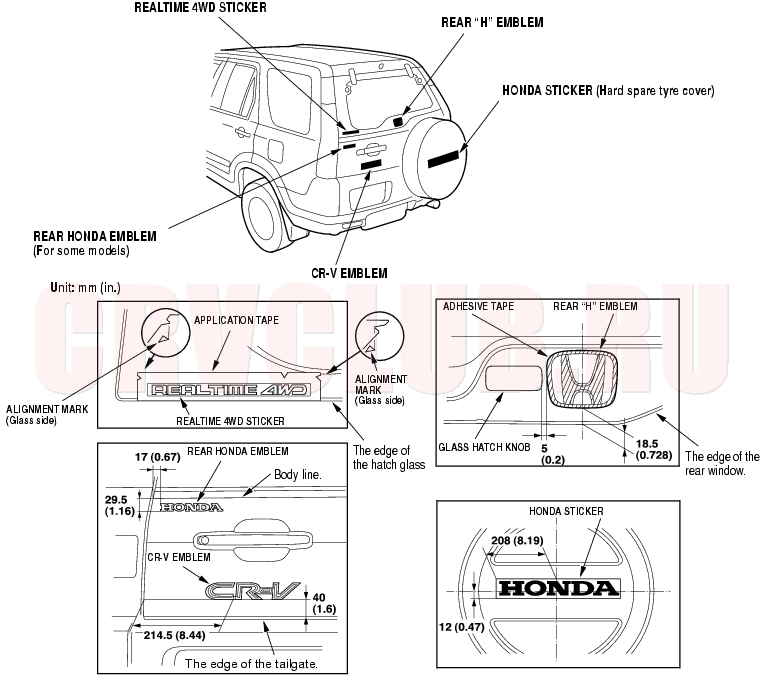
Emblem/Sticker Replacement20-153
NOTE: When removing the emblem/sticker, take care not to scratch the body.
- To remove the front ''H'' emblem, remove the front grille (see page 20-139) .
- Clean the body surface with a sponge dampened in alcohol. After cleaning, keep oil, grease, and water from getting on the surface.
- Apply the emblem/sticker, where shown. When installing the REALTIME 4WD sticker on the hatch glass, align the application tape with the alignment marks, then press the sticker into place, and remove the application tape.
Emblem/Sticker Replacement (cont'd)20-154
|
Body20-1
Exterior Trim20-139 |