Ignition System04-18
|
Engine Electrical04-1
Ignition System04-18 |
Ignition System04-18
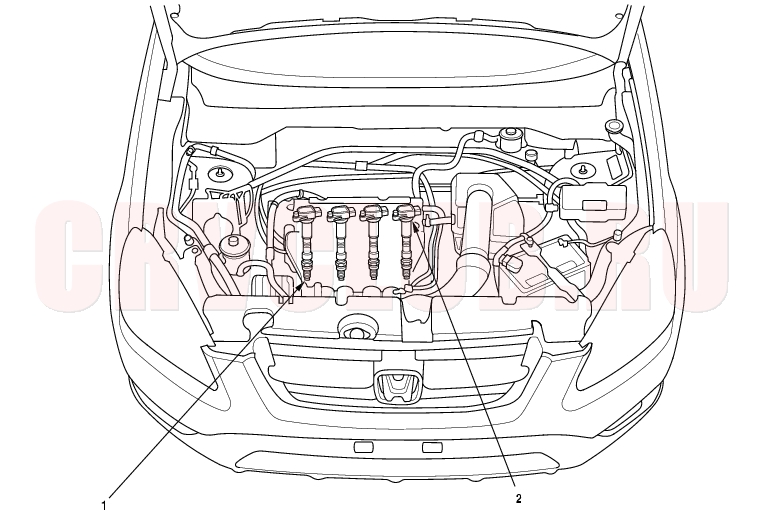
Component Location Index
Inspection, page 04-23 Ignition Timing Inspection, page 04-20 Removal/Installation, page 04-21 Troubleshooting, page 04-21
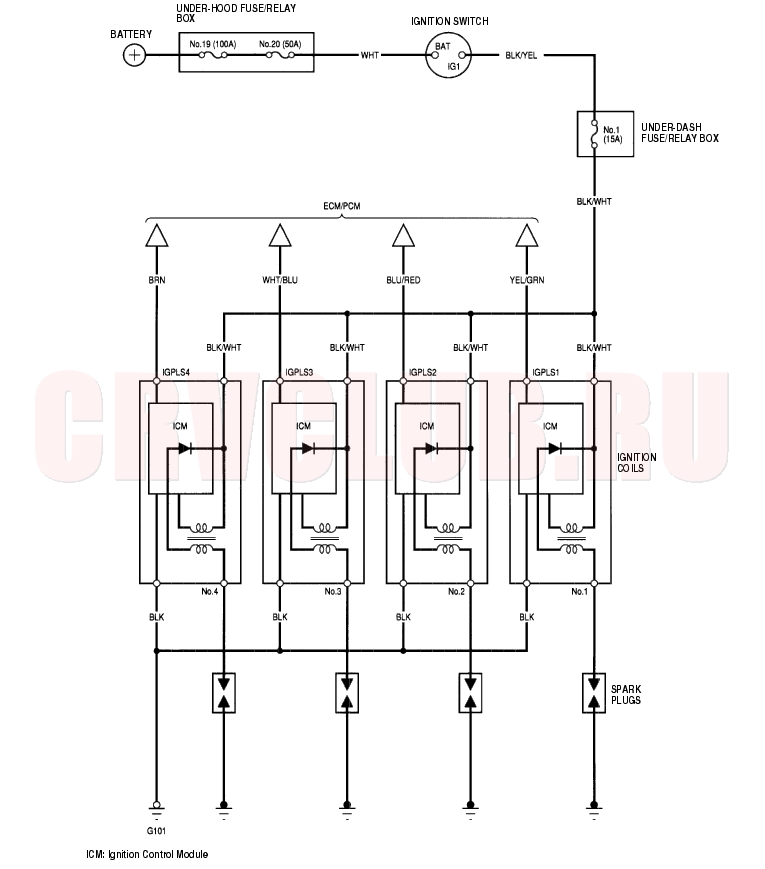
Circuit Diagram04-19
Ignition Timing Inspection04-20
Special Tools Required
- Start the engine. Hold the engine at 3,000 rpm (min-1) with no load (in Park or Neutral) until the radiator fan comes on, then let it idle.
- Check the idle speed (see page 11-148) .
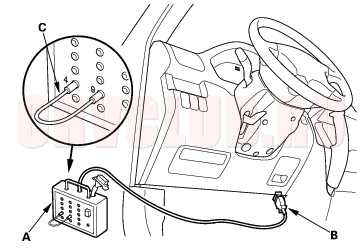
- Short the SCS terminal to ground by using the DLC pin box: Connect the DLC pin box (A) to the Data Link Connector (DLC) (16P) (B), then connect the No. 4 and No. 9 terminals on the DLC pin box with a jamper wire (C), and push the switch.
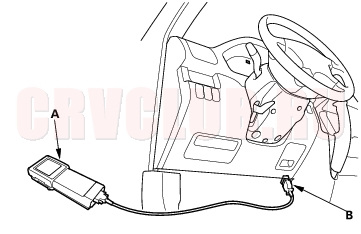
- Short the SCS terminal to ground by using the Honda PGM Tester: Connect the Honda PGM tester (A) to the data link connector (16P) (B).
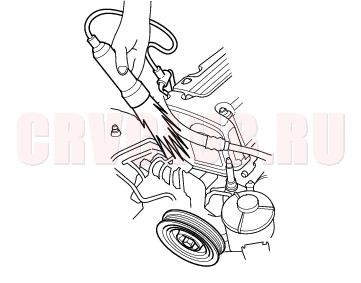
- Connect the timing light to the service loop.
- Point the light toward the pointers (A) on the chain case. Check the ignition timing under no load conditions: headlights, blower fan, rear window defogger, and air conditioner are not operating.
Ignition Timing:
M/T: 8° ± 2° BTDC (RED mark (B)) during idling
in neutral
A/T: 8° ± 2° BTDC (RED mark (B)) during idling
in [P] or [N]
- If the ignition timing differs from the specification, replace the Engine Control Module (ECM)/Powertrain Control Module (PCM) (see page 11-4) .
- Disconnect the special tool/Honda PGM Tester and the timing light.
Ignition Coil Removal/Installation04-21
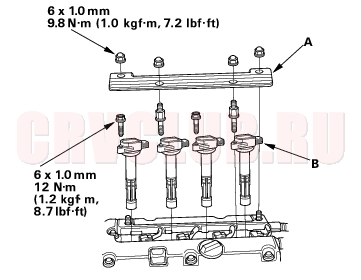
- Remove the ignition coil cover (A), then remove the ignition coils (B).
- Install the ignition coils in the reverse order of removal.
Ignition Coil Troubleshooting04-21
- Remove the four ignition coils (see page 04-21) .
- Remove the spark plugs from the cylinder head, and inspect the spark plug (see page 04-23) .
Is the spark plug OK?
Yes : Go to step 3.
No : Replace the spark plug.

- Disconnect the four injector connectors (see page 11-117) .
- Install the spark plugs on the ignition coils.
- Connect the ignition coil connector, and connect the spark plug on the ground.
- With the shift lever in [N] or [P] (A/T), turn the ignition switch to start (III), and check the spark.
Does the plug spark?
Yes : Ignition coil is OK.
No : Go to step 7.
Does the plug spark?
Yes : Replace the original ignition coil.
No : Go to step 8.
- Disconnect the ignition coil 3P connector.
- Turn the ignition switch ON (II).
- Measure voltage between the ignition coil 3P connector terminal No. 3 and body ground.
Is there battery voltage?
Yes : Go to step 11.
No : Repair open in the wire between ignition coil and No. 1 (15A) fuse in the under-dash fuse/relay box.
Ignition Coil Troubleshooting (cont'd)04-22
- Turn the ignition switch OFF.
- Check for continuity between the ignition coil 3P connector terminal No. 2 and body ground.
Is there continuity?
Yes : Go to step 13.
No : Repair open in the wire between the ignition coil and G101.
- Disconnect the negative cable from the battery.
- Disconnect Engine Control Module (ECM)/Powertrain Control Module (PCM) connector A (31P).
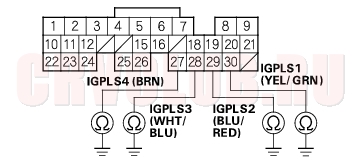
- Check for continuity between body ground and following ECM/PCM connector terminal.
- A27 (No. 4 ignition coil)
- A28 (No. 3 ignition coil)
- A29 (No. 2 ignition coil)
- A30 (No. 1 ignition coil)
Is there continuity?
Yes : Repair short in the wire between the ECM/PCM and the ignition coil.
No : Go to step 16.
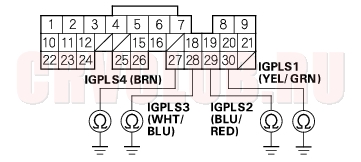
- Check for continuity between body ground and following ECM/PCM connector terminal.
- A27 (No. 4 ignition coil)
- A28 (No. 3 ignition coil)
- A29 (No. 2 ignition coil)
- A30 (No. 1 ignition coil)
Is there continuity?
Yes : Substitute a known-good ECM/PCM, and recheck (see page 11-5).
No : Repair open in the wire between the ECM/PCM and the ignition coil.
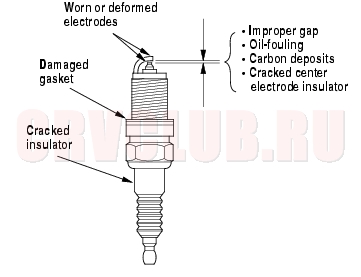
Spark Plug Inspection04-23
- Inspect the electrodes and ceramic insulator.
- Burned or worn electrodes may be caused by:
- Advanced ignition timing
- Loose spark plug
- Plug heat range too hot
- Insufficient cooling
- Fouled plug may be caused by:
- Retarded ignition timing
- Oil in combustion chamber
- Incorrect spark plug gap
- Plug heat range too cold
- Excessive idling/low speed running
- Clogged air cleaner element
- Deteriorated ignition coils
- Check the electrode gap (A). If the gap is over the standard, adjust the gap with suitable gapping tool.
Electrode Gap:
Standard (New): 1.0 - 1.1 mm
(0.039 - 0.043 in.)
- Replace the plug at the specified interval, or if the center electrode is rounded (A). Use only the spark plugs listed below.
Spark Plugs:
ZFR6K-11 (NGK)
KJ20DR-M11 (DENSO)
|
Engine Electrical04-1
Ignition System04-18 |